

VNC server搭建、VNC Viewer 客户端连接及常见错误处理(The connection closed unexpectedly)
1)如果5900端口未启用(如:docker启动时未暴露5900端口),则会报错:The connection closed unexpectedly.该镜像是含有ubuntu 通过docker运行的桌面环境,并接受vnc 的连接。3)暴露80、5900端口的同时,设置VNC登录的密码:abc@123$2)同时暴露80、5900端口,此时web、客户端工具都可以连接。1)只暴露容器的80端口,此时
目录
VNC (Virtual Network Console),虚拟网络控制台是一个图形桌面共享软件,允许您使用键盘和鼠标远程控制另一台计算机。
VNC是在基于UNIX和Linux操作系统的免费开源软件,远程控制能力强大,高效实用,具有平台无关的特性。国内以VNC为核心的软件有网络人远程控制软件。VNC几乎支持所有的图形界面的操作系统,并支持Java。多个VNC客户端"VNC Viewer"可以同时连接到服务器,流行的应用包括远程技术支持、相互传输两台计算机的文件等。
搭建vnc server
一、镜像方式,ubuntu下可以使用该方式
1、下载镜像
https://github.com/fcwu/docker-ubuntu-vnc-desktop
该镜像是含有ubuntu 通过docker运行的桌面环境,并接受vnc 的连接
docker pull dorowu/ubuntu-desktop-lxde-vnc2、运行容器
1)只暴露容器的80端口,此时只能通过web的方式访问vnc
docker run --rm -itd --name vnc_test -p 6080:80 -v /dev/shm:/dev/shm dorowu/ubuntu-desktop-lxde-vnc2)同时暴露80、5900端口,此时web、客户端工具都可以连接
docker run --rm -itd --name vnc_test -p 6080:80 -p 5900:5900 -v /dev/shm:/dev/shm dorowu/ubuntu-desktop-lxde-vnc3)暴露80、5900端口的同时,设置VNC登录的密码:abc@123$
docker run --rm -itd --name vnc_test -p 6080:80 -p 5900:5900 -e VNC_PASSWORD=abc@123$ -v /dev/shm:/dev/shm dorowu/ubuntu-desktop-lxde-vnc4)指定分辨率 -e RESOLUTION=1920x1080
docker run --rm -itd --name vnc_test -p 6080:80 -p 5900:5900 -e RESOLUTION=1920x1080 -e VNC_PASSWORD=abc@123$ -v /dev/shm:/dev/shm dorowu/ubuntu-desktop-lxde-vnc二、yum方式,麒麟系统下可以使用该方式
1、查看是否安装了VNC
rpm -q tigervnc tigervnc-server2、安装vnc client和server
yum install tigervnc tigervnc-server -y
3、设置vnc的登录(连接)密码
vncpasswd
4、启动vncserver@:1.service
[root@www ~]#  systemctl start vncserver@:1.service
Job for vncserver@:1.service failed because the control process exited with error code.
See "systemctl status vncserver@:1.service" and "journalctl -xe" for details.


[root@www ~]# systemctl status vncserver@:1.service
● vncserver@:1.service - Remote desktop service (VNC)
   Loaded: loaded (/etc/systemd/system/vncserver@:1.service; disabled; vendor preset: disabled)
   Active: failed (Result: exit-code) since Wed 2024-04-17 16:08:23 CST; 1h 17min ago
  Process: 248162 ExecStart=/usr/libexec/vncsession-start :1 (code=exited, status=1/FAILURE)
从命令的结果看,vncserver@:1.service启动失败,但是不影响服务的使用,继续用启动vnc server
5、启动 vnc server服务
vncserver默认启动的为“桌面号”为1的服务,即与命令vncserver :1等价
[root@www ~]# vncserver

WARNING: vncserver has been replaced by a systemd unit and is about to be removed in future releases.
Please read /usr/share/doc/tigervnc/HOWTO.md for more information.

New '192.168.1.56:1 (root)' desktop is 192.168.1.56.com:1

Starting applications specified in /root/.vnc/xstartup
Log file is /root/.vnc/192.168.1.56:1.log
vncserver启动成功,监听的端口为5901

启动“桌面号”为2的服务:vncserver :2,即端口为5902的服务
启动服务
vncserver :2
[root@www ~]# vncserver :2

WARNING: vncserver has been replaced by a systemd unit and is about to be removed in future releases.
Please read /usr/share/doc/tigervnc/HOWTO.md for more information.

New '192.168.1.56:2 (root)' desktop is 192.168.1.56:2

Starting applications specified in /root/.vnc/xstartup
Log file is /root/.vnc/192.168.1.56:2.log
注意:不需要再复制一个桌面号为2的vnc操作脚本,即不需要执行:cp /lib/systemd/system/vncserver@.service /etc/systemd/system/vncserver@:2.service,直接使用命令vncserver :2启动服务即可,同样启动5903的服务:vncserver :3
3)查看监听的端口

8、停止vnc server
vncserver -kill :1
注意:冒号后面紧跟着1
[root@www ~]# vncserver -kill :1

WARNING: vncserver has been replaced by a systemd unit and is about to be removed in future releases.
Please read /usr/share/doc/tigervnc/HOWTO.md for more information.
Killing Xvnc process ID 248181
9、查看vncserver@:1.service配置
[root@www ~]# cat /etc/systemd/system/vncserver@:1.service
# The vncserver service unit file
#
# Quick HowTo:
# 1. Add a user mapping to /etc/tigervnc/vncserver.users.
# 2. Adjust the global or user configuration. See the
#    vncsession(8) manpage for details. (OPTIONAL)
# 3. Run `systemctl enable vncserver@:<display>.service`
# 4. Run `systemctl start vncserver@:<display>.service`
#
# DO NOT RUN THIS SERVICE if your local area network is
# untrusted!  For a secure way of using VNC, you should
# limit connections to the local host and then tunnel from
# the machine you want to view VNC on (host A) to the machine
# whose VNC output you want to view (host B)
#
# [user@hostA ~]$ ssh -v -C -L 590N:localhost:590M hostB
#
# this will open a connection on port 590N of your hostA to hostB's port 590M
# (in fact, it ssh-connects to hostB and then connects to localhost (on hostB).
# See the ssh man page for details on port forwarding)
#
# You can then point a VNC client on hostA at vncdisplay N of localhost and with
# the help of ssh, you end up seeing what hostB makes available on port 590M
#
# Use "nolisten=tcp" to prevent X connections to your VNC server via TCP.
#
# Use "localhost" to prevent remote VNC clients connecting except when
# doing so through a secure tunnel.  See the "-via" option in the
# `man vncviewer' manual page.


[Unit]
Description=Remote desktop service (VNC)
After=syslog.target network.target

[Service]
Type=forking
ExecStart=/usr/libexec/vncsession-start %i
PIDFile=/run/vncsession-%i.pid
SELinuxContext=system_u:system_r:vnc_session_t:s0

[Install]
WantedBy=multi-user.target
连接远程主机桌面
一、web的方式访问,在浏览器中输入http://10.10.1.1:6080,则将打开远程桌面:
二、使用客户端工具vnc viewer 连接访问
1、下载vnc viewer:https://downloads.realvnc.com/download/file/viewer.files/VNC-Viewer-7.10.0-Windows.exe
2、安装vnc viewer,一路next安装即可。
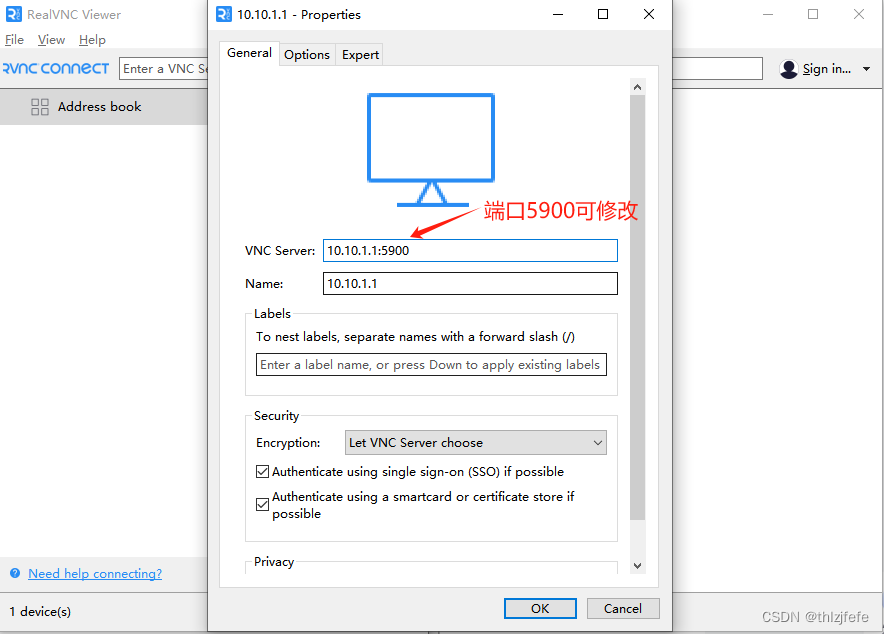
3、启动vnc viewer,建立到服务器10.10.1.1的链接

4、连接远程的vnc server,默认会连接vnc server的5900端口
1)配置连接
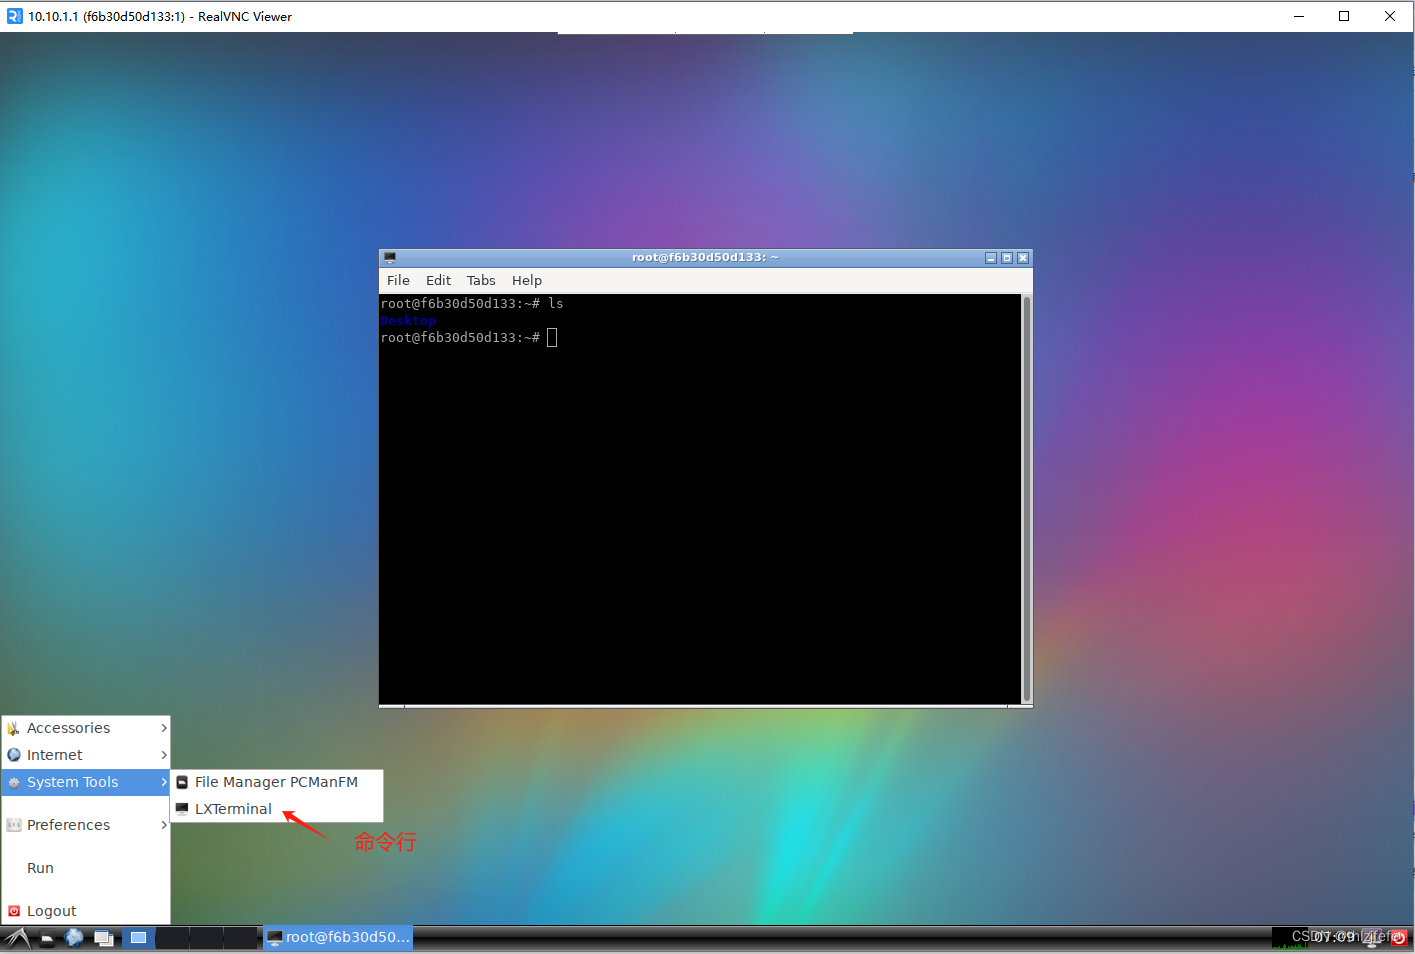
2)连接服务,点击continue后,即可连接到远程桌面

3)系统为ubuntu 20.04.2 LTS (Focal Fossa),默认集成了chrome、firefox等浏览器


常见错误处理
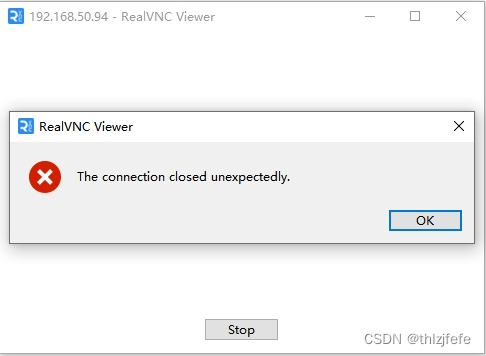
1)如果5900端口未启用(如:docker启动时未暴露5900端口),则会报错:The connection closed unexpectedly.
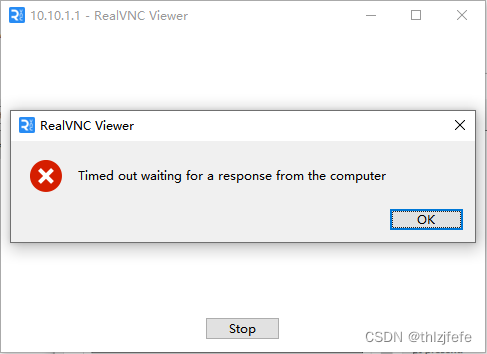
2)如果10.10.1.1无法访问,则报错:Timed out waiting for a response from the computer
参考:使用桌面环境和 VNC 在 Docker 中运行 Ubuntu Linux |

瓜分20万奖金 获得内推名额 丰厚实物奖励 易参与易上手
更多推荐


 5
5 0
0- 0


 已为社区贡献6条内容

所有评论(0)