
ubuntu18.04详尽编译DS_SLAM流程(推荐收藏)
DS-SLAM是一款基于orb-slam2改进的剔除动态物体实时定位建图程序,本文主要功能为复现DS_SLAM,并将整体编译流程通过详细代码方式进行分享。
一、介绍
DS-SLAM是一款基于orb-slam2改进的剔除动态物体实时定位建图程序, 本文主要功能为复现DS_SLAM,具体代码解析并不涉及。本次复现设备配置为:
Ubuntu 18.04
CPU:AMD R7 3700x
GPU:RTX 2070super
内存:16G
DS-SLAM具体原理与代码如下:
DS-SLAM代码:
https://github.com/ivipsourcecode/DS-SLAM、
https://github.com/yubaoliu/DS-SLAM(建议下载该博主的改进版,该版本优化了最终launch文件中的各参量输入方式)
DS-SLAM论文: https://arxiv.org/abs/1809.08379v1
二、整体流程
如果一切顺利,DS-SLAM需进行一下步骤:
安装nvidia显卡驱动->安装CUDA11+cudnn7->安装ros->安装opencv3.3.1、pangolin->安装eigen3.2.10->搭建caffe框架->编译caffe-segnet-cudnn7->在工作空间下复制octomap_mapping+octomap_rviz两个package并catkin_make通过->编译DS-SLAM代码->下载数据集->修改对应数据集launch文件->成功rviz显示构建地图
三、安装显卡驱动
1、驱动安装
依赖安装
sudo apt update
sudo apt-get install build-essential
sudo apt-get install cmake
显卡驱动没有安装按照右面教程进行安装-显卡驱动安装教程
NVIDIA显卡驱动下载地址
Ubuntu下驱动安装相较与Windows下有很大区别,需要禁用Ubuntu自带的nouveau驱动
sudo gedit /etc/modprobe.d/blacklist.conf
在最后一行添加
blacklist nouveau
options nouveau modeset=0 #禁用nouveau第三方驱动
之后执行
sudo apt-get remove --purge nvidia*
sudo update -initramfs -u # 更新内核
sudo add-apt-repository ppa:graphics-drivers/ppa
sudo apt-get update
此时进入下载好的显卡驱动路径输入
sudo apt-get install nvidia-driver-xxx # 这里版本可以根据自己所下载的名称进行填写
安装完毕后
sudo apt-get install mesa-common-dev
sudo apt-get update
sudo apt-get upgrade
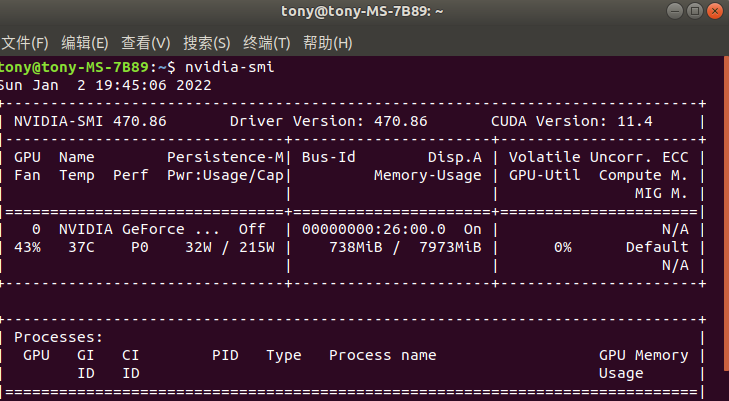
通过命令成功查询到NVIDIA驱动版本
nvidia-smi
出现下图证明驱动安装成功

2、对应驱动安装CUDA与Cudnn模块
首先根据下图选择对应显卡驱动和CUDA版本号直接的关系,该过程一定要严格对应,不然会导致之后过程出现程序cmake无法通过的问题

CUDA与cudnn下载与安装可以参考该博主分享
cuda下载过程中出现的问题
通过apt-get install 命令进行cuda安装包下载时会在99%报错停止,导致迟迟无法成功下载,本文所采用的解决方式为复制命令行中的下载链接,在浏览器网址输入栏中黏贴,通过浏览器进行下载。初步分析该问题出现的原因是apt-get下载NVIDIA的驱动时在结尾需要与其服务器进行一个玄学交互,该过程在墙内无法顺利进行,但是了;浏览器下载却没有该交互流程,故能成功下载。
安装成功后输入
nvcc --version
出现对应信息,则CUDA配置成功,进而开始安装cudnn模块

查询cudnn安装成功代码
cat /usr/local/cuda/include/cudnn.h | grep CUDNN_MAJOR -A 2
四、ROS安装
首先将Ubuntu18.04的下载源改为国内源,该流程参考该博主分享(Ubuntu18.04安装ROS)
sudo sh -c '. /etc/lsb-release && echo "deb http://mirrors.ustc.edu.cn/ros/ubuntu/ $DISTRIB_CODENAME main" > /etc/apt/sources.list.d/ros-latest.list'
ros安装秘钥
sudo apt-key adv --keyserver 'hkp://keyserver.ubuntu.com:80' --recv-key C1CF6E31E6BADE8868B172B4F42ED6FBAB17C654
更新
sudo apt-get update
安装依赖
sudo apt-get install python-rosdep python-rosinstall python-rosinstall-generator python-wstool build-essential
安装ROS完整版本
sudo apt-get install ros-melodic-desktop-full
初始化与更新
sudo rosdep init
rosdep update
在国内该过程经常无法成功初始化,本文通过该方法
完成最终的初始化与更新
设置环境变量
echo "source /opt/ros/melodic/setup.bash" >> ~/.bashrc
然后更新bashrc
source ~/.bashrc
在命令行输入
roscore
成功出现

则表明ros安装成功
五、安装opencv3.3.1
*当进行到这一环节时,说明DS-SLAM的第一道坎也将到来。 *
1、确认系统是否存在其他版本opencv
首先你要考虑你的设备在运行DS-SLAM前是否安装了其他版本的opencv,若安装了建议对其进行卸载,并清空对应的系统路径下的opencv关联文件(例如usr/include与usr/lib等)并在Python中输入
import cv2
显示no module则表明opencv卸载完成
2、下载opencv3.3.1与opencv_contrib
opencv下载 选择3.3.1版本下载source压缩包
opencv_contrib下载 在Tags里找到相应版本下载,注意版本要与opencv一致
下载好解压后,将opencv_contrib3.3.1放在opencv3.3.1文件夹里面(为方便后续操作,可将上面两个文件夹分别命名为opencv和opencv_conrib)
3、环境配置
sudo apt-get install build-essential
sudo apt-get install cmake git libgtk2.0-dev pkg-config libavcodec-dev libavformat-dev libswscale-dev
sudo apt-get install python-dev python-numpy libtbb2 libtbb-dev libjpeg-dev libpng-dev libtiff-dev libjasper-dev libdc1394-22-dev
4、安装opencv
解压opencv压缩包,并进入opencv文件路径下
mkdir build
cd build
cd build
cmake -D CMAKE_BUILD_TYPE=Release -D CMAKE_INSTALL_PREFIX=/usr/local -D OPENCV_EXTRA_MODULES_PATH=你的opencv_contrib-3.3.1路径/modules ..
//后面“OPENCV_EXTRA_MODULES_PATH=xxopencv_contrib-3.3.1xx/modules”为你opencv_contrib的modules文件夹所在的路径
整体编译过程会出现不同问题,在此仅列举我所已知的部分
报错:编译OpenCV:nvcc fatal : Unsupported gpu architecture ‘compute_75’
在cmake 命令后添加 -D CUDA_GENERATION=Auto 即
cmake -D CMAKE_BUILD_TYPE=Release -D CMAKE_INSTALL_PREFIX=/usr/local -D OPENCV_EXTRA_MODULES_PATH=你的opencv_contrib-3.3.1路径/modules -D CUDA_GENERATION=Auto ..
cmake成功后,进行
make
sudo make install
该过程不建议采用-j4的多线程编译,因为可能某各环节出现error但其他线程依然在等待该线程结果,从而导致编译卡死或者所显示错误与实际问题不符的情况。
5、测试
进入opencv/samples/cpp/example_cmake目录下,终端打开,依次输入:
cmake .
make
./opencv_example
如果最终编译成功,则会显示(设备未连接摄像头,所以显示no capture)

6、安装pangolin(版本号为V0.5)
下载源文件(pangolin的文件地址建议放在工作空间外,这样不用在每次调用pangolin都要source 一下的配置文件)
下载地址:https://github.com/stevenlovegrove/Pangolin/tree/v0.5
安装对应依赖项
sudo apt-get install libglew-dev
sudo apt-get install cmake
sudo apt-get install libpython2.7-dev
sudo apt-get install ffmpeg libavcodec-dev libavutil-dev libavformat-dev libswscale-dev libavdevice-dev
sudo apt-get install libdc1394-22-dev libraw1394-dev
sudo apt-get install libjpeg-dev libpng12-dev libtiff5-dev libopenexr-dev
编译
cd Pangolin
mkdir build
cd build
cmake ..
make
sudo make install
提示“No package ‘xbcommon’ found 的方法
sudo apt-get install libxkbcommon-dev
该方法参考该博客
六、安装eigen3.2.10
eigen3的版本需要严格确保一致
其他版本虽然可以让DS-SLAM成功编译,但在程序运行时会导致未知节点崩溃,
所以复现时一定要检查所安装的eigen3版本为3.2.10!
eigen3.2.10下载地址
https://gitlab.com/libeigen/eigen/-/tree/3.2.10
编译
cd eigen-3.2.10
mkdir build
cd build
cmake ..
make
sudo make install
七、搭建caffe框架
1、配置依赖项
sudo apt-get install git
sudo apt-get install libprotobuf-dev libleveldb-dev libsnappy-dev libopencv-dev
libhdf5-serial-dev protobuf-compiler
sudo apt-get install --no-install-recommends libboost-all-dev
sudo apt-get install libatlas-base-dev
sudo apt-get install python-dev
sudo apt-get install libgflags-dev libgoogle-glog-dev liblmdb-dev
2、源码下载
git clone https://github.com/BVLC/caffe.git
3、编译
cd caffe
mkdir build
cd build
cmake ..
make all
sudo make install
make runtest
若检测均通过,则证明caffe安装成功
若出现“error: hdf5.h: No such file or directory”
则需
sudo apt-get install libhdf5-serial-dev
然后在caffe 路径下打开Makefile.config,寻找
INCLUDE_DIRS := $(PYTHON_INCLUDE) /usr/local/include
将其改为
INCLUDE_DIRS := $(PYTHON_INCLUDE) /usr/local/include /usr/include/hdf5/serial/
保存后打开Makefile,将
LIBRARIES += glog gflags protobuf boost_system boost_filesystem boost_regex m hdf5_hl hdf5
改为
LIBRARIES += glog gflags protobuf boost_system boost_filesystem boost_regex m hdf5_serial_hl hdf5_serial
删除build文件夹,重复本节流程即可解决。
若出现“Unsupported gpu architecture ‘compute_20’”
打开Makefile.config文件,修改
# CUDA architecture setting: going with all of them.
# For CUDA < 6.0, comment the lines after *_35 for compatibility.
CUDA_ARCH :=
            -gencode arch=compute_20,code=sm_20 \
            -gencode arch=compute_20,code=sm_21 \
            -gencode arch=compute_30,code=sm_30 \
             -gencode arch=compute_35,code=sm_35 \
             -gencode arch=compute_50,code=sm_50 \
             -gencode arch=compute_52,code=sm_52 \
             -gencode arch=compute_61,code=sm_61
改为
# CUDA architecture setting: going with all of them.
# For CUDA < 6.0, comment the lines after *_35 for compatibility.
#CUDA_ARCH :=
#-gencode arch=compute_20,code=sm_20 \
#-gencode arch=compute_20,code=sm_21
CUDA_ARCH := -gencode arch=compute_30,code=sm_30 \
             -gencode arch=compute_35,code=sm_35 \
             -gencode arch=compute_50,code=sm_50 \
             -gencode arch=compute_52,code=sm_52 \
             -gencode arch=compute_61,code=sm_61
重新编译即可解决。
若出现
/usr/bin/ld: cannot find -lhdf5_hl
/usr/bin/ld: cannot find -lhdf5
/usr/bin/ld: cannot find -lopenblas”
安装缺失库即可解决
sudo apt-get install libopenblas-dev
该流程参考该博客
八、编译caffe-segnet-cudnn7
在工作空间外路径下载源码
git clone https://github.com/yubaoliu/caffe-segnet.git
cd caffe-segnet
编译
mkdir build
cd build
cmake  -D CMAKE_INSTALL_PREFIX=/usr/local ..
make
sudo make install
如果caffe中的runtest调试通过,该过程也可顺利编译成功
九、配置DS-SLAM所需依赖
先下载
https://github.com/OctoMap/octomap_mapping
https://github.com/OctoMap/octomap_rviz_plugins
两个插件下载到 catkin_ws(工作空间)/src下,然后
sudo apt-get install ros-melodic-octomap ros-melodic-octomap-msgs ros-melodic-octomap-ros ros-melodic-octomap-rviz-plugins
然后对工作空间进行编译即可。
感谢评论区@七友的提示
要显示彩色地图还需要:
1.在octomap_mapping/octomap_server/include/octomap_server/OctomapServer.h 文件中去掉#define COLOR_OCTOMAP_SERVER 的注释
2.彩色八叉地图参数设置:文件路径
(/catkin_ws/src/DS-SLAM/Examples/ROS/ORB_SLAM2_PointMap_SegNetM/launch/Octomap.launch)
3.再进行catkin_make编译一次
十、DS_SLAM程序编译
在 catkin_ws(工作空间)/src下拷贝DS_SLAM源码
cd catkin_ws/src
git clone https://github.com/yubaoliu/DS-SLAM.git
然后在命令行中输入
gedit ~/.bahsrc
在文件末尾添加该命令
export ROS_PACKAGE_PATH=$ROS_PACKAGE_PATH:$/你的工作空间路径/src/DS-SLAM/Examples/ROS/ORB_SLAM2_PointMap_SegNetM
上方.bashrc文件中的export命令所设定的工作空间路径要为你本地的路径,可以通过工作空间下的文件属性中查询到
(例:ROS_PACKAGE_PATH=$ ROS_PACKAGE_PATH:$HOME/catkin_ws/src/DS-SLAM/Examples/ROS/ORB_SLAM2_PointMap_SegNetM)
保存关闭后
source ~/.bashrc
随后开始对DS_SLAM进行编译
cd DS-SLAM
chmod +x DS_SLAM_BUILD.sh
./DS_SLAM_BUILD.sh
该过程会出现非常多的报错,需要通过报错信息对环境或者依赖进行调整或者检查,我也会针对该流程进行各种问题的解决方式汇总
十一、下载数据集与修改launch文件
数据集下载地址
建议下载该数据集

并且需要自己建立对应的tum数据集处理工具associate.py
gedit associate.py
将下列代码复制进去
#!/usr/bin/python
# Software License Agreement (BSD License)
#
# Copyright (c) 2013, Juergen Sturm, TUM
# All rights reserved.
#
# Redistribution and use in source and binary forms, with or without
# modification, are permitted provided that the following conditions
# are met:
#
#  * Redistributions of source code must retain the above copyright
#    notice, this list of conditions and the following disclaimer.
#  * Redistributions in binary form must reproduce the above
#    copyright notice, this list of conditions and the following
#    disclaimer in the documentation and/or other materials provided
#    with the distribution.
#  * Neither the name of TUM nor the names of its
#    contributors may be used to endorse or promote products derived
#    from this software without specific prior written permission.
#
# THIS SOFTWARE IS PROVIDED BY THE COPYRIGHT HOLDERS AND CONTRIBUTORS
# "AS IS" AND ANY EXPRESS OR IMPLIED WARRANTIES, INCLUDING, BUT NOT
# LIMITED TO, THE IMPLIED WARRANTIES OF MERCHANTABILITY AND FITNESS
# FOR A PARTICULAR PURPOSE ARE DISCLAIMED. IN NO EVENT SHALL THE
# COPYRIGHT OWNER OR CONTRIBUTORS BE LIABLE FOR ANY DIRECT, INDIRECT,
# INCIDENTAL, SPECIAL, EXEMPLARY, OR CONSEQUENTIAL DAMAGES (INCLUDING,
# BUT NOT LIMITED TO, PROCUREMENT OF SUBSTITUTE GOODS OR SERVICES;
# LOSS OF USE, DATA, OR PROFITS; OR BUSINESS INTERRUPTION) HOWEVER
# CAUSED AND ON ANY THEORY OF LIABILITY, WHETHER IN CONTRACT, STRICT
# LIABILITY, OR TORT (INCLUDING NEGLIGENCE OR OTHERWISE) ARISING IN
# ANY WAY OUT OF THE USE OF THIS SOFTWARE, EVEN IF ADVISED OF THE
# POSSIBILITY OF SUCH DAMAGE.
#
# Requirements:
# sudo apt-get install python-argparse

"""
The Kinect provides the color and depth images in an un-synchronized way. This means that the set of time stamps from the color images do not intersect with those of the depth images. Therefore, we need some way of associating color images to depth images.

For this purpose, you can use the ''associate.py'' script. It reads the time stamps from the rgb.txt file and the depth.txt file, and joins them by finding the best matches.
"""

import argparse
import sys
import os
import numpy


def read_file_list(filename):
    """
    Reads a trajectory from a text file.

    File format:
    The file format is "stamp d1 d2 d3 ...", where stamp denotes the time stamp (to be matched)
    and "d1 d2 d3.." is arbitary data (e.g., a 3D position and 3D orientation) associated to this timestamp.

    Input:
    filename -- File name

    Output:
    dict -- dictionary of (stamp,data) tuples

    """
    file = open(filename)
    data = file.read()
    lines = data.replace(","," ").replace("\t"," ").split("\n")
    list = [[v.strip() for v in line.split(" ") if v.strip()!=""] for line in lines if len(line)>0 and line[0]!="#"]
    list = [(float(l[0]),l[1:]) for l in list if len(l)>1]
    return dict(list)

def associate(first_list, second_list,offset,max_difference):
    """
    Associate two dictionaries of (stamp,data). As the time stamps never match exactly, we aim
    to find the closest match for every input tuple.

    Input:
    first_list -- first dictionary of (stamp,data) tuples
    second_list -- second dictionary of (stamp,data) tuples
    offset -- time offset between both dictionaries (e.g., to model the delay between the sensors)
    max_difference -- search radius for candidate generation

    Output:
    matches -- list of matched tuples ((stamp1,data1),(stamp2,data2))

    """
    first_keys = first_list.keys()
    second_keys = second_list.keys()
    potential_matches = [(abs(a - (b + offset)), a, b)
                         for a in first_keys
                         for b in second_keys
                         if abs(a - (b + offset)) < max_difference]
    potential_matches.sort()
    matches = []
    for diff, a, b in potential_matches:
        if a in first_keys and b in second_keys:
            first_keys.remove(a)
            second_keys.remove(b)
            matches.append((a, b))

    matches.sort()
    return matches

if __name__ == '__main__':

    # parse command line
    parser = argparse.ArgumentParser(description='''
    This script takes two data files with timestamps and associates them
    ''')
    parser.add_argument('first_file', help='first text file (format: timestamp data)')
    parser.add_argument('second_file', help='second text file (format: timestamp data)')
    parser.add_argument('--first_only', help='only output associated lines from first file', action='store_true')
    parser.add_argument('--offset', help='time offset added to the timestamps of the second file (default: 0.0)',default=0.0)
    parser.add_argument('--max_difference', help='maximally allowed time difference for matching entries (default: 0.02)',default=0.02)
    args = parser.parse_args()

    first_list = read_file_list(args.first_file)
    second_list = read_file_list(args.second_file)

    matches = associate(first_list, second_list,float(args.offset),float(args.max_difference))

    if args.first_only:
        for a,b in matches:
            print("%f %s"%(a," ".join(first_list[a])))
    else:
        for a,b in matches:
            print("%f %s %f %s"%(a," ".join(first_list[a]),b-float(args.offset)," ".join(second_list[b])))
然后将associate.py复制到所下载的数据集路径下
cd 你的数据集路径
python associate.py rgb.txt depth.txt > associate.txt
随后在该路径下即生成一个associate.txt文件
下载所需模型下载地址:https://pan.baidu.com/s/1gkI7nAvijF5Fjj0DTR0rEg【密码:fpa3】
将.launch中各种模型与文件的路径进行替换,如下

即可运行DS_SLAM
roslaunch fr3_walk_xyz_raw.launch
十二、rviz显示构建地图
如果成功运行程序,并启动rviz,则选择左下角的add,选择by topic,选择occupied_cells_vis_array下的MarkerArray,就可以复现成功。建图成功后如图

深度图像
 彩色图像
彩色图像
相机轨迹的保存与关键帧的保存
在Examples/ROS/ORB_SLAM2_PointMap_SegNetM/ros_tum_realtime.cc文件中修改如下语句,即可保存相机轨迹与关键帧轨迹。
	SLAM.SaveTrajectoryTUM("CameraTrajectory.txt");
    SLAM.SaveKeyFrameTrajectoryTUM("KeyFrameTrajectory.txt");
//如果想要修改保存路径,可以在对应位置改为绝对路径
注意最后这两个文件的存放路径,如果不改源代码的话,默认存放于根目录/.ros下
(例: /home/tony/.ros)文件夹里面,所以需要在根目录下按键Ctrl+H 显示隐藏文件。

上图为相机轨迹图
当完成系列步骤,恭喜你成功复现了DS_SLAM!
十三、小结
对于DS_SLAM的编译过程,为其配置合适的编译环境是运行该程序的难点之一,并且由于官方程序发布已经过去多年,笔者在相同环境下编译官方程序与改良版DS_SLAM出现两种不同结果,官方程序依然在运行过程中崩溃跳出,而改良版却可以很好的运行建图,具体原因目前还未确定。
由于近期跟进其他项目,无法及时回复各类提问,敬请各位朋友谅解。

瓜分20万奖金 获得内推名额 丰厚实物奖励 易参与易上手
更多推荐

 26
26 0
0- 0


 已为社区贡献1条内容

所有评论(0)