
安装gitlab仓库、配置ssh协议免密上传代码
前言环境:centos7.9前面介绍了公网上的远程仓库GitHub,这次我们来介绍内网远程仓库gitlab,gitlab比较合适内网环境的企业,同时也可以提高安全性,毕竟GitHub是外网,gitlab是内网。本篇我们就俩介绍gitlab。什么是gitlabGitLab 是一个用于仓库管理系统的开源项目,使用Git作为代码管理工具,并在此基础上搭建起来的Web服务。安装gitlab软件,搭建git
目录
前言
环境:centos7.9
gitlab是公司企业中的内网代码托管仓库,gitlab是用来托管企业项目代码的,开发工程师会把开发的代码上传到gitlab仓库中进行托管。
本篇我们就来介绍gitlab的安装和使用。
安装gitlab软件,搭建gitlab服务器
gitlab软件的rpm包可以在清华的镜像源中找到,如:https://mirrors.tuna.tsinghua.edu.cn/gitlab-ce/yum/el7/gitlab-ce-14.7.0-ce.0.el7.x86_64.rpm,下载对应的版即可,这里我下载gitlab-ce社区版,centos7版本。
建议将gitlab安装在一台单独的服务器,因为gitlab会安装很多软件。,避免端口仓库,gitlab也比较耗资源。
[root@gitlab ~]# wget https://mirrors.tuna.tsinghua.edu.cn/gitlab-ce/yum/el7/gitlab-ce-14.7.0-ce.0.el7.x86_64.rpm
[root@gitlab ~]# rpm -ivh gitlab-ce-14.7.0-ce.0.el7.x86_64.rpm				#开始安装gitlab
.................
Thank you for installing GitLab!
GitLab was unable to detect a valid hostname for your instance.
Please configure a URL for your GitLab instance by setting `external_url`
configuration in /etc/gitlab/gitlab.rb file.
Then, you can start your GitLab instance by running the following command:
  sudo gitlab-ctl reconfigure

For a comprehensive list of configuration options please see the Omnibus GitLab readme
https://gitlab.com/gitlab-org/omnibus-gitlab/blob/master/README.md

Help us improve the installation experience, let us know how we did with a 1 minute survey:
https://gitlab.fra1.qualtrics.com/jfe/form/SV_6kVqZANThUQ1bZb?installation=omnibus&release=14-7

[root@gitlab ~]#
#上面的安装输出的信息提示了需要去 /etc/gitlab/gitlab.rb修改参数external_url,来定义实例名,然后还需要sudo gitlab-ctl reconfigure重新加载gitlab的配置
#下面我们照着提示做即可
[root@gitlab ~]# vim /etc/gitlab/gitlab.rb 			#将external_url修改为自己的主机IP
external_url 'http://192.168.118.130'
[root@gitlab ~]# sudo gitlab-ctl reconfigure		#重新加载配置

#配置重新加载成功后会告诉你,默认账号为root,密码位于/etc/gitlab/initial_root_password文件,登陆之后必须马上修改root密码
查看gitlab状态
[root@gitlab conf]# gitlab-ctl status									#查看gitlab状态
run: alertmanager: (pid 5135) 354s; run: log: (pid 4811) 426s
run: gitaly: (pid 5159) 354s; run: log: (pid 4263) 539s
run: gitlab-exporter: (pid 5097) 357s; run: log: (pid 4713) 444s
run: gitlab-workhorse: (pid 5074) 359s; run: log: (pid 4630) 462s
run: grafana: (pid 5168) 354s; run: log: (pid 5020) 379s
run: logrotate: (pid 4187) 552s; run: log: (pid 4199) 549s
run: nginx: (pid 4646) 457s; run: log: (pid 4659) 454s
run: node-exporter: (pid 5086) 358s; run: log: (pid 4696) 448s
run: postgres-exporter: (pid 5153) 354s; run: log: (pid 4902) 420s
run: postgresql: (pid 4390) 533s; run: log: (pid 4405) 530s
run: prometheus: (pid 5106) 356s; run: log: (pid 4754) 432s
run: puma: (pid 4564) 477s; run: log: (pid 4580) 473s
run: redis: (pid 4218) 546s; run: log: (pid 4235) 543s
run: redis-exporter: (pid 5099) 357s; run: log: (pid 4730) 438s
run: sidekiq: (pid 4590) 470s; run: log: (pid 4604) 467s
[root@gitlab conf]#
#gitlab自带了很多软件,所以建议单独将gitlab安装在一台干净的服务器上,避免造成端口冲突
[root@gitlab conf]# ps 4646									#查看gitlab启动的nginx
   PID TTY      STAT   TIME COMMAND
  4646 ?        Ss     0:00 nginx: master process /opt/gitlab/embedded/sbin/nginx -p /var/opt/gitlab/nginx
[root@gitlab conf]# grep -Ev '#|^$' /var/opt/gitlab/nginx/conf/gitlab-http.conf | head -n 15
server {
  listen *:80;												#发现查看gitlab启动的nginx启动了一个80端口
  server_name 192.168.118.130;
  client_max_body_size 0;
  add_header Strict-Transport-Security "max-age=63072000";
  proxy_hide_header Referrer-Policy;
  add_header Referrer-Policy strict-origin-when-cross-origin;
  access_log  /var/log/gitlab/nginx/gitlab_access.log gitlab_access;
  error_log   /var/log/gitlab/nginx/gitlab_error.log error;
  if ($http_host = "") {
    set $http_host_with_default "192.168.118.130";
  }
  if ($http_host != "") {
    set $http_host_with_default $http_host;
  }
[root@gitlab conf]#
启动、重启、停止gitlab
gitlab并不是使用systemd管理,使用rpm包安装好gitlab之后,会产生gitlan-ctl命令,使用该命令来管理gitlab:
[root@gitlab ~]# gitlab-ctl --help					#查看帮助
[root@gitlab ~]# gitlab-ctl start					#启动gitlab
[root@gitlab ~]# gitlab-ctl restart					#重启gitlab
[root@gitlab ~]# gitlab-ctl stop					#停止gitlab
[root@gitlab ~]# gitlab-ctl status					#查看gitlab的状态
[root@gitlab ~]# gitlab-ctl service-list			#查看gitlab的所有服务
web页面访问gitlab
上一步我们发现gitlab自带了一个nginx,访问端口是80,下面我们在浏览器访问gitlab。
访问地址:http://192.168.118.130:80


创建一个项目

本地上传提交代码
这里先讲一下git remote命令,该命令为添加一个远程仓库,语法格式为:
git remote add [shortname] [url]			#shortname是自定义的名称,表示为这个远程仓库设置一个名称

#示例:添加一个远程仓库地址
[root@git Dosier_Project]# git remote add my_gitlab_repository http://192.168.118.130/root/dossier_project.git
[root@git Dosier_Project]# git push -u my_gitlab_repository master:dev			#提交当前本地的master分支到名为my_gitlab_repository远程仓库的指定dev分支
[root@git Dosier_Project]# git remote -v		#查看保存了哪些远程仓库
[root@git Dosier_Project]# git remote add gitlab_Dossier_Project http://192.168.118.130/root/dossier_project.git
[root@git Dosier_Project]# git remote -v								#查看保存了哪些远程仓库
gitlab_Dossier_Project  http://192.168.118.130/root/dossier_project.git (fetch)
gitlab_Dossier_Project  http://192.168.118.130/root/dossier_project.git (push)

[root@git Dosier_Project]# git push gitlab_Dossier_Project main:dev		#提交到远程分支,main:dev表示本地main分支提交到远程dev分支
Username for 'http://192.168.118.130': root								#需要输入账号密码
Password for 'http://root@192.168.118.130':
......
[root@git Dosier_Project]#
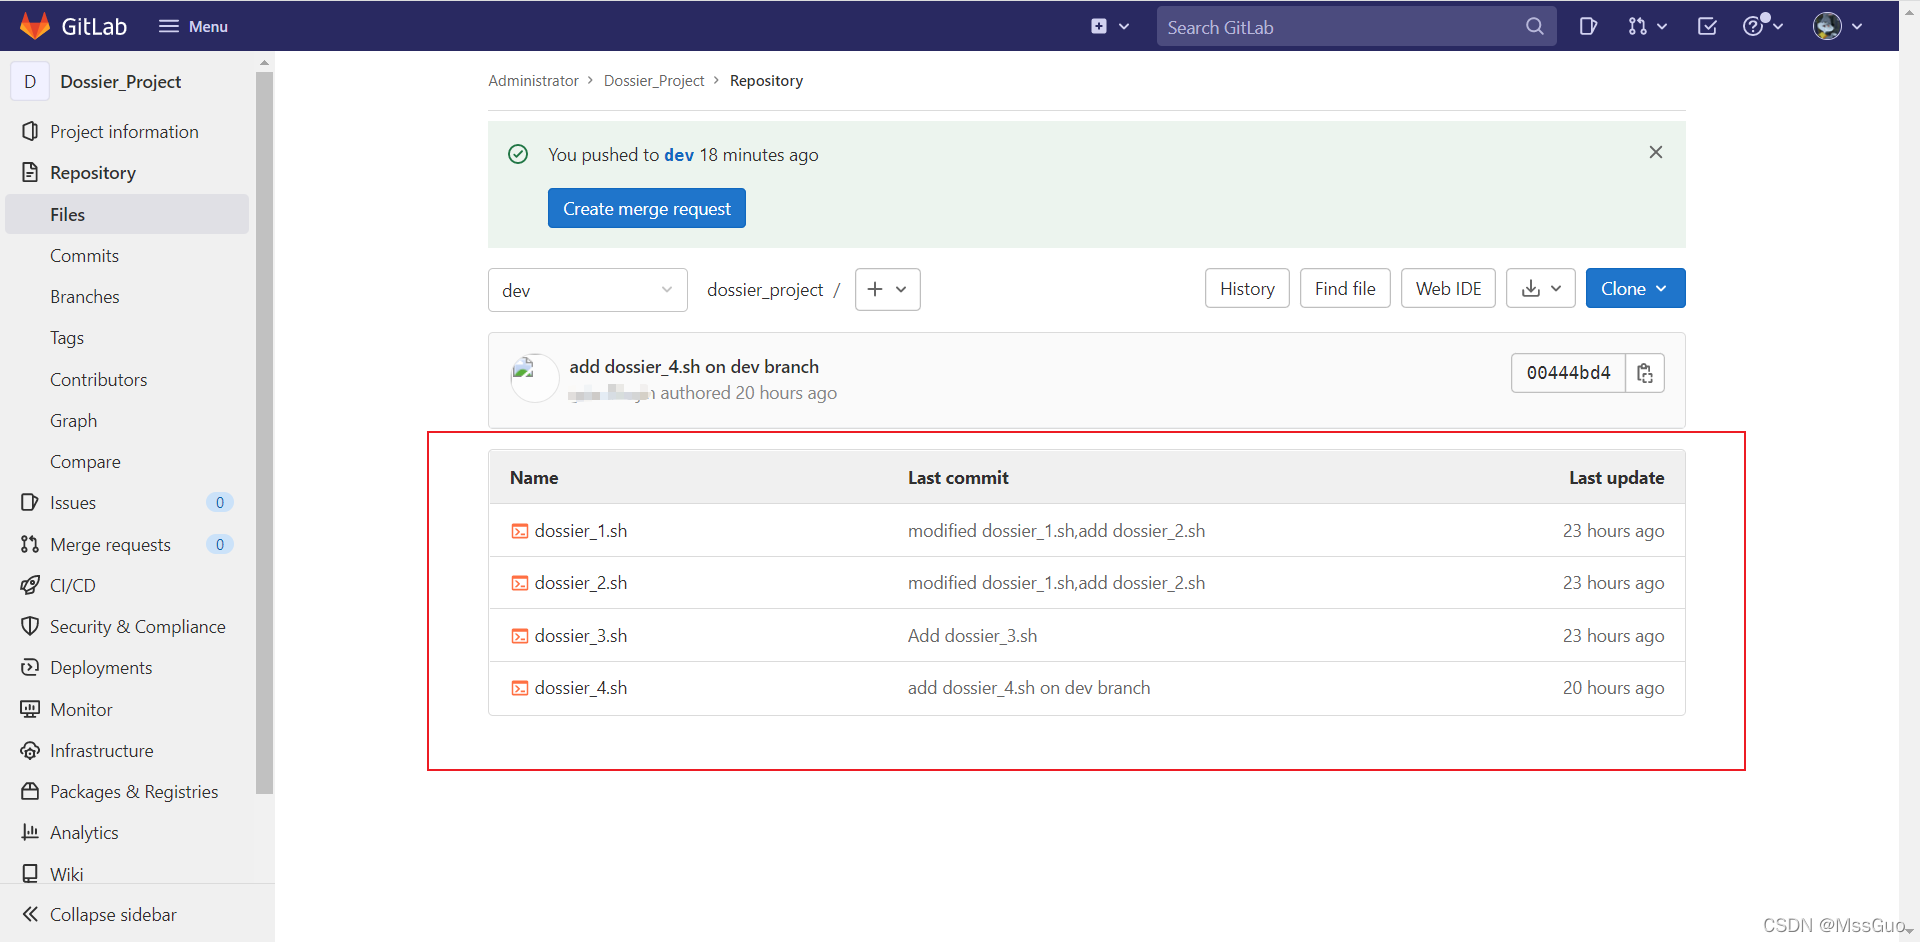
提交之后我们在gitlab页面查看dev分支,发现已经有文件了,如下图所示,说明已经提交成功了。
克隆下载
如果下载克隆下载项目代码,可以直接使用git clone命令来克隆,如下:
[root@git ~]# git clone http://192.168.118.130/root/dossier_project.git #克隆远程仓库代码到本地,默认会生成一个跟项目名称的目录来存放下载下来的代码
配置ssh协议实现免密上传代码到gitlab仓库
我们知道,当搭建了一个自己的gitlab仓库,创建了一个私有仓库,拉取或上传代码到gitlab 私有仓库有两种方式,如git@192.168.xx.xx:root/xx.git和http://192.168.xx.xx/root/xx.git,即一种是通过https或http,一种是git的形式这种git形式其实就是使用了ssh协议,使用https或http上传代码是需要输入用户账号密码的,为了方便我们可以使用ssh协议做ssh免密上传,如下配置:
ssh免密上传代码到gitlab仓库
1、开发者电脑生成秘钥对
ssh-keygen -t rsa #指定生成的秘钥类型为rsa
2、gitlab配置免密上传,将id_rsa.pub公钥复制到gitlab
复制公钥,即复制/~/.ssh/id_rsa.pub文件的内容,粘贴到gitlab的界面上保存,如下所示:
管理员登录gitlab-右上角-展开管理员头像-Edit profile -左侧SSh keys:

3、免密测试上传
这次我们上传代码不再使用http的方式,而是采用ssh协议上传。
[root@git haroy_project]# git clone git@192.168.118.130:root/haroy_project.git	#先使用ssh方式克隆一份项目代码下来
[root@git haroy_project]# git remote -v						#克隆时候默认会将本地仓库与远端仓库建立链接,名称叫origin
origin  git@192.168.118.130:root/haroy_project.git (fetch)
origin  git@192.168.118.130:root/haroy_project.git (push)
[root@git haroy_project]# git config --global user.name 'Lisi' #设置开发者信息
[root@git haroy_project]# git config --global user.email 'Lisi@devpoer.com'
[root@git haroy_project]# echo "I am good">>haroy_7.sh		#创建一个文件
[root@git haroy_project]# git add haroy_7.sh				#提交暂存区
[root@git haroy_project]# git commit -m "Add haroy_7.sh"	#提交本地仓库
[root@git haroy_project]# git push origin dev:dev			#提交到远程gitlab仓库dev分支,不用输入密码,实现了ssh免密上传
使用docker安装gitlab
https://docs.gitlab.com/ee/install/docker.html

瓜分20万奖金 获得内推名额 丰厚实物奖励 易参与易上手
更多推荐

 0
0 0
0- 0


 已为社区贡献5条内容

所有评论(0)