langchain入门系列之八 langgraph多agent示例
langgraph多agent系统示例
·
在之前的文章中我们介绍了langgraph,并且用它做了一个小小的示例,在本文中,我们将使用智普清言来构建多agent 系统。百度千帆对langgraph支持较差(尤其是强制要求奇数偶数的role设置,传入messages的奇数偶数要求,让人有点怀疑人生)

如果想快速学习langgraph建议优先使用open ai,其次是glm4也就是智普清言,官网链接,当然glm4并不是完美的,例如它现在对langchain中的ToolMessage支持还不是很好,但相对而言已经胜出qianfan太多。一家之言,听听就好。
在阅读本文之前,需要你对langgraph中的一些概念有所了解,不然阅读起来会很吃力。如下是ai生成的langgraph的一些基本知识:
LangGraph 是一个用于构建基于复杂工作流的大型语言模型(LLM)应用的开发库。它通过将任务的节点和关系以图形结构定义,支持更多样化和复杂的应用场景。
以下是 LangGraph 的一些基本概念:
状态图(StateGraph):这是 LangGraph 的核心,代表整个状态图的基础类。状态图维护一个中央状态对象,会根据节点的跳转不断更新,状态包含的属性可自行定义。
节点(Nodes):节点是 LangGraph 的基本构建块,每个节点代表一个特定的功能或计算步骤,如处理输入、做出决策或与外部 API 交互。节点可以是一个独立的操作,每个节点可以和一个方法关联起来。
边(Edges):边连接图中的节点,定义计算的流程。LangGraph 支持普通边和条件边。普通边代表上一个节点运行完成后立即进入下一个节点,而条件边则根据条件函数的返回来决定下游节点。
条件边(Conditional Edges):条件边是 LangGraph 中的一种特殊边,它根据条件函数的返回值来决定下一个执行的节点。这种边不仅需要上游节点、下游节点,还需要一个条件函数。
状态信息(State Information):在多个节点之间执行操作时,需要保持状态,这就需要用到状态信息。状态信息可以在节点之间传递和更新。
编译(Compile):对工作流进行编译,将定义好的图转换成可执行的应用。
执行(Execution):传参、执行工作流,触发工作流按预定义顺序执行相关操作。
多智能体系统(Multi-Agent System):LangGraph 支持构建多智能体系统,即多个 AI 智能体构成的系统,通过相互关联与协作共同完成任务。
工具节点(Tool Nodes):在 LangGraph 中,工具节点代表可以被调用的工具,执行特定的工具操作,如调用 API 或执行特定服务。
入口点(Entry Point):在状态图中设置的起始节点,计算将从这个节点开始。
这些概念共同构成了 LangGraph 的框架,使其能够支持复杂的 LLM 应用开发,如增强的 RAG 应用、自修复代码助手、多智能体系统构建等。通过 LangGraph,开发者可以创建具有循环计算、状态执行和条件逻辑的智能体应用。
本次主题是将英国最近5年的gpd化成图
安装依赖
%pip install -U langchain zhipuai langsmith pandas langchain_experimental matplotlib langgraph langchain_core
1、引入包,设置环境,这里需要注意的是,我们在这里设置了langsmith 和zhipu的相关参数,langsmith可以方便我们调试和监控langchain流程,TAVILY_API_KEY这个需要自己去TavilySearch官网注册一个账号使用。
import os
from langchain_community.chat_models import ChatZhipuAI
from langchain_core.messages import (
    BaseMessage,
    HumanMessage,
    ToolMessage,
)
from langchain_core.prompts import ChatPromptTemplate, MessagesPlaceholder
from langgraph.graph import END, StateGraph, START
from langchain_community.tools.tavily_search import TavilySearchResults
from langchain_core.tools import tool
from langchain_experimental.utilities import PythonREPL
from langgraph.prebuilt import ToolNode
from IPython.display import Image, display
import operator
from typing import Annotated, Sequence, TypedDict
from typing import Literal
import functools
from langchain_core.messages import AIMessage


# 设置API
os.environ["LANGCHAIN_TRACING_V2"] = "true"
os.environ["LANGCHAIN_API_KEY"] = ""
os.environ["LANGCHAIN_ENDPOINT"] = "https://api.smith.langchain.com"
os.environ["LANGCHAIN_PROJECT"] = 'default'
os.environ["TAVILY_API_KEY"] = ""
os.environ["ZHIPUAI_API_KEY"] = ""
2、这里我们首先定义了agent的创建,再然后定义了两个工具,一个是使用@tool的语法糖自定义了一个执行python代码的工具,还有一个是TavilySearch,这个需要自己去TavilySearch官网注册一个,一个月有1000次免费的使用量。
读过前面文章的朋友对这里的llm创建应该没有问题,如果有困扰,可以在这个函数里输出prompt看一下。
def create_agent(llm, tools, system_message: str):
    """创建agent"""
    prompt = ChatPromptTemplate.from_messages(
        [
            (
                "system",
                "You are a helpful AI assistant, collaborating with other assistants."
                " Use the provided tools to progress towards answering the question."
                " If you are unable to fully answer, that's OK, another assistant with different tools "
                " will help where you left off. Execute what you can to make progress."
                " If you or any of the other assistants have the final answer or deliverable,"
                " prefix your response with FINAL ANSWER so the team knows to stop."
                " You have access to the following tools: {tool_names}.\n{system_message}",
            ),
            MessagesPlaceholder(variable_name="messages"),
        ]
    )
    prompt = prompt.partial(system_message=system_message)
    prompt = prompt.partial(tool_names=", ".join([tool.name for tool in tools]))
    # lecl
    return prompt | llm.bind_tools(tools)

@tool
def python_repl(
    code: Annotated[str, "The python code to execute to generate your chart."],
):
    """执行python代码"""
    try:
        result = repl.run(code)
    except BaseException as e:
        return f"Failed to execute. Error: {repr(e)}"
    result_str = f"Successfully executed:\n```python\n{code}\n```\nStdout: {result}"
    return (
        result_str + "\n\nIf you have completed all tasks, respond with FINAL ANSWER."
    )


tavily_tool = TavilySearchResults(max_results=5)
repl = PythonREPL()
3、定义agent的state结构体
class AgentState(TypedDict):
    """agent state 结构体定义"""
    messages: Annotated[Sequence[BaseMessage], operator.add]
    sender: str
4、定义agent 执行任务的函数,最后返回的结果,就是上面定义的结构体。
def agent_node(state, agent, name):
    messages = state["messages"]
    last_message = messages[-1]
    # glm4 agent 还不支持tool message,这里做一下转换
    if isinstance(last_message, ToolMessage):
        message_dict = {
            "role": "tool",
            "content": last_message.content,
            "tool_call_id": last_message.tool_call_id,
        }
        state["messages"][-1] = AIMessage(**message_dict)
    result = agent.invoke(state)
    # 将代理输出转换成适合附加到全局状态的格式
    if isinstance(result, ToolMessage):
        pass
    else:
        result = AIMessage(**result.dict(exclude={"type", "name"}), name=name, role="assistant")
    result = [result]

    return {
        "messages": result,
        "sender": name,
    }
5、实例化llm
llm = ChatZhipuAI(
    model="glm-4",
    temperature=0.01
)
6、定义agent和node
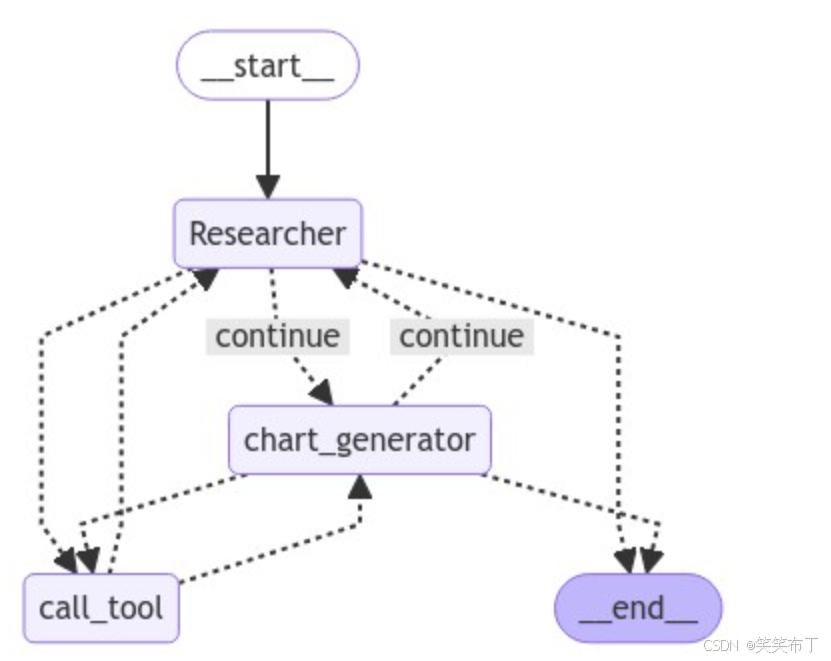
需要稍加注意的是tool_node,它包含了两种工具,后面看流程图就知道为啥它要包含两种tool。
research_agent = create_agent(
    llm,
    [tavily_tool],
    system_message="You should provide accurate data for the chart_generator to use.",
)
research_node = functools.partial(agent_node, agent=research_agent, name="Researcher")

chart_agent = create_agent(
    llm,
    [python_repl],
    system_message="Any charts you display will be visible by the user.",
)
chart_node = functools.partial(agent_node, agent=chart_agent, name="chart_generator")

tools = [tavily_tool, python_repl]
tool_node = ToolNode(tools)
7、定义路由,也就是做判断选择执行哪个流程
def router(state) -> Literal["call_tool", "__end__", "continue"]:
    # 条件路由
    messages = state["messages"]
    last_message = messages[-1]
    if last_message.tool_calls:
        # 前一个代理正在调用一个工具
        return "call_tool"
    if "FINAL ANSWER" in last_message.content:
        # 流程结束
        return "__end__"
    if len(state["messages"]) % 2 == 0:
        state["messages"].append(AIMessage(content="nothing, go on.", role="user"))
    return "continue"
8、创建工作流
# 加入node
workflow = StateGraph(AgentState)
workflow.add_node("Researcher", research_node)
workflow.add_node("chart_generator", chart_node)
workflow.add_node("call_tool", tool_node)

# 添加条件边
workflow.add_conditional_edges(
    "Researcher",
    router,
    {"continue": "chart_generator", "call_tool": "call_tool", "__end__": END},
)
workflow.add_conditional_edges(
    "chart_generator",
    router,
    {"continue": "Researcher", "call_tool": "call_tool", "__end__": END},
)

workflow.add_conditional_edges(
    "call_tool",
    lambda x: x["sender"],
    {
        "Researcher": "Researcher",
        "chart_generator": "chart_generator",
    },
)
# 添加起始边
workflow.add_edge(START, "Researcher")
graph = workflow.compile()
9、画出graph流程图
try:
    display(Image(graph.get_graph(xray=True).draw_mermaid_png()))
except Exception:
    # This requires some extra dependencies and is optional
    pass

10、执行工作流
events = graph.stream(
    {
        "messages": [
            HumanMessage(
               content="Fetch the UK's GDP over the past 5 years,"
                " then draw a line graph of it."
                " Once you code it up, finish."
            )
        ],
    },
    # 迭代限制
    {"recursion_limit": 150},
)


for s in events:
    print(s)
    print("-----")
结果绘图:


开放原子开发者工作坊旨在鼓励更多人参与开源活动,与志同道合的开发者们相互交流开发经验、分享开发心得、获取前沿技术趋势。工作坊有多种形式的开发者活动,如meetup、训练营等,主打技术交流,干货满满,真诚地邀请各位开发者共同参与!
更多推荐
 已为社区贡献4条内容


所有评论(0)