【设计模式】模板方法与策略模式的结合使用
模板方法是一种非常简单的设计模式,只要能够理解面向对象中的继承与多态就能够理解这种设计模式,我们可以在很多的框架源码中找到它的身影。同时在我们的日常开发中,它一般是用在同类型且不同实现方式的业务逻辑中,抽取公共逻辑,简单的说就是,模板方法经常和策略模式结合使用。《SpringBoot优雅使用策略模式》本篇文章介绍了什么是模板方法、模板方法的简单实现与在SpringBoot中的实现的。然后对比了模板
1. 概述
模板方法是一种非常简单的设计模式,只要能够理解面向对象中的继承与多态就能够理解这种设计模式,我们可以在很多的框架源码中找到它的身影。
同时在我们的日常开发中,它一般是用在同类型且不同实现方式的业务逻辑中,抽取公共逻辑,简单的说就是,模板方法经常和策略模式结合使用。
本篇后续的代码中会涉及到策略模式,如果还不太熟悉策略模式使用实例的同学,可以先看一下上一篇文章:《SpringBoot优雅使用策略模式》
1.1.简述模板方法
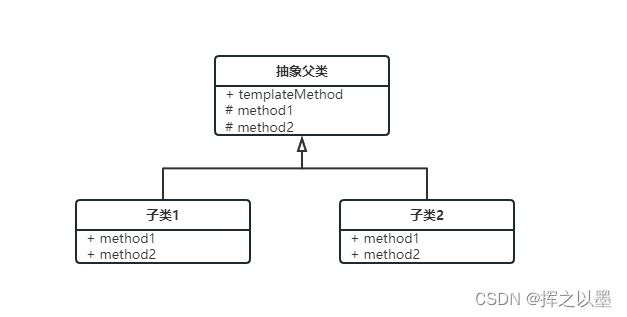
模板方法通过继承来实现,顶层是一个抽象类,用于封装通用函数,并提供一个或多个抽象方法,下层是多个实现类,用于实现不同的业务逻辑分支,类图如下:

2.模板方法实现
实际使用的时候,一般会通过子类的实例调用父类中的模板方法templateMethod,在模板方法中调用抽象方法,最终还是会调用到子类中覆写的实例方法,这是一种常见的钩子函数使用方式。
2.1.简单实现
- 抽象父类:
/** * 抽象父类 */ public abstract class BaseClass { final public void templateMethod() { System.out.println("执行模板方法"); method1(); method2(); } abstract protected void method1(); abstract protected void method2(); } - 子类实现
/**
 * 子类1
 */
public class ChildClass1 extends BaseClass {
    @Override
    protected void method1() {
        System.out.println("执行子类1的方法1");
    }
    @Override
    protected void method2() {
        System.out.println("执行子类1的方法2");
    }
}
/** * 子类2 */ public class ChildClass2 extends BaseClass { @Override protected void method1() { System.out.println("执行子类2的方法1"); } @Override protected void method2() { System.out.println("执行子类2的方法2"); } }
简单的测试一下:
public static void main(String[] args) {
    BaseClass baseClass = new ChildClass1();
    baseClass.templateMethod();

    baseClass = new ChildClass2();
    baseClass.templateMethod();
}
打印出测试结果:

2.2.在SpringBoot中的实现
在使用SpringBoot进行开发的时候,我们通常不会手动去创建对象,而是将不同的已经创建好的bean结合起来使用,我们可以在子类的对象中,通过@Autowired将其他的bean注入进来,并在运行时执行方法调用。
如果这个方法调用是通用的,我们可以将它抽取到的父类中去,但由于父类是抽象类无法实例化,自然也无法直接通过@Autowired注入bean,此时可以对子类做一点小改造,通过构造函数对父类进行赋值。
实现起来也非常的简单,下面是代码示例:
- 首先提供一个
QueryService供子类注入import org.springframework.stereotype.Service; @Service public class QueryService { public void query() { System.out.println("执行查询方法"); } } - 其次需要再抽象父类中定义
QueryServicepublic abstract class BaseClass { protected QueryService queryService; final public void templateMethod() { System.out.println("执行模板方法"); queryService.query(); method1(); } abstract protected void method1(); } - 最后,在子类中注入并对父类的
QueryService赋值
import org.springframework.stereotype.Component;

/**
 * 子类1
 */
@Component
public class ChildClass1 extends BaseClass {

    public ChildClass1(QueryService queryService) {
        super.queryService = queryService;
    }

    @Override
    protected void method1() {
        System.out.println("执行子类1的方法1");
    }

}
/**
 * 子类2
 */
@Component
public class ChildClass2 extends BaseClass {

    public ChildClass2(QueryService queryService) {
        super.queryService = queryService;
    }

    @Override
    protected void method1() {
        System.out.println("执行子类2的方法1");
    }

}
使用ApplicationContext做一个简单的测试:
@Component
public class Test implements ApplicationContextAware {

    @Override
    public void setApplicationContext(ApplicationContext applicationContext) throws BeansException {
        applicationContext.getBean(ChildClass1.class).templateMethod();
        applicationContext.getBean(ChildClass2.class).templateMethod();
    }
}

3.模板方法与策略模式的结合使用
模板方法与策略模式天然的可以结合使用,为了大家能够有个更直观的感受,我把两个类图放到一起,大家可以做一下对比。


相信大家也很容易可以看出来,如果我们现在业务中通过策略模式,让程序能够自行选择需要使用的子类实例,只需要再加上一个选择器就好了。
3.1.代码实现
在 上篇文章 中已经介绍了如何构建选择器,有需要的同学可以去看一下,在这里就不过多赘述,直接放实现代码。
只需要两个步骤就可以完成改造:
-
第一步,编写策略选择器与选择器枚举
import org.jetbrains.annotations.NotNull;
import org.springframework.beans.BeansException;
import org.springframework.context.ApplicationContext;
import org.springframework.context.ApplicationContextAware;
import org.springframework.stereotype.Component;

import java.util.Map;
import java.util.stream.Collectors;

/**
 * 策略选择器
 */
@Component
public class Selector implements ApplicationContextAware {

    private Map<String, BaseClass> selectorMap;

    public BaseClass select(String type) {
        return selectorMap.get(type);
    }

    @Override
    public void setApplicationContext(@NotNull ApplicationContext applicationContext) throws BeansException {
        this.selectorMap = applicationContext.getBeansOfType(BaseClass.class).values().stream()
                .filter(strategy -> strategy.getClass().isAnnotationPresent(SelectorAnno.class))
                .collect(Collectors.toMap(strategy -> strategy.getClass().getAnnotation(SelectorAnno.class).value(), strategy -> strategy));
    }
}
import java.lang.annotation.*; /** * 选择器注解 */ @Retention(RetentionPolicy.RUNTIME) @Target({ElementType.TYPE}) @Inherited @Documented public @interface SelectorAnno { String value(); } -
第二步:在两个子类中分别加入枚举
@Component
@SelectorAnno("child1")
public class ChildClass1 extends BaseClass{
}
@Component @SelectorAnno("child2") public class ChildClass2 extends BaseClass { }
改造完成之后,模拟一下调用端发起请求,做一个简单的测试:
import org.springframework.stereotype.Component;

import javax.annotation.PostConstruct;

@Component
public class Test {

    private final Selector selector;

    public Test(Selector selector) {
        this.selector = selector;
    }

    @PostConstruct
    public void test() {
        // 模拟调用端传入策略标识
        this.doInvoke("child1");
    }

    public void doInvoke(String type) {
        BaseClass baseClass = selector.select(type);
        baseClass.templateMethod();
    }

}
这里模拟的是调用端传入child1,选择子类1进行测试,打印的结果为:
执行模板方法
执行查询方法
执行子类1的方法1
4.总结
本篇文章介绍了什么是模板方法、模板方法的简单实现与在SpringBoot中的实现的。然后对比了模板方法与策略模式的类图,发现两者天然就可以结合在一起使用。最后,通过代码实现验证了两者结合使用的可行性。
当然,本篇文章中的都是简单的示例代码,突出的只是实现的思想,在日常的开发中,可以结合实际的业务流程对上述的代码进行改造。

开放原子开发者工作坊旨在鼓励更多人参与开源活动,与志同道合的开发者们相互交流开发经验、分享开发心得、获取前沿技术趋势。工作坊有多种形式的开发者活动,如meetup、训练营等,主打技术交流,干货满满,真诚地邀请各位开发者共同参与!
更多推荐
 已为社区贡献11条内容


所有评论(0)