深度学习 GNN图神经网络(三)模型思想及文献分类案例实战
本文介绍GNN图神经网络的思想原理,然后使用Cora数据集对其中的2708篇文献进行分类。用普通的神经网络与GNN图神经网络分别实现,并对比两者之间的效果。
如果你有一定神经网络的知识基础,想学习GNN图神经网络,可以按顺序参考系列文章:
深度学习 GNN图神经网络(一)图的基本知识
深度学习 GNN图神经网络(二)PyTorch Geometric(PyG)安装
深度学习 GNN图神经网络(三)模型原理及文献分类案例实战
一、前言
本文介绍GNN图神经网络的思想原理,然后使用Cora数据集对其中的2708篇文献进行分类。用普通的神经网络与GNN图神经网络分别实现,并对比两者之间的效果。
二、总体思想
GNN的作用就是对节点进行特征提取,可以看下这个几分钟的视频《简单粗暴带你快速理解GNN》。
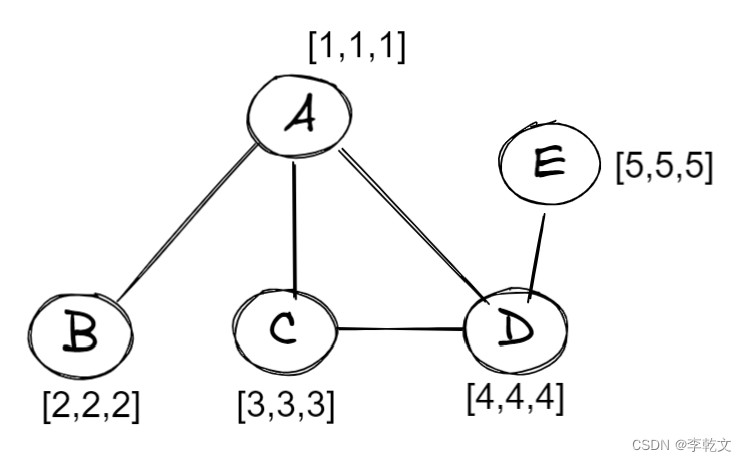
比如说这里有一张图,包含5个节点,每个节点有三个特征值:

节点A的特征值
x
a
=
[
1
,
1
,
1
]
x_a=[1,1,1]
xa=[1,1,1],节点B的特征值
x
b
=
[
2
,
2
,
2
]
x_b=[2,2,2]
xb=[2,2,2] …
我们依次对所有节点的特征值进行更新:
新的信息=自身的信息 + 所有邻居点的信息
所有邻居点信息的表达有几种:
- 求和Sum
- 求平均Mean
- 求最大Max
- 求最小Min
我们以求和为例:
x
^
a
=
σ
(
w
a
x
a
+
w
b
x
b
+
w
c
x
c
)
\hat{x}_a=\sigma(w_ax_a+w_bx_b+w_cx_c)
x^a=σ(waxa+wbxb+wcxc)
x
^
b
=
σ
(
w
b
x
b
+
w
a
x
a
)
\hat{x}_b=\sigma(w_bx_b+w_ax_a)
x^b=σ(wbxb+waxa)
x
^
c
=
σ
(
w
c
x
c
+
w
a
x
a
+
w
d
x
d
)
\hat{x}_c=\sigma(w_cx_c+w_ax_a+w_dx_d)
x^c=σ(wcxc+waxa+wdxd)
x
^
d
=
σ
(
w
d
x
d
+
w
a
x
a
+
w
c
x
c
)
\hat{x}_d=\sigma(w_dx_d+w_ax_a+w_cx_c)
x^d=σ(wdxd+waxa+wcxc)
x
^
e
=
σ
(
w
e
x
e
+
w
d
x
d
)
\hat{x}_e=\sigma(w_ex_e+w_dx_d)
x^e=σ(wexe+wdxd)
其中,
w
w
w是各自节点的权重参数,
σ
\sigma
σ是激活函数。
求所有邻居点信息并更新特征值的操作叫做消息传递、信息聚合或图卷积(跟CNN卷积神经网络中的卷积是两回事)。
我们再以简单的求平均为例(忽略权重),得到特征平均值后,将其传入神经网络,输出两个值,这时节点的特征值个数就变成了两个。这整个结构叫做图卷积网络(GCN)。
当然设计几层GCN或者输出值个数,我们都是可以自定义的。

在经历第一次更新操作后:
A中有B、C、D的信息;
B中有A的信息;
C中有A、D的信息;
D中有A、C、E的信息;
E中有D的信息;
在经历第二次更新操作后:
A中有B、C、D、E的信息;
⋮
\vdots
⋮
E中有A、C、D、E的信息;
如此循环,节点逐渐包含更多其他节点的信息,只是权重不同。
PS:过年了,这段写得有点仓促,如有错误恳请纠正。作者也会在这留下TODO,后续参考更多的资料进行校正。祝兔年快乐~ 😃
三、数据集介绍
Cora数据集由2708篇机器学习论文组成。 这些论文分为七类:
- 基于案例
- 遗传算法
- 神经网络
- 概率方法
- 强化学习
- 规则学习
- 理论
每个论文样本包含1433个特征值,由0/1组成,表示论文内容是否包含某关键字。
数据集中的边表示论文引用关系。
四、实战案例
4.1、引入数据集
我们首先引入Cora数据集,看看图数据集的格式:
from torch_geometric.datasets import Planetoid
from torch_geometric.transforms import NormalizeFeatures

# 手动下载https://gitee.com/jiajiewu/planetoid
# 或者https://linqs-data.soe.ucsc.edu/public/lbc/cora.tgz
dataset=Planetoid(root="./data/Planetoid",name='Cora',transform=NormalizeFeatures())
print(f'num_features={dataset.num_features}')
print(f'num_classes={dataset.num_classes}')
print(dataset.data)
print(dataset.data.edge_index.T)
输出结果:
num_features=1433
num_classes=7
Data(x=[2708, 1433], edge_index=[2, 10556], y=[2708], train_mask=[2708], val_mask=[2708], test_mask=[2708])
tensor([[   0,  633],
        [   0, 1862],
        [   0, 2582],
        ...,
        [2707,  598],
        [2707, 1473],
        [2707, 2706]])
num_features=1433:有1433个特征值
num_classes=7:有7种类型
x=[2708,1433]:数据包含2708篇论文,每篇论文有1433个特征值
edge_index=[2, 10556]:每条边连接两篇论文,存在10556条边,即论文间有10556次引用关系
y=[2708]:有2708个标签(0-6)
4.2 多层感知器分类测试
首先,我们使用多层感知器,即普通的神经网络进行分类测试。
定义网络模型:
import torch
import torch.nn as nn
import matplotlib.pyplot as plt


class MLP(nn.Module):

    def __init__(self):
        # 初始化Pytorch父类
        super().__init__()

        # 定义神经网络层
        self.model = nn.Sequential(
            nn.Linear(dataset.num_features, 16),
            nn.ReLU(),
            nn.Linear(16, dataset.num_classes),
        )

        # 创建损失函数,使用交叉熵误差
        self.loss_function = nn.CrossEntropyLoss()

        # 创建优化器,使用Adam梯度下降
        self.optimiser = torch.optim.Adam(self.parameters(), lr=0.01,weight_decay=5e-4)

        # 训练次数计数器
        self.counter = 0
        # 训练过程中损失值记录
        self.progress = []

    # 前向传播函数
    def forward(self, inputs):
        return self.model(inputs)

    # 训练函数
    def train(self, inputs, targets):
        # 前向传播计算,获得网络输出
        outputs = self.forward(inputs)

        # 计算损失值
        loss = self.loss_function(outputs[dataset.data.train_mask], targets)

        # 累加训练次数
        self.counter += 1

        # 每10次训练记录损失值
        if (self.counter % 10 == 0):
            self.progress.append(loss.item())

        # 每10000次输出训练次数
        if (self.counter % 100 == 0):
            print(f"counter={self.counter}, loss={loss.item()}")

        # 梯度清零, 反向传播, 更新权重
        self.optimiser.zero_grad()
        loss.backward()
        self.optimiser.step()

    # 测试函数
    def test(self, inputs, targets):
        # 前向传播计算,获得网络输出
        outputs = self.forward(inputs)

        pred=outputs.argmax(dim=1)
        test_correct=pred[dataset.data.test_mask]==targets
        return (test_correct.sum()/dataset.data.test_mask.sum()).item()

    # 绘制损失变化图
    def plot_progress(self):
        plt.plot(range(100),self.progress)
迭代训练:
M = MLP()
for i in range(1000):
    M.train(dataset.data.x,dataset.data.y[dataset.data.train_mask])
运行结果:
counter=100, loss=0.0084211565554142
counter=200, loss=0.0063483878038823605
counter=300, loss=0.0051103029400110245
counter=400, loss=0.004452046472579241
counter=500, loss=0.0040738522075116634
counter=600, loss=0.0038454567547887564
counter=700, loss=0.003702200250700116
counter=800, loss=0.0036090961657464504
counter=900, loss=0.0035553970374166965
counter=1000, loss=0.0035170542541891336
输出损失值变化图:
M.plot_progress()

测试结果:
M.test(dataset.data.x,dataset.data.y[dataset.data.test_mask])
运行结果:
0.5730000138282776
可以看到,准确率大概为57.3%,效果比较差。
4.3 GNN分类测试
现在我们构建GNN图神经网络进行分类测试。
import torch
import torch.nn as nn
from torch_geometric.nn import GCNConv
import matplotlib.pyplot as plt

class GNN(nn.Module):

    def __init__(self):
        # 初始化Pytorch父类
        super().__init__()

        # 定义神经网络层,torch_geometric有自己的Sequential实现
        # 报错信息https://github.com/pyg-team/pytorch_geometric/discussions/3726
        # 见https://pytorch-geometric.readthedocs.io/en/latest/modules/nn.html#torch_geometric.nn.sequential.Sequential
        # self.model = nn.Sequential(
        #     GCNConv(dataset.num_features, 16),
        #     nn.ReLU(),
        #     GCNConv(16, dataset.num_classes),
        # )

        self.conv1=GCNConv(dataset.num_features, 16)
        self.conv2=GCNConv(16, dataset.num_classes)

        # 创建损失函数,使用交叉熵误差
        self.loss_function = nn.CrossEntropyLoss()

        # 创建优化器,使用Adam梯度下降
        self.optimiser = torch.optim.Adam(self.parameters(), lr=0.01,weight_decay=5e-4)

        # 训练次数计数器
        self.counter = 0
        # 训练过程中损失值记录
        self.progress = []

    # 前向传播函数
    def forward(self, x, edge_index):
        # return self.model(x, edge_index)
        x=self.conv1(x,edge_index)
        x=x.relu()
        x=self.conv2(x, edge_index)
        return x

    # 训练函数
    def train(self, x, edge_index, targets):

        # 前向传播计算,获得网络输出
        outputs = self.forward(x, edge_index)

        # 计算损失值
        loss = self.loss_function(outputs[dataset.data.train_mask], targets)

        # 累加训练次数
        self.counter += 1

        # 每10次训练记录损失值
        if (self.counter % 10 == 0):
            self.progress.append(loss.item())

        # 每10000次输出训练次数
        if (self.counter % 100 == 0):
            print(f"counter={self.counter}, loss={loss.item()}")

        # 梯度清零, 反向传播, 更新权重
        self.optimiser.zero_grad()
        loss.backward()
        self.optimiser.step()

    # 测试函数
    def test(self, x, edge_index, targets):
        # 前向传播计算,获得网络输出
        outputs = self.forward(x, edge_index)

        pred=outputs.argmax(dim=1)
        test_correct=pred[dataset.data.test_mask]==targets
        return (test_correct.sum()/dataset.data.test_mask.sum()).item()

    # 绘制损失变化图
    def plot_progress(self):
        plt.plot(range(100),self.progress)
迭代训练:
G = GNN()
for i in range(1000):
    G.train(dataset.data.x,dataset.data.edge_index,dataset.data.y[dataset.data.train_mask])
运行结果:
counter=100, loss=0.01617591269314289
counter=200, loss=0.010460852645337582
counter=300, loss=0.008510907180607319
counter=400, loss=0.007648027036339045
counter=500, loss=0.007218983490020037
counter=600, loss=0.006993760820478201
counter=700, loss=0.0068700965493917465
counter=800, loss=0.006797503679990768
counter=900, loss=0.006750799715518951
counter=1000, loss=0.006724677048623562
输出损失值变化图:
G.plot_progress()

测试结果:
G.test(dataset.data.x,dataset.data.edge_index,dataset.data.y[dataset.data.test_mask])
运行结果:
0.8059999942779541
可以看到,准确率大概为80.6%,效果好了很多。
五、参考资料

开放原子开发者工作坊旨在鼓励更多人参与开源活动,与志同道合的开发者们相互交流开发经验、分享开发心得、获取前沿技术趋势。工作坊有多种形式的开发者活动,如meetup、训练营等,主打技术交流,干货满满,真诚地邀请各位开发者共同参与!
更多推荐
 已为社区贡献9条内容


所有评论(0)