基于zynq的phy调试记录
从petalinux的搭建,到uboot、kernel、rootfs的调试、打包提示:以下是本篇文章正文内容,下面案例可供参考本次要讲述的zynq的phy驱动加载小知识就说到这里了,兄弟萌要有什么指导意见或疑问可以在评论区留下"足迹"。
ZYNQ系列文章目录
第一章:基于zynq在linux下的phy调试记录
第二章:qemu制作ubuntu文件系统
第三章:基于zynq在linux下的AXI-CAN实战
文章目录
前言
记录zynq调试:
从petalinux的搭建,到uboot、kernel、rootfs的调试、打包
提示:以下是本篇文章正文内容,下面案例可供参考
一、关于PHY的配置
博主基于双网口(ZYNQ7010-PS-RGMII),PHY芯片为RTL8211I-CG。本人5.10的内核,有些地方可能不一致。
1.1 内核配置
内核之下执行
make menuconfig ARCH =arm CROSS_COMPILE=arm-linux-gnueabihf
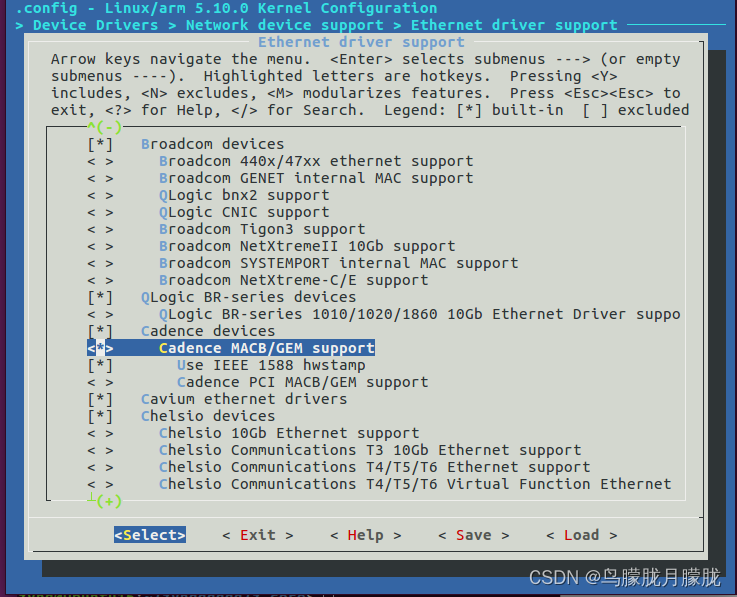
配置xiilinx自己的macb驱动。

配置本人需要使用的PHY驱动

附注:打开动态调试开关
CONFIG_DEBUG_FS=y
CONFIG_DYNAMIC_DEBUG=y


动态调试在系统起来之后可以用echo开启动态调试
动态调试的开启
echo "file macb_main.c +p" > /sys/kernel/debug/dynamic_debug/control
动态调试的关闭
echo "file macb_main.c -p" > /sys/kernel/debug/dynamic_debug/control
1.2设备树配置
前提:双网口都基于PS的RGMII接口
打开system_user.dtsi zynq-uboot.dts 内核与uboot配置一样
ethernet0 = &gem0;
ethernet1 = &gem1;
&gem0 {
status = "okay";
phy-mode = "rgmii-id";
phy-handle = <ðernet_phy>;
local-mac-address = [00 0a 33 00 01 b2];
ethernet_phy: ethernet-phy@7 {
reg = <7>;
device_type = "ethernet-phy";
};
};
&gem1 {
status = "okay";
phy-mode = "rgmii-id";
phy-handle = <ðernet_phy1>;
l ocal-mac-address = [00 0d 36 01 01 b2];
ethernet_phy1: ethernet-phy@0 {
reg = <0>;
device_type = "ethernet-phy";
};
};
二、内核中PHY的运行流程
Fixed MDIO Bus初始化(此部分对于xilinx-gem无效)
fixed_mdio_bus_init(void)
|->printk("fixed_phy-init®ister miibus\r\n");
|->ret = mdiobus_register(fmb->mii_bus);
|->phydev = mdiobus_scan(bus, i);//轮询找phy id去匹配
|->pr_info("%s: probed\n", bus->name); //bus->name为Fixed MDIO Bus


正篇开始
1、mdio总线初始化
mdio总线随内核启动初始化–subsys_initcall比module_init先执行
static int __init phy_init(void)
{
	int rc;
	rc = mdio_bus_init();
	if (rc)
		return rc;
	ethtool_set_ethtool_phy_ops(&phy_ethtool_phy_ops);
	features_init();

	rc = phy_driver_register(&genphy_c45_driver, THIS_MODULE);
	if (rc)
		goto err_c45;

	rc = phy_driver_register(&genphy_driver, THIS_MODULE);
	if (rc) {
		phy_driver_unregister(&genphy_c45_driver);
err_c45:
		mdio_bus_exit();
	}

	return rc;
}
subsys_initcall(phy_init);
struct bus_type mdio_bus_type = {
	.name		= "mdio_bus",
	.dev_groups	= mdio_bus_dev_groups,
	.match		= mdio_bus_match,
	.uevent		= mdio_uevent,
};
EXPORT_SYMBOL(mdio_bus_type);

int __init mdio_bus_init(void)
{
	int ret;

	ret = class_register(&mdio_bus_class);
	if (!ret) {
		ret = bus_register(&mdio_bus_type);
		if (ret)
			class_unregister(&mdio_bus_class);
	}

	return ret;
}
2、macb设备初始化

根据DTS中识别到的“macb”,加载该驱动,创建
struct phy_device类型的设备
static struct platform_driver macb_driver = {
	.probe		= macb_probe,
	.remove		= macb_remove,
	.driver		= {
		.name		= "macb",
		.of_match_table	= of_match_ptr(macb_dt_ids),
		.pm	= &macb_pm_ops,
	},
};
module_platform_driver(macb_driver);
macb_probe继而触发macb_mii_init
/**gem-macb运行流程**/
macb_mii_init(struct macb *bp)//xilinx-gem初始化
|->bp->mii_bus->name = "MACB_mii_bus";
|->of_mdiobus_register(bp->mii_bus, mdio_np);//注册mii_bus结构体并扫描phy设备
   |->mdiobus_register(mdio);//调用device_register将mii_bus设备注册进设备模型
   |->of_mdiobus_register_phy(mdio, child, addr);
      |->get_phy_device(mdio, addr, is_c45);//获取phy设备信息 读取phy芯片的id号
      	|->phy_device_create(bus, addr, phy_id, is_c45, &c45_ids);//分配phy_device结构体并对其进行初始化
      	  |->phy_bus_match
      	    |->phydrv->match_phy_device
      	  |->INIT_DELAYED_WORK(&dev->state_queue, phy_state_machine);//这里就是 phy device 的轮询任务
      |->of_mdiobus_phy_device_register(mdio, phy, child, addr);
        |->phy_device_register(phy);//phy_device_register中首先调用mdiobus_register_device将该phy_device添加进mii_bus的mdio_map数组中,最终调用device_add将phy_device注册进驱动模型并初始化该phy_device的phy状态机。
|->macb_mii_probe(bp->dev);//初始化和启动phy硬件
   |->phylink_create(&bp->phylink_config, bp->pdev->dev.fwnode,bp->phy_interface, &macb_phylink_ops);
	  |->of_phy_connect
	  |->phy_connect_direct//判断phy_device是否绑定了phy驱动,如果没有的话则将通用phy驱动genphy_driver作为phy_device的驱动
2、PHY驱动匹配
下图为刚开始匹配,顺利匹配上了phy地址,并读取了phy寄存器内容,但最终发现设备的ID与通用驱动中不匹配,开始重新匹配。

重新匹配后,识别到设备为RTL8211F,开始匹配专用驱动,如下图所示

然后根据设备树的配置将PHY与网络设备连接。
struct phy_device *of_phy_connect(struct net_device *dev,
				  struct device_node *phy_np,
				  void (*hndlr)(struct net_device *), u32 flags,
				  phy_interface_t iface)
{
	struct phy_device *phy = of_phy_find_device(phy_np);
	int ret;

	if (!phy)
		return NULL;

	phy->dev_flags = flags;

	ret = phy_connect_direct(dev, phy, hndlr, iface);

	/* refcount is held by phy_connect_direct() on success */
	put_device(&phy->mdio.dev);

	return ret ? NULL : phy;
}
EXPORT_SYMBOL(of_phy_connect);
3、PHY的LINK阶段及初步自适应
/**
 * phy_connect_direct - connect an ethernet device to a specific phy_device
 * @dev: the network device to connect
 * @phydev: the pointer to the phy device
 * @handler: callback function for state change notifications
 * @interface: PHY device's interface
 */
int phy_connect_direct(struct net_device *dev, struct phy_device *phydev,
		       void (*handler)(struct net_device *),
		       phy_interface_t interface)
{
	int rc;

	rc = phy_attach_direct(dev, phydev, phydev->dev_flags, interface);
	if (rc)
		return rc;

	phy_prepare_link(phydev, handler);
	phy_start_machine(phydev);
	if (phydev->irq > 0)
		phy_start_interrupts(phydev);

	return 0;
}
EXPORT_SYMBOL(phy_connect_direct);
phy_prepare_link用于在链路状态发生变化时接收通知。当PHY基础设施检测到链路状态(如连接或断开)发生变化时,它会调用这个回调函数。
phy_state_machine(),这个就是phy_device查询任务的主体,用来查询 phy 芯片的状态维护 phy
状态机。后期的循环任务会用到这个函数,很重要。
主要作用:启动一个延迟工作队列,该队列负责跟踪PHY设备的状态。这个工作队列会周期性地检查PHY的状态,并根据需要更新或响应这些状态变化。
4、PHY的循环任务
ndo_open()
`-| macb_open()
   `-| phylink_start()
        `-| phylink_run_resolve()  //(1) 启动 `phy_link` 的轮询任务 link状态更新
             `-| queue_work(system_power_efficient_wq, &pl->resolve);
     | phy_start()   //(2) 启动 `phy_device` 的轮询任务 各种phy相关操作及配置
            `-| phy_trigger_machine()
               `-| phy_queue_state_machine(phydev, 0);
                  `-| queue_delayed_work(system_power_efficient_wq, &phydev->state_queue, 0);
shell命令与c函数的匹配
ifconfig eth0 up
(macb_main.c) macb_open --> phy_start --> phy_trigger_machine

ifconfig eth0  down
(macb_main.c) macb_close --> phy_disconnect ---> (phy.c)phy_stop_machine --> (workqueue.c)cancel_delayed_work_sync---> __cancel_work_timer
总结
这里对文章进行总结:
本次要讲述的zynq的phy驱动加载小知识就说到这里了,兄弟萌要有什么指导意见或疑问可以在评论区留下"足迹"。

开放原子开发者工作坊旨在鼓励更多人参与开源活动,与志同道合的开发者们相互交流开发经验、分享开发心得、获取前沿技术趋势。工作坊有多种形式的开发者活动,如meetup、训练营等,主打技术交流,干货满满,真诚地邀请各位开发者共同参与!
更多推荐
 已为社区贡献2条内容


所有评论(0)