relation-graph——数据组装+鼠标移入后的详情(自定义插槽的用法)——js技能提升
relation-graph——数据组装+鼠标移入后的详情(自定义插槽的用法)——js技能提升
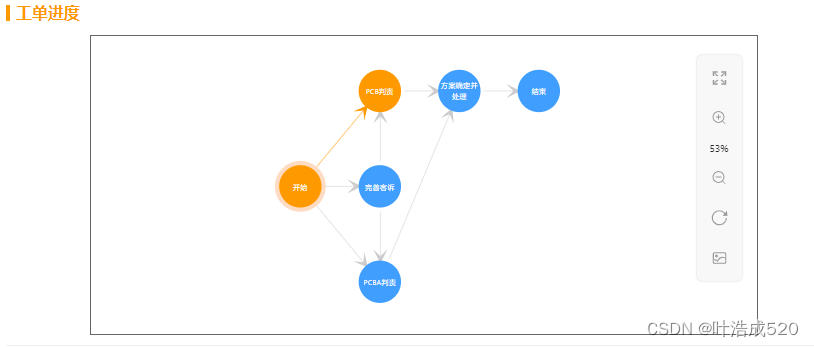
最近在写后台管理系统的时候,遇到一个需求,就是给我一些节点,让我渲染到页面上,效果图如下:
之前写过一篇文章关于relation-graph关系图组件http://t.csdnimg.cn/7BGYm的用法
还有一篇关于relation-graph——实现右击节点显示详情+点击展开折叠操作——技能提升http://t.csdnimg.cn/K3rzf

关于插件的安装和使用,在此不再赘述。可以参照上面的两个链接。

下面给我的数据结构及想要的效果:

原始数据结构
this.taskRecords = {
    "nodes": [
        {
            "taskName": "完善客诉",
            "taskNodeName": "WanShanKeSu"
        },
        {
            "taskName": "PCB判责",
            "taskNodeName": "PCBPanZe"
        },
        {
            "taskName": "PCBA判责",
            "taskNodeName": "PCBAPanZe"
        },
        {
            "taskName": "方案确定并处理",
            "taskNodeName": "FangAnQuDingBingChuLi"
        }
    ],
    "connections": [
        {
            "from": "",
            "to": "WanShanKeSu",
            "depth": null
        },
        {
            "from": "",
            "to": "PCBPanZe",
            "depth": null
        },
        {
            "from": "",
            "to": "PCBAPanZe",
            "depth": null
        },
        {
            "from": "WanShanKeSu",
            "to": "PCBPanZe",
            "depth": null
        },
        {
            "from": "WanShanKeSu",
            "to": "PCBAPanZe",
            "depth": null
        },
        {
            "from": "PCBPanZe",
            "to": "FangAnQuDingBingChuLi",
            "depth": null
        },
        {
            "from": "PCBAPanZe",
            "to": "FangAnQuDingBingChuLi",
            "depth": null
        }
    ]
}
可以看出提供的节点有4个
完善客诉 PCB判责 PCBA判责 方案确定并处理
给出的连线有:
1.空 ——> 完善客诉
2.空 ——> PCB判责
3.空 ——> PCBA判责
4.完善客诉 ——> PCB判责
5.完善客诉 ——> PCBA判责
6.PCB判责 ——> 方案确定并处理
7.PCBA判责 ——> 方案确定并处理
如果不进行任何的处理,直接通过 渲染,则会出现下面的情况

上图乍一看,没啥问题,但是通过拖动【完善客诉】节点,就会发现问题了,就是【完善客诉】指向【PCBA判责】与【完善客诉】指向【PCB判责】的连线重合了,就会有【完善客诉】指向【PCB判责】再指向【PCBA判责】的错觉。这样的效果不是我们想要的。

想要实现【完善客诉】在【PCBA判责】与【PCB判责】节点中间,则需要指定排列的顺序。
比如上面的nodes节点更改顺序如下:
"nodes": [
		{
            "taskName": "PCB判责",
            "taskNodeName": "PCBPanZe"
        },
        {
            "taskName": "完善客诉",
            "taskNodeName": "WanShanKeSu"
        },
        {
            "taskName": "PCBA判责",
            "taskNodeName": "PCBAPanZe"
        },
        {
            "taskName": "方案确定并处理",
            "taskNodeName": "FangAnQuDingBingChuLi"
        }
    ],
这样就是我们想要的效果了
考虑到还有多层路径的情况,所以要通过递归来排列节点的顺序
我的思路
根据connections将空的节点填充为start开始节点,然后将没有任何from引申的节点,通通相当于指向end结束节点
1.开始 ——> 完善客诉
2.开始 ——> PCB判责
3.开始 ——> PCBA判责
4.完善客诉 ——> PCB判责
5.完善客诉 ——> PCBA判责
6.PCB判责 ——> 方案确定并处理
7.PCBA判责 ——> 方案确定并处理
8.方案确定并处理 ——> 结束
1.给from为空的节点赋值为start
let endArr = [];
let nodeObj = {};
let nodeArr = [];
this.taskRecords.connections.forEach((item) => {
  if (!item.from) {
    item.from = 'start';
  }
  endArr.push(item.from);
});
上面的endArr就是所有连线的开始节点,比如现在的endArr=['完善客诉','PCB判责','PCBA判责']
所有节点的集合:
this.taskRecords.nodes &&this.taskRecords.nodes.forEach((item) => {
  nodeArr.push(item.taskNodeName);
  nodeObj[item.taskNodeName] = [];
});
目前nodeArr=['完善客诉','PCB判责','PCBA判责','方案确定并处理']
this.taskRecords.connections &&this.taskRecords.connections.forEach((item) => {
  nodeObj[item.from].push(item.to);
});
经过上面的处理,nodeObj内容如下:
nodeObj = {
	'开始':['完善客诉','PCB判责','PCBA判责'],
	'完善客诉':['PCB判责','PCBA判责',],
	'PCB判责':['方案确定并处理'],
	'PCBA判责':['方案确定并处理'],
	'方案确定并处理':[],
	'结束':[]
}
我的思路是:遍历nodeObj,如果节点对应的数组长度大于1,则表示有好几个分支,则分支的排序尤为重要。比如【开始】节点,指向三个节点,我需要再次遍历,每一个子节点是否有好几个分支,如果有,则需要将该节点,位置安排在分支中间。
比如【完善客诉】的子节点【PCB判责】【PCBA判责】,则【完善客诉】位置应该是位于【PCB判责】和【PCBA判责】中间。
下面的代码可以实现这一操作:
for (let key in nodeObj) {
  if (nodeObj[key].length) {
    nodeObj[key].forEach((item) => {
      if (nodeObj[item].length > 1) {
        let arr = nodeObj[item].filter(
          (n) => nodeObj[key].indexOf(n) > -1
        );
        let len = Math.floor(arr.length / 2);
        let centerIndex = this.taskRecords.connections.findIndex(
          (no) => no.from == key && no.to == item
        );
        let currentObj = this.taskRecords.connections[centerIndex];
        this.taskRecords.connections.splice(centerIndex, 1);
        this.taskRecords.connections.splice(len, 0, currentObj);
      }
    });
  }
}
经过上面的操作:
endArr=['完善客诉','PCB判责','PCBA判责']
nodeArr=['完善客诉','PCB判责','PCBA判责','方案确定并处理']
所以存在于nodeArr中,但是不存在于endArr中的【方案确定并处理】应该有一条线是指向【结束】的
 nodeArr && nodeArr.forEach((item) => {
  if (endArr.indexOf(item) == -1) {
    this.taskRecords.connections.push({
      from: item,
      to: 'end',
    });
  }
});
重新组装nodes节点数据:
let nodes = [
  {
    text: '开始',
    id: 'start',
    color: this.info.taskList.length ? '#f90' : null,
  },
];
this.taskRecords.nodes &&
  this.taskRecords.nodes.forEach((item) => {
    nodes.push({
      id: item.taskNodeName,
      text: item.taskName,
      color: item.color,
      ...item,
    });
  });
nodes.push({
  text: '结束',
  id: 'end',
});
上面的步骤基本能实现想要的效果了。
//需要指定 节点参数和连接线的参数
this.graph_json_data = {
  rootId: 'start',
  nodes: nodes,
  lines: this.taskRecords.connections,
};
this.$refs.seeksRelationGraph.setJsonData(
  this.graph_json_data,
  (seeksRGGraph) => {}
);
我的效果图中,还有节点变亮,以及变亮节点中间的连线也是变亮的。这个就是给对应的节点和连线中添加color即可。
自定义插槽
下面要讲的是自定义插槽:
鼠标移入到节点上时,可以i显示其他的内容,此时需要使用插槽了。

<RelationGraph
          ref="seeksRelationGraph"
          style="
            height: 300px;
            width: 80%;
            margin: 0 auto;
            border: 1px solid #666;
          "
          :options="graphOptions"
        >
          <template #node="{ node }">
            <div class="my-node">
              <div class="my-node-text">{{ node.text }}</div>
              <div
                class="my-node-detail"
                v-if="node.data && node.data.creatorName"
              >
                <div @dblclick="handleCopy(node.data)">
                  {{ node.data.taskOwnerName || node.data.creatorName }}:{{
                    (node.data.completedTime || node.data.creationTime) | moment
                  }}
                </div>
              </div>
            </div>
          </template>
        </RelationGraph>
上面中的graphOptions就是一些普通的配置项,具体的可以在https://relation-graph.com/#/options-tools链接中在线配置好后,拷贝到本地使用。

自定义插槽,一定要注意:node中识别内容只有id``text``data,其中的data可以是个对象,一开始我使用的是detail对象,则没有显示出来。改成data就可以了。
.my-node {
  height: 100%;
  display: flex;
  justify-content: center;
  align-items: center;
  position: relative;
  .my-node-detail {
    display: none;
  }
  &:hover {
    .my-node-detail {
      display: block;
      position: absolute;
      left: 50%;
      transform: translateX(-50%);
      top: -50%;
      width: 250px;
      height: auto;
      min-height: 60px;
      line-height: 30px;
      background: #fff;
      padding: 10px 0;
      border: 3px solid #f90;
      color: #000;
      z-index: 1;
      font-size: 18px;
      user-select: all;
    }
  }
}
监听全屏/取消全屏——保证关系图在页面中间
我的思路就是,全屏/取消全屏时,重新渲染
监听页面的全屏操作
mounted() {
  // 添加全屏变化的事件监听器
  document.addEventListener('fullscreenchange', this.onFullScreenChange);
},
方法:
onFullScreenChange() {
  this.$refs.seeksRelationGraph.setJsonData(
    this.graph_json_data,
    (seeksRGGraph) => {}
  );
},

开放原子开发者工作坊旨在鼓励更多人参与开源活动,与志同道合的开发者们相互交流开发经验、分享开发心得、获取前沿技术趋势。工作坊有多种形式的开发者活动,如meetup、训练营等,主打技术交流,干货满满,真诚地邀请各位开发者共同参与!
更多推荐
 已为社区贡献8条内容


所有评论(0)