SpringBoot 整合常用JSON解析
JSON(JavaScript Object Notation)是一种轻量级的数据交换格式。SpringBoot本身提供了Jackson和Gson,和另一种比较常用的第三方FastJson。新建一个SpringBoot项目,创建一个User类来测试。public class User {private int id;private String name;private Integer age;p
JSON(JavaScript Object Notation) 是一种轻量级的数据交换格式。
SpringBoot本身提供了Jackson和Gson,和另一种比较常用的第三方FastJson。
新建一个SpringBoot项目,创建一个User类来测试。
public class User {
    private int id;
    private String name;
    private Integer age;

    private Date birthday;
...
}
一、使用默认的Jackson处理JSON
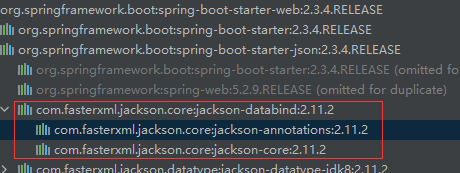
SpringBoot项目中当我们添加了spring-boot-starter-web依赖,就默认提供了 Jackson用来解析Json。
        <dependency>
            <groupId>org.springframework.boot</groupId>
            <artifactId>spring-boot-starter-web</artifactId>
        </dependency>
1、示例
创建一个Controller类
    @GetMapping("/object2Json")
    @ResponseBody
    public List<User> object2Json(){
        List<User> list = new ArrayList<>();
        for (int i = 0; i < 3; i++) {
            User user = new User();
            user.setId(i);
            user.setName("赵云--" + i);
            user.setCreateTime(LocalDateTime.now());
            list.add(user);
        }
        return list;
    }
启动项目,浏览器访问,可以看到默认返回的JSON格式的数据

我们可以对时间类型数据进行自定义格式,在实体类的属性上添加 @JsonFormat 注解可以实现:
    @JsonFormat(timezone = "GMT+8", pattern = "yyyy-MM-dd")
    //@JsonFormat(timezone = "GMT+8", pattern = "yyyy-MM-dd HH:mm:ss")
private Date birthday;![]()
每个实体类添加的话,还是比较麻烦的,可以配置全局的 Json格式。
2、修改特定数据的全局JSON格式
JSON的解析离不开 HttpMessageConvert接口,HttpMessageConvert是一个消息转换工具,主要有两方面的功能:
- 将服务端返回的对象序列化成JSON字符串
- 将前端传来的JSON字符串反序列化成Java对象
SpringMVC中默认配置了Jackson和Gson的HttpMessageConverter,并对其做了自动化配置,主要由以下两个类实现:
org.springframework.boot.autoconfigure.http.JacksonHttpMessageConvertersConfiguration
org.springframework.boot.autoconfigure.http.GsonHttpMessageConvertersConfiguration
JacksonHttpMessageConvertersConfiguration 的源码如下:
@Configuration(
        proxyBeanMethods = false
)
class JacksonHttpMessageConvertersConfiguration {
    JacksonHttpMessageConvertersConfiguration() {
    }

    @Configuration(
            proxyBeanMethods = false
    )
    @ConditionalOnClass({XmlMapper.class})
    @ConditionalOnBean({Jackson2ObjectMapperBuilder.class})
    protected static class MappingJackson2XmlHttpMessageConverterConfiguration {
        protected MappingJackson2XmlHttpMessageConverterConfiguration() {
        }

        @Bean
        @ConditionalOnMissingBean
        public MappingJackson2XmlHttpMessageConverter mappingJackson2XmlHttpMessageConverter(Jackson2ObjectMapperBuilder builder) {
            return new MappingJackson2XmlHttpMessageConverter(builder.createXmlMapper(true).build());
        }
    }

    /**
     * @Configuration - 配置类注解
     * @ConditionalOnXxx
     *      - 为条件注解,当添加了Jackson依赖,就有了ObjectMapper.class和属性,后面的配置就会生效
     */
    @Configuration(
            proxyBeanMethods = false
    )
    @ConditionalOnClass({ObjectMapper.class})
    @ConditionalOnBean({ObjectMapper.class})
    @ConditionalOnProperty(
            name = {"spring.mvc.converters.preferred-json-mapper"},
            havingValue = "jackson",
            matchIfMissing = true
    )
    static class MappingJackson2HttpMessageConverterConfiguration {
        MappingJackson2HttpMessageConverterConfiguration() {
        }

        /**
         * MappingJackson2HttpMessageConverter就是Jackson的消息转换工具类
         * @ConditionalOnMissingBean
         *   - 表示如果我们没有配置这个Bean,就自动创建一个默认的,当我们配置了就使用我们自定义的Bean。
         *
         * @param objectMapper
         * @return
         */
        @Bean
        @ConditionalOnMissingBean(
                value = {MappingJackson2HttpMessageConverter.class},
                ignoredType = {"org.springframework.hateoas.server.mvc.TypeConstrainedMappingJackson2HttpMessageConverter", "org.springframework.data.rest.webmvc.alps.AlpsJsonHttpMessageConverter"}
        )
        MappingJackson2HttpMessageConverter mappingJackson2HttpMessageConverter(ObjectMapper objectMapper) {
            // JSON中序列化对象主要用ObjectMapper工具类
            return new MappingJackson2HttpMessageConverter(objectMapper);
        }
    }
通过查看上面源码,可以知道我们修改生成的JSON的全局格式有以下两种方式:
1)自定义MappingJackson2HttpMessageConverter类
自己创建一个Bean,取代JacksonHttpMessageConvertersConfiguration中项目自带的。
例如:删除 @JsonFormat注解,新建一个配置类,内容如下:
@Configuration
public class WebMVCConfig {

    @Bean
    MappingJackson2HttpMessageConverter mappingJackson2HttpMessageConverter(){
        MappingJackson2HttpMessageConverter converter = new MappingJackson2HttpMessageConverter();
        ObjectMapper objectMapper = new ObjectMapper();
        objectMapper.setDateFormat(new SimpleDateFormat("yyyy-MM-dd"));
        converter.setObjectMapper(objectMapper);
        return converter;
    }
}
2)自定义ObjectMapper类
通过上面的类可以看到类中主要起作用的是ObjectMapping,ObjectMapping是直接注入的。它是在配置类JacksonAutoConfiguration 类中提供的。

例如:在WebMVCConfig配置类中,注入自定义的ObjectMapping,内容如下:
@Configuration
public class WebMVCConfig {

    @Bean
    ObjectMapper objectMapper(){
        ObjectMapper objectMapper = new ObjectMapper();
        objectMapper.setDateFormat(new SimpleDateFormat("yyyy-MM-dd"));
        return objectMapper;
    }
}
浏览器访问:
![]()
二、使用Gson处理JSON
GSON也是SpringBoot中提供了自动化配置的,我们需要去掉 spring-boot-starter-json依赖。然后引入gson依赖。
        <dependency>
            <groupId>org.springframework.boot</groupId>
            <artifactId>spring-boot-starter-web</artifactId>
            <exclusions>
                <exclusion>
                    <groupId>org.springframework.boot</groupId>
                    <artifactId>spring-boot-starter-json</artifactId>
                </exclusion>
            </exclusions>
        </dependency>

        <dependency>
            <groupId>com.google.code.gson</groupId>
            <artifactId>gson</artifactId>
        </dependency>
1、示例
删除上导入的jackson包注释或类,然后启动项目。
![]()
2、修改特定数据的全局JSON格式

1)自定义GsonHttpMessageConverter对象
@Configuration
public class WebMVCConfig {

    @Bean
    GsonHttpMessageConverter gsonHttpMessageConverter(){
        GsonHttpMessageConverter converter=new GsonHttpMessageConverter();
        converter.setGson(new GsonBuilder().setDateFormat("yyyy-MM-dd").create());
        return converter;
    }
}
2)自定义Gson对象
Gson对象是在 GsonAutoConfiguration类中,当我们没有配置时为我们创建的。然后在GsonHttpMessageConverter中使用。
@Configuration
public class WebMVCConfig {

    @Bean
    Gson gson() {
        return new GsonBuilder().setDateFormat("yyyy-MM-dd").create();
    }
}![]()
三、使用FastJson处理JSON
需要去掉spring-boot-starter-json依赖。然后引入第三方的FastJson依赖。
        <dependency>
            <groupId>org.springframework.boot</groupId>
            <artifactId>spring-boot-starter-web</artifactId>
            <exclusions>
                <exclusion>
                    <groupId>org.springframework.boot</groupId>
                    <artifactId>spring-boot-starter-json</artifactId>
                </exclusion>
            </exclusions>
        </dependency>

        <dependency>
            <groupId>com.alibaba</groupId>
            <artifactId>fastjson</artifactId>
            <version>1.2.72</version>
        </dependency>
1、示例
因为 SpringBoot没有提供相关的自动化配置类,所以我们需要手动创建 FastJson的消息转换工具类:
@Configuration
public class WebMVCConfig {

    @Bean
    FastJsonHttpMessageConverter fastJsonHttpMessageConverter(){
        FastJsonHttpMessageConverter converter = new FastJsonHttpMessageConverter();

        return converter;
    }
}
2、修改特定数据的全局JSON格式
FastJson是直接在 FastJsonHttpMessageConverter类中进行修改,新建一个FastJsonConfig对象来设置编码,数据格式自定义等。
@Configuration
public class WebMVCConfig {

    @Bean
    FastJsonHttpMessageConverter fastJsonHttpMessageConverter(){
        FastJsonHttpMessageConverter converter = new FastJsonHttpMessageConverter();
        // 新建一个FastJsonConfig对象,设置编码,特定数据自定义。
        FastJsonConfig config = new FastJsonConfig();
        // 处理中文乱码问题
        List<MediaType> fastMediaTypes = new ArrayList<>();
        fastMediaTypes.add(MediaType.APPLICATION_JSON_UTF8);
        converter.setSupportedMediaTypes(fastMediaTypes);
        //设置日期格式
        config.setDateFormat("yyyy-MM-dd");
        converter.setFastJsonConfig(config);
        return converter;
    }
}![]()
通过上面的整合,可以看出,不同的JSON解析工具对数据的处理是不一样的,注意:null或者空值的显示问题。自行查看官网。
—— Stay Hungry. Stay Foolish. 求知若饥,虚心若愚。

开放原子开发者工作坊旨在鼓励更多人参与开源活动,与志同道合的开发者们相互交流开发经验、分享开发心得、获取前沿技术趋势。工作坊有多种形式的开发者活动,如meetup、训练营等,主打技术交流,干货满满,真诚地邀请各位开发者共同参与!
更多推荐
 已为社区贡献33条内容


所有评论(0)