MybatisPlus--03--IService、ServiceImpl
提示:文章写完后,目录可以自动生成,如何生成可参考右边的帮助文档。
·
提示:文章写完后,目录可以自动生成,如何生成可参考右边的帮助文档
1. IService接口

1.1 IService、ServiceImpl 接口的使用
- IService的使用需要另外两个接口的配合:baseMapper和ServiceImpl

第一步:实现basemapper接口
public interface AdminMapper extends BaseMapper<Admin> {
}
第二步:编写service类
public interface AdminService extends IService<Admin> {
}
第三步:编写serviceImpl
- ServiceImpl里面是各种的方法实现,好奇的可以点进源码看下
两个泛型需要注意的
- 第一个是继承basemapper的(AdminMapper),
- 第二个是实体类(Admin)。
public class AdminServiceImpl extends ServiceImpl<AdminMapper,Admin>
    						  implements AdminService {}
第四步:在controller层调用
我们可以参考IService接口解释或者Mybatis-plus官网的方法解释来调用
@Slf4j
@RestController
@RequestMapping("/data-board")
public class DataBoardController {

@Autowired AdminService adminService;

    @PostMapping("/taskList")
    public ApiResponse<List<PersonalMediaTaskModel>> test1() {
		// adminService中有很多方法
        Admin admin = adminService.getById(13);
        return ApiResponse.createBySuccess(admin );
    }
}
1.2 原理
综合来看,比较合理的解释是:
- 从分层角度来解释,BaseMapper是DAO层的CRUD封装,而IService是业务业务逻辑层的CRUD封装,所以多了批量增、删、改的操作封装,这也比较符合官方指南中的阐述;
- IService是对BaseMapper的扩展,从BaseMapper、IService、ServiceImpl三者的类关系以及源码可以看出;
- 如果继承BaseMapper,则不需要去实现其内部方法,依靠mybatis的动态代理即可实现CRUD操作; 而如果自定义IBaseService去继承IService,则需要去实现IService中的方法;


2. IService接口具体方法
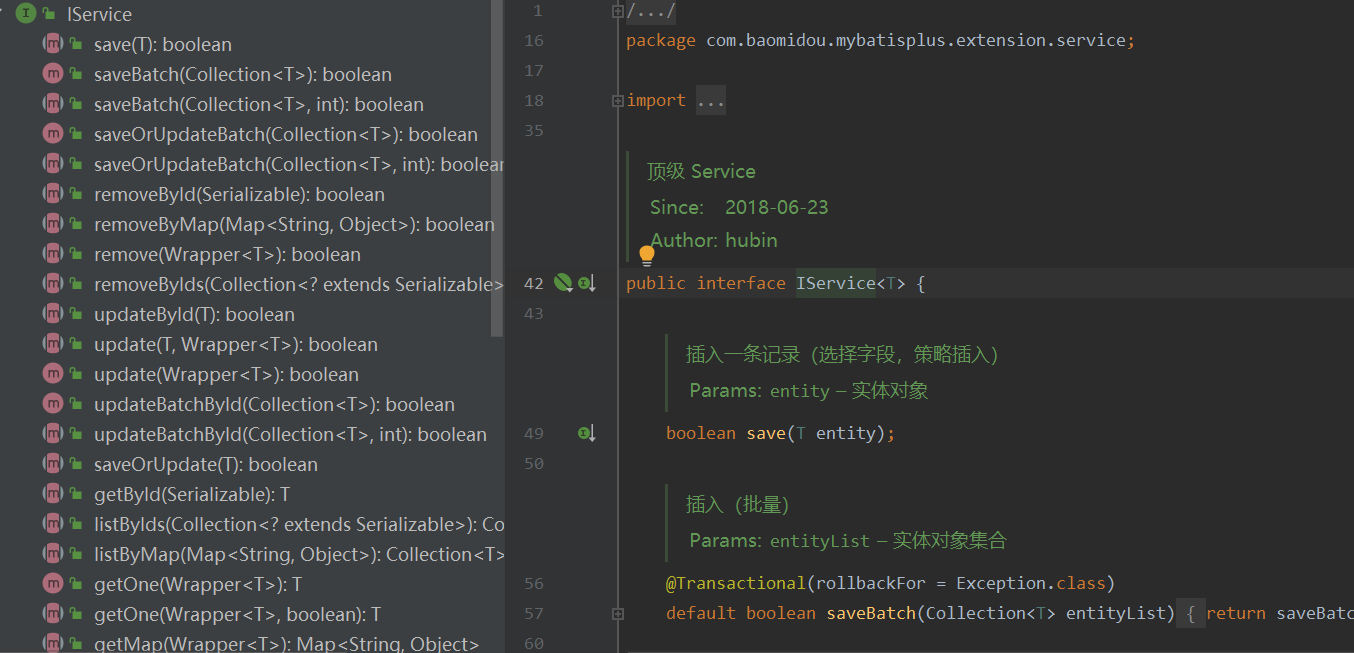
BaseMapper 是用在Mapper中,而IService是在Service层使用的封装接口,它进一步封装 CRUD 。为了和BaseMapper 中方法进行区分,它采用了不同的前缀:
- save新增
- get 查询单行
- remove 删除
- update修改
- list 查询集合
- page 分页

2.1 新增 save

2.1.1新增一条记录
@Resource
private UserService userService;
@Test
public void testServcie(){
    User user  = new User();
    user.setUsername("service增加");
    user.setPassword("12321");
    boolean save = userService.save(user);
    System.out.println("是否成功:"+save);
}

2.1.2 批量操作
@Resource
private UserService userService;
@Test
public void testServcie(){
    List<User> users = new ArrayList<>();
    User user1 = new User("批量增加1","123");
    users.add(user1);
    User user2 = new User("批量增加2","123");
    users.add(user2);
    User user3 = new User("批量增加3","123");
    users.add(user3);
    User user4 = new User("批量增加4","123");
    users.add(user4);
    User user5 = new User("批量增加5","123");
    users.add(user5);

    boolean save = userService.saveBatch(users);
    System.out.println("是否成功:"+save);
}

2.1.3 设置批次数量
public void testServcie(){
    List<User> users = new ArrayList<>();
    User user1 = new User("指定数量批量增加6","123");
    users.add(user1);
    User user2 = new User("指定数量批量增加7","123");
    users.add(user2);
    User user3 = new User("指定数量批量增加8","123");
    users.add(user3);
    User user4 = new User("指定数量批量增加9","123");
    users.add(user4);
    User user5 = new User("指定数量批量增加10","123");
    users.add(user5);

    boolean save = userService.saveBatch(users,2);
    System.out.println("是否成功:"+save);
}

2.2 查询 get

根据id查询
@Test
public void testServcie(){
    User user = userService.getById(1);
    System.out.println(user);
}

2.3 多行查询 list

根据ID批量查询
@Test
public void testServcie(){
    List<Integer> list = Arrays.asList(1, 2, 3);
    List<User> users = userService.listByIds(list);
    users.forEach(System.out::println);
}

查询所有
@Test
public void testServcie(){
    //返回list
 	List<User> list = userService.list();
    System.out.println(list);
    //返回map
    List<Map<String, Object>> maps = userService.listMaps();
    System.out.println(maps);

    List<Object> objects = userService.listObjs();
    System.out.println(objects);
}

2.4 删除 remove

根据id删除
@Test
public void testServcie(){
    boolean b = userService.removeById(21);
}

根据实体的id删除
@Test
public void testServcie(){
    User user = userService.getById(22);
    boolean b = userService.removeById(user);
}
批量删除
@Test
public void testServcie(){
    List<Integer> list = Arrays.asList(23, 24, 25);
    boolean b = userService.removeByIds(list);
}

根据Map条件删除
@Test
public void testServcie(){
    Map<String ,Object> map = new HashMap<>();
    map.put("username","批量增加5");
    map.put("password","123");
    boolean b = userService.removeByMap(map);
}

2.5 修改 update

根据ID修改
@Test
public void testServcie(){
    User user = userService.getById(27);
    user.setUsername("修改1");
    user.setPassword("213123");
    boolean b = userService.updateById(user);
}

批量修改
@Test
public void testServcie(){
    List<Integer> list = Arrays.asList(28, 29, 30);
    List<User> users = userService.listByIds(list);
    users.forEach(user -> {
        user.setUsername("批量修改");
    });
    boolean b = userService.updateBatchById(users);
}

修改或更新

2.6 查询记录数 count

@Test
public void testServcie(){
    long count = userService.count();
    System.out.println(count);
}

2.7 分页 Page

在Mybatis-plus中提供了有关分页的接口和实现类 IPage 和 Page
public class Page<T> implements IPage<T> {
    private static final long serialVersionUID = 8545996863226528798L;
    //用来存放查询出来的数据
    protected List<T> records = Collections.emptyList();
    //返回的数据总数
    protected long total = 0;
    // 每页显示条数,默认 10
    protected long size = 10;
    //当前页,默认1
    protected long current = 1;
    // 排序字段信息
    @Setter
    protected List<OrderItem> orders = new ArrayList<>();
    //自动优化 COUNT SQL
    protected boolean optimizeCountSql = true;
    // 是否进行 count 查询
    protected boolean searchCount = true;

    public Page() {
    }

    /**
     * 有参构造函数
     * @param current 当前页
     * @param size    每页显示条数
     */
    public Page(long current, long size) {
        this(current, size, 0);
    }

    public Page(long current, long size, long total) {
        this(current, size, total, true);
    }

    public Page(long current, long size, boolean searchCount) {
        this(current, size, 0, searchCount);
    }

    public Page(long current, long size, long total, boolean searchCount) {
        if (current > 1) {
            this.current = current;
        }
        this.size = size;
        this.total = total;
        this.searchCount = searchCount;
    }

    //是否存在上一页
    public boolean hasPrevious() {
        return this.current > 1;
    }

    //是否存在下一页
    public boolean hasNext() {
        return this.current < this.getPages();
    }
    ..........
}
配置
- 使用Spring时,在Spring的配置文件中先配置mybatis-plus内置的分页插件
<!-- 配置mybatis-plus的分页拦截器-->
<bean id="paginationInnerInterceptor" class="com.baomidou.mybatisplus.extension.plugins.inner.PaginationInnerInterceptor"/>

<!-- 配置mybatis-plus的分页拦截器插件 -->
<bean id="mybatisPlusInterceptor" class="com.baomidou.mybatisplus.extension.plugins.MybatisPlusInterceptor">
    <property name="interceptors" >
        <list>
            <ref bean="paginationInnerInterceptor"/>
        </list>
    </property>
</bean>
<!-- 将插件加入到MybatisSqlSessionFactoryBean 中-->
<bean class="com.baomidou.mybatisplus.extension.spring.MybatisSqlSessionFactoryBean">
    <!--加载连接池-->
    <property name="dataSource" ref="dataSource"/>
    <!-- 设置MyBatis配置文件的路径(可以不设置) -->
    <property name="configLocation" value="classpath:mybatis-config.xml"/>
    <!--加载映射文件路径-->
    <property name="mapperLocations" value="classpath:mapping/*.xml"/>
    <!--分页插件生效 -->
    <property name="plugins">
        <array>
            <ref bean="mybatisPlusInterceptor"/>
        </array>
    </property>
</bean>
使用SpringBoot时配置时,在配置类中配置
@Bean
public MybatisPlusInterceptor mybatisPlusInterceptor() {
    MybatisPlusInterceptor interceptor = new MybatisPlusInterceptor();
    interceptor.addInnerInterceptor(new PaginationInnerInterceptor(DbType.MYSQL));
    return interceptor;
}
分页查询数据
@Test
public void testServcie(){
    Page<User> page = userService.page(new Page<>(1,5));
    System.out.println("总数据:"+page.getTotal());
    List<User> users = page.getRecords();
    users.forEach(System.out::println);
}


开放原子开发者工作坊旨在鼓励更多人参与开源活动,与志同道合的开发者们相互交流开发经验、分享开发心得、获取前沿技术趋势。工作坊有多种形式的开发者活动,如meetup、训练营等,主打技术交流,干货满满,真诚地邀请各位开发者共同参与!
更多推荐
 已为社区贡献24条内容


所有评论(0)