探索MediaPipe的人像分割
MediaPipe是Google开源的计算机视觉处理框架,基于TensorFlow来训练模型。图像分割模块提供人像分割、头发分割、多类分割。本文主要探索如何实现人像分割,当然在人像分割基础上,我们可以做背景替换、背景模糊。
MediaPipe是Google开源的计算机视觉处理框架,基于TensorFlow来训练模型。图像分割模块提供人像分割、头发分割、多类分割。本文主要探索如何实现人像分割,当然在人像分割基础上,我们可以做背景替换、背景模糊。
目录
一、配置参数与模型
1、配置参数
图像分割的参数包括:运行模式、输出类别掩码、输出置信度掩码、标签语言、结果回调,具体如下表所示:
| 参数 | 描述 | 取值范围 | 默认值 |
| running_mode | IMAGE:单个图像 VIDEO:视频帧 LIVE_STREAM:实时流 | {IMAGE,VIDEO, LIVE_STREAM} | IMAGE |
| output_category_mask | 输出的类别掩码 | Boolean | false |
| output_confidence_mask | 输出的置信度掩码 | Boolean | true |
| display_names_locale | 标签名称的语言 | Locale code | en |
| result_callback | 结果回调(用于LIVE_STREAM模式) | N/A | N/A |
2、分割模型
图像分割的模型有deeplabv3、haird_segmenter、selfie_multiclass、selfie_segmenter。其中,自拍的人像分割使用的模型是selfie_segmenter。相关模型如下图所示:

2.1 人像分割模型
人像分割输出两类结果:0表示背景、1表示人像。提供两种形状的模型,如下图所示:

2.2 头发分割模型
头发分割也是输出两类结果:0表示背景、1表示头发。我们在识别到头发时,可以重新给头发上色,或者添加特效。
2.3 多类分割模型
多类分割包括:背景、头发、身体皮肤、面部皮肤、衣服、其他部位。数值对应关系如下:
0 - background
1 - hair
2 - body-skin
3 - face-skin
4 - clothes
5 - others (accessories)
二、工程配置
以Android平台为例,首先导入MediaPipe相关包:
implementation 'com.google.mediapipe:tasks-vision:0.10.0'然后运行下载模型的task,并且指定模型保存路径:
project.ext.ASSET_DIR = projectDir.toString() + '/src/main/assets'

apply from: 'download_models.gradle'
图像分割模型有4种,可以按需下载:
task downloadSelfieSegmenterModelFile(type: Download) {
    src 'https://storage.googleapis.com/mediapipe-models/image_segmenter/' +
            'selfie_segmenter/float16/1/selfie_segmenter.tflite'
    dest project.ext.ASSET_DIR + '/selfie_segmenter.tflite'
    overwrite false
}

preBuild.dependsOn downloadSelfieSegmenterModelFile
三、初始化工作
1、初始化人像分割
人像分割的初始化主要有:设置运行模式、加载对应的分割模型、配置参数,示例代码如下:
   fun setupImageSegmenter() {
        val baseOptionsBuilder = BaseOptions.builder()
        // 设置运行模式
        when (currentDelegate) {
            DELEGATE_CPU -> {
                baseOptionsBuilder.setDelegate(Delegate.CPU)
            }
            DELEGATE_GPU -> {
                baseOptionsBuilder.setDelegate(Delegate.GPU)
            }
        }
        // 加载对应的分割模型
        when(currentModel) {
            MODEL_DEEPLABV3 -> { //DeepLab V3
                baseOptionsBuilder.setModelAssetPath(MODEL_DEEPLABV3_PATH)
            }
            MODEL_HAIR_SEGMENTER -> { // 头发分割
                baseOptionsBuilder.setModelAssetPath(MODEL_HAIR_SEGMENTER_PATH)
            }
            MODEL_SELFIE_SEGMENTER -> { // 人像分割
                baseOptionsBuilder.setModelAssetPath(MODEL_SELFIE_SEGMENTER_PATH)
            }
            MODEL_SELFIE_MULTICLASS -> { // 多类分割
                baseOptionsBuilder.setModelAssetPath(MODEL_SELFIE_MULTICLASS_PATH)
            }
        }

        try {
            val baseOptions = baseOptionsBuilder.build()
            val optionsBuilder = ImageSegmenter.ImageSegmenterOptions.builder()
                .setRunningMode(runningMode)
                .setBaseOptions(baseOptions)
                .setOutputCategoryMask(true)
                .setOutputConfidenceMasks(false)
            // 检测结果异步回调
            if (runningMode == RunningMode.LIVE_STREAM) {
                optionsBuilder.setResultListener(this::returnSegmentationResult)
                    .setErrorListener(this::returnSegmentationHelperError)
            }

            val options = optionsBuilder.build()
            imagesegmenter = ImageSegmenter.createFromOptions(context, options)
        } catch (e: IllegalStateException) {
            imageSegmenterListener?.onError(
                "Image segmenter failed to init, error:${e.message}")
        } catch (e: RuntimeException) {
            imageSegmenterListener?.onError(
                "Image segmenter failed to init. error:${e.message}", GPU_ERROR)
        }
    }
2、初始化摄像头
摄像头的初始化步骤包括:获取CameraProvider、设置预览宽高比、配置图像分析参数、绑定camera生命周期、关联SurfaceProvider。
    private fun setUpCamera() {
        val cameraProviderFuture =
            ProcessCameraProvider.getInstance(requireContext())
        cameraProviderFuture.addListener(
            {
                // 获取CameraProvider
                cameraProvider = cameraProviderFuture.get()
                // 绑定camera
                bindCamera()
            }, ContextCompat.getMainExecutor(requireContext())
        )
    }

    private fun bindCamera() {
        val cameraProvider = cameraProvider ?: throw IllegalStateException("Camera init failed.")
        val cameraSelector = CameraSelector.Builder().requireLensFacing(cameraFacing).build()

        // 预览宽高比设置为4:3
        preview = Preview.Builder().setTargetAspectRatio(AspectRatio.RATIO_4_3)
            .setTargetRotation(fragmentCameraBinding.viewFinder.display.rotation)
            .build()

        // 配置图像分析的参数
        imageAnalyzer =
            ImageAnalysis.Builder().setTargetAspectRatio(AspectRatio.RATIO_4_3)
                .setTargetRotation(fragmentCameraBinding.viewFinder.display.rotation)
                .setBackpressureStrategy(ImageAnalysis.STRATEGY_KEEP_ONLY_LATEST)
                .setOutputImageFormat(ImageAnalysis.OUTPUT_IMAGE_FORMAT_RGBA_8888)
                .build()
                .also {
                    it.setAnalyzer(backgroundExecutor!!) { image ->
                        imageSegmenterHelper.segmentLiveStreamFrame(image,
                            cameraFacing == CameraSelector.LENS_FACING_FRONT)
                    }
                }

        cameraProvider.unbindAll()

        try {
            // 绑定camera生命周期
            camera = cameraProvider.bindToLifecycle(
                this, cameraSelector, preview, imageAnalyzer)
            // 关联SurfaceProvider
            preview?.setSurfaceProvider(fragmentCameraBinding.viewFinder.surfaceProvider)
        } catch (exc: Exception) {
            Log.e(TAG, "Use case binding failed", exc)
        }
    }
四、人像分割
1、运行人像分割
以摄像头的LIVE_STREAM模式为例,首先拷贝图像数据,然后图像处理:旋转与镜像,接着把Bitmap对象转换为MPImage,最后执行人像分割。示例代码如下:
    fun segmentLiveStreamFrame(imageProxy: ImageProxy, isFrontCamera: Boolean) {
        val frameTime    = SystemClock.uptimeMillis()
        val bitmapBuffer = Bitmap.createBitmap(imageProxy.width,
            imageProxy.height, Bitmap.Config.ARGB_8888)

        // 拷贝图像数据
        imageProxy.use {
            bitmapBuffer.copyPixelsFromBuffer(imageProxy.planes[0].buffer)
        }

        val matrix = Matrix().apply {
            // 旋转图像
            postRotate(imageProxy.imageInfo.rotationDegrees.toFloat())
            // 如果是前置camera,需要左右镜像
            if(isFrontCamera) {
                postScale(-1f, 1f, imageProxy.width.toFloat(), imageProxy.height.toFloat())
            }
        }

        imageProxy.close()

        val rotatedBitmap = Bitmap.createBitmap(bitmapBuffer, 0, 0,
            bitmapBuffer.width, bitmapBuffer.height, matrix, true)
        // 转换Bitmap为MPImage
        val mpImage = BitmapImageBuilder(rotatedBitmap).build()
        // 执行人像分割
        imagesegmenter?.segmentAsync(mpImage, frameTime)
    }
2、绘制人像分割
首先把检测到的背景标记颜色,然后计算缩放系数,主动触发draw操作:
    fun setResults(
        byteBuffer: ByteBuffer,
        outputWidth: Int,
        outputHeight: Int) {
        val pixels = IntArray(byteBuffer.capacity())
        for (i in pixels.indices) {
            // Deeplab使用0表示背景,其他标签为1-19. 所以这里使用20种颜色
            val index = byteBuffer.get(i).toUInt() % 20U
            val color = ImageSegmenterHelper.labelColors[index.toInt()].toAlphaColor()
            pixels[i] = color
        }
        val image = Bitmap.createBitmap(pixels, outputWidth, outputHeight, Bitmap.Config.ARGB_8888)
        // 计算缩放系数
        val scaleFactor = when (runningMode) {
            RunningMode.IMAGE,
            RunningMode.VIDEO -> {
                min(width * 1f / outputWidth, height * 1f / outputHeight)
            }
            RunningMode.LIVE_STREAM -> {
                max(width * 1f / outputWidth, height * 1f / outputHeight)
            }
        }

        val scaleWidth = (outputWidth * scaleFactor).toInt()
        val scaleHeight = (outputHeight * scaleFactor).toInt()

        scaleBitmap = Bitmap.createScaledBitmap(image, scaleWidth, scaleHeight, false)
        invalidate()
    }
最终执行绘制的draw函数,调用canvas来绘制bitmap:
    override fun draw(canvas: Canvas) {
        super.draw(canvas)
        scaleBitmap?.let {
            canvas.drawBitmap(it, 0f, 0f, null)
        }
    }
五、分割效果
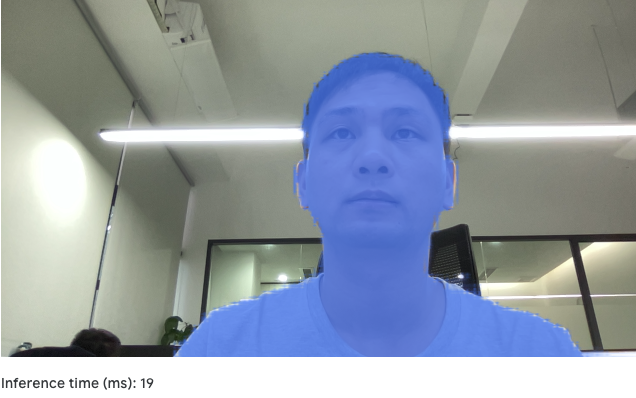
人像分割本质是把人像和背景分离,最终效果图如下:


开放原子开发者工作坊旨在鼓励更多人参与开源活动,与志同道合的开发者们相互交流开发经验、分享开发心得、获取前沿技术趋势。工作坊有多种形式的开发者活动,如meetup、训练营等,主打技术交流,干货满满,真诚地邀请各位开发者共同参与!
更多推荐
 已为社区贡献10条内容


所有评论(0)