连通域分析--种子填充法(SeedFilling)
连通区域(Connected Component)一般是指图像中具有相同像素值且位置相邻的前景像素点组成的图像区域(Region,Blob).连通区域分析(Connected Component Analysis,Connected Component Labeling)是指将图像中的各个连通区域找出并标记.通常连通区域分析处理的对象是一张二值化后的图像.
连通域分析–种子填充法(SeedFilling)
微信公众号:幼儿园的学霸
前言
连通区域(Connected Component)一般是指图像中具有相同像素值且位置相邻的前景像素点组成的图像区域(Region,Blob).连通区域分析(Connected Component Analysis,Connected Component Labeling)是指将图像中的各个连通区域找出并标记.通常连通区域分析处理的对象是一张二值化后的图像.
连通域
在我们讨论连通区域标记的算法之前,我们先要明确什么是连通区域,怎样的像素邻接关系构成连通.在图像中,最小的单位是像素,每个像素周围有8个邻接像素,常见的邻接关系有2种:4邻接与8邻接.4邻接一共4个点,即上下左右,如下左图所示.8邻接的点一共有8个,包括了对角线位置的点,如下右图所示.

在视觉上看来,彼此连通的点形成了一个区域,而不连通的点形成了不同的区域.这样的一个所有的点彼此连通点构成的集合,我们称为一个连通区域.
下面这幅图中,如果考虑4邻接,则有3个连通区域;如果考虑8邻接,则有2个连通区域.

连通域分析算法–种子填充法
从连通区域的定义可以知道,一个连通区域是由具有相同像素值的相邻像素组成像素集合,因此,我们就可以通过这两个条件在图像中寻找连通区域,对于找到的每个连通区域,我们赋予其一个唯一的标识(Label),以区别其他连通区域.
有两种经典的连通区域分析算法:1、Two-Pass(两次遍历), 2、 Seed Filling(种子填充).本文介绍比较简单的种子填充算法.
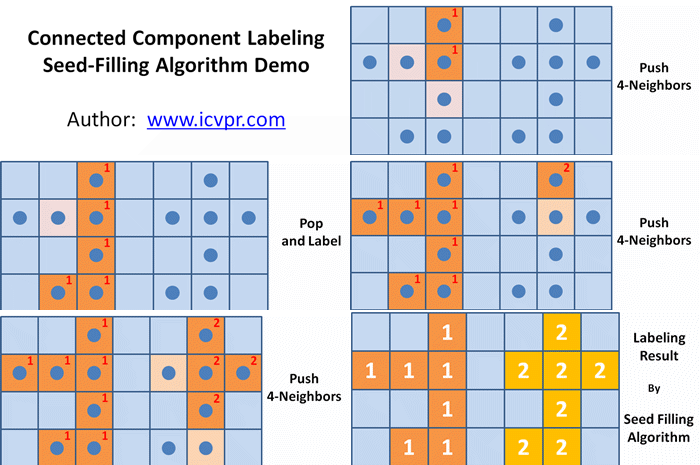
种子填充法源于计算机图像学,常用于对某些图形进行填充,它基于区域生长算法.该方法首先将所有非0像素放到一个集合中,之后在集合中随机选出一个像素作为种子像素,根据邻域关系不断扩充种子像素所在的连通域,并在集合中删除掉扩充出的像素,直到种子像素所在的连通域无法扩充,之后再从集合中随机选取一个像素作为新的种子像素,重复上述过程直到集合中没有像素.
1.扫描图像,直到当前像素点B(x,y)==1:
1)将B(x,y)作为种子(像素位置),并赋予其一个label,然后将该种子相邻的所有前景像素都压入栈中;
2)弹出栈顶像素,赋予其相同的label,然后再将与该栈顶像素相邻的所有前景像素都压入栈中;
3)重复上一步操作,直到栈为空;
(此时,便找到了图像B中的一个连通区域,该区域内的像素值被标记为label)
2. 重复第(1)步,直到扫描结束;
下面这张图动态地演示了Seed-Filling算法:

算法实现示例
一个简单的种子填充算法示例代码如下:
//
// Created by liheng on 12/7/21.
//

#include <opencv2/opencv.hpp>
#include <iostream>
#include <vector>
#include <stack>

typedef struct Blob
{
    int label;// 连通域的label值
    int area;// 连通域的面积
    //std::vector<cv::Point> points;//该连通域的点集
    cv::Rect boundingbox;// 连通域的外接矩形框
} Blob;


/*!
 * 4连通 连通域求解示例
 * @param binImg 待检测连通域的二值化图像.CV_8UC1
                foreground pixel: binImg(x,y) = 255
                background pixel: binImg(x,y) = 0
 * @param lableImg 标记后的图像 CV_8UC1 0:背景.[1,254]各连通域的label
 * @param featherList 连通域列表
 * @return 连通域的数量
 * @author liheng
 */
int bwLabel(const cv::Mat& binImg, cv::Mat& lableImg, std::vector<Blob>& featherList)
{
    const int rows = binImg.rows;
    const int cols = binImg.cols;

    std::vector<Blob>().swap(featherList);

    int labelValue = 0;//分配给连通域的label.// labelValue最大为254,最小为1.


    lableImg = binImg.clone();
    for( int i = 0; i < rows; ++i)
    {
        const uchar *pRow = lableImg.ptr<uchar>(i);
        for( int j = 0; j < cols; ++j)
        {
            if(255 == pRow[j] )//找到连通域的第一个点,作为第一个种子点
            {
                cv::Point seed = cv::Point(j, i);// Point(横坐标,纵坐标)

                // 对该连通域信息进行初始化
                int area = 1;//连通域的面积(点的数量)

                // 连通域的边界,即外接最小矩形的边框,横纵坐标值
                int leftBoundary = seed.x;
                int rightBoundary = seed.x;
                int topBoundary = seed.y;
                int bottomBoundary = seed.y;

                labelValue++;//分配给该连通域的label

                //种子点入栈
                lableImg.at<uchar>(seed) = labelValue;//标记该种子点

                std::stack<cv::Point> pointStack;//该连通域的堆栈
                pointStack.push(seed);

                while(!pointStack.empty())//遍历属于当前连通域的所有点
                {
                    //四邻域:(0,-1)(-1,0)(1,0)(0,1)
                    //如果邻域点未被标记过,则该邻域点入栈

                    cv::Point neighbor;

                    //right pixel
                    neighbor = cv::Point(seed.x+1, seed.y);
                    if((neighbor.x <= (cols-1)) && (lableImg.at<uchar>(neighbor) == 255))
                    {
                        lableImg.at<uchar>(neighbor) = labelValue;//标记该邻域点
                        pointStack.push(neighbor);//该邻域点入栈,稍后通过while循环继续遍历

                        area++;
                        if(rightBoundary < neighbor.x)
                            rightBoundary = neighbor.x;
                    }

                    // down pixel
                    neighbor = cv::Point(seed.x, seed.y+1);
                    if((neighbor.y <= (rows-1)) && (lableImg.at<uchar>(neighbor) == 255))
                    {
                        lableImg.at<uchar>(neighbor) = labelValue;
                        pointStack.push(neighbor);

                        area++;
                        if(bottomBoundary < neighbor.y)
                            bottomBoundary = neighbor.y;

                    }

                    //left pixel
                    neighbor = cv::Point(seed.x-1, seed.y);
                    if((neighbor.x >= 0) && (lableImg.at<uchar>(neighbor) == 255))
                    {
                        lableImg.at<uchar>(neighbor) = labelValue;
                        pointStack.push(neighbor);

                        area++;
                        if(leftBoundary > neighbor.x)
                            leftBoundary = neighbor.x;
                    }

                    //up piexl
                    neighbor = cv::Point(seed.x, seed.y-1);
                    if((neighbor.y >= 0) && (lableImg.at<uchar>(neighbor) == 255))
                    {
                        lableImg.at<uchar>(neighbor) = labelValue;
                        pointStack.push(neighbor);

                        area++;
                        if(topBoundary > neighbor.y)
                            topBoundary = neighbor.y;
                    }

                    seed = pointStack.top();
                    pointStack.pop();
                }

                //外接矩形框
                cv::Rect box = cv::Rect(leftBoundary, topBoundary,
                        rightBoundary-leftBoundary+1, bottomBoundary-topBoundary+1);//尺寸需要+1

                Blob blob;
                blob.area = area;
                blob.boundingbox = box;
                blob.label = labelValue;
                featherList.emplace_back(blob);
            }
        }
    }
    return labelValue;
}

/*!
 * 对连通域label进行色彩处理,方便展示
 * @param labelImg CV_8UC1
 * @param colorLabelImg CV_8UC3
 */
void ColoredLabel(const cv::Mat& labelImg, cv::Mat& colorLabelImg)
{
    std::map<int, cv::Scalar> colors ;

    const int rows = labelImg.rows ;
    const int cols = labelImg.cols ;

    colorLabelImg.create(rows, cols, CV_8UC3) ;
    colorLabelImg = cv::Scalar::all(0) ;

    for (int i = 0; i < rows; ++i)
    {
        const auto* data_src = (uchar*)labelImg.ptr<uchar>(i);//1~254
        auto* data_dst = colorLabelImg.ptr<uchar>(i) ;
        for (int j = 0; j < cols; ++j)
        {
            int pixelValue = data_src[j] ;
            if (pixelValue > 0)
            {
                if (colors.count(pixelValue) <= 0)
                {
                    cv::RNG rng(cv::getTickCount());
                    colors[pixelValue] = cv::Scalar(rng.uniform(0,255),rng.uniform(0,255),rng.uniform(0,255));
                }
                cv::Scalar color = colors[pixelValue] ;
                (*data_dst++) = color[0];
                (*data_dst++) = color[1];
                (*data_dst++) = color[2];
            }
            else
            {
                data_dst++ ;
                data_dst++ ;
                data_dst++ ;
            }
        }
    }
}


int main(int argc, char *argv[])
{
    cv::Mat src(cv::imread("./binary.bmp", cv::IMREAD_GRAYSCALE));
    if(src.empty())
        return -1;

    cv::threshold(src, src, 5, 255, cv::THRESH_BINARY);   // 二值化图像
    cv::imshow("binary",src);


//    cv::Mat src = (cv::Mat_<uchar>(5,5)<<
//            0,0,0,0,0,
//            0,0,0,0,0,
//            0,0,0,0,0,
//            0,0,0,0,255,
//            255,0,0,0,0);


    std::vector<Blob> blobArray;                    // 存放连通域特征
    cv::Mat labelImg;
    std::cout << "连通域数量: " << bwLabel(src, labelImg, blobArray) << std::endl;

    cv::Mat coloredLabelImage;
    ColoredLabel(labelImg,coloredLabelImage);

    std::cout << "label" << "\t" << "area" << std::endl;
    for(const auto& item:blobArray)
    {
        std::cout << item.label << "\t" << item.area << std::endl;
        cv::rectangle(coloredLabelImage, item.boundingbox, cv::Scalar(255,255,255));
    }


    cv::imshow("coloredLabelImage",coloredLabelImage);

    cv::waitKey(0);
    cv::destroyAllWindows();

    return 0;
}
其中输入图像如下:

输出结果如下:

参考资料
1.利用种子填充法对二值图像进行连通域标记
2.DFS 求连通块 + 种子填充算法–利用DFS求连通域,一种思路
3.图像分析:二值图像连通域标记

开放原子开发者工作坊旨在鼓励更多人参与开源活动,与志同道合的开发者们相互交流开发经验、分享开发心得、获取前沿技术趋势。工作坊有多种形式的开发者活动,如meetup、训练营等,主打技术交流,干货满满,真诚地邀请各位开发者共同参与!
更多推荐
 已为社区贡献22条内容


所有评论(0)