TensorRT-llm入门
3.int8-kv-cache量化:KV Cache 量化是指将逐 Token(Decoding)生成过程中的上下文 K 和 V 中间结果进行 INT8 量化(计算时再反量化),以降低生成过程中的显存占用。最先进的量化方法,如SmoothQuant和AWQ,在量化造成的性能损失适中时,可以有效提升性能。1. 模型量化参考:https://github.com/NVIDIA/TensorRT-LLM
一、目录
- 作用
- TensorRT-llm 为什么快?
- 流程
- TensorRT-LLM 环境配置
- 大模型 转换、编译与推理
- 如何选择量化类型?
- lora 大模型如何合并?
- lora 大模型如何编译,使用?
- 模型类型safetensors与bin互相转换.
- 推理加速模型 tensorrRT-LLM、Vllm、fasterTransformer、BetterTransformer 的对比
- 如何优化 LLM 模型推理中的访存密集问题?
二、实现
- 作用
NVIDIA提出, TensorRT-LLM 默认采用 FP16/BF16 的精度推理,并且可以利用业界的量化方法,使用硬件吞吐更高的低精度推理进一步推升推理性能。 - TensorRT-llm 为什么快?
1. 模型预编译,并优化内核
2. 模型进行量化
3. In-flight批处理
4. page attention 以及高效缓存K、V. - 流程
1. huggingface 模型—>tensorRT-llm模型(模型转换)---->转为trt引擎----->trt引擎推理。 - TensorRT-LLM 环境配置
1. 下载tensorRT-LLM 项目,注意,下载0.8.0, 其中0.9.0问题较多git clone -b v0.8.0 https://github.com/NVIDIA/TensorRT-LLM.git
cd TensorRT-LLM- 创建容器(cuda 最好是大于12.2), 也可以是其他容器,该容器包含tritonserver服务。
docker pull nvcr.io/nvidia/tritonserver:24.02-trtllm-python-py3
- 创建容器(cuda 最好是大于12.2), 也可以是其他容器,该容器包含tritonserver服务。
docker run --gpus all
–name trt_llm
-d
–ipc=host
–ulimit memlock=-1
–restart=always
–ulimit stack=67108864
-p 8000:8000
-p 7860:7860
-v ${PWD}/examples:/app/tensorrt_llm/examples
nvcr.io/nvidia/tritonserver:24.02-trtllm-python-py3 sleep 8640000
- 安装tensorRT-LLM
>>pip install tensorrt_llm==0.8.0 --extra-index-url https://pypi.nvidia.com --extra-index-url https://download.pytorch.org/whl/cu121 - 检查安装
>> python3 -c “import tensorrt_llm” 生成版本号。 - 安装大模型本身需要的环境。
参考:https://github.com/Tlntin/Qwen-TensorRT-LLM
5.大模型 转换、编译与推理
>>cd TensorRT-LLM/examples/bloom
文件1. convert_checkpoint.py: 将hf 模型转为tensorRT-LLM格式模型。
文件2. …/run.py 推理文件, 根据需求进行相应的修改
文件3. …/summarize.py 在cnn_dailymail 数据集中的测试文本。生成rouge 结果
文件4 benchmark.py 测试吞吐量
方式一、含有build.py 文件
1. 编译 参考:https://github.com/Tlntin/Qwen-TensorRT-LLM
>>python3 build.py --添加参数
2. 使用
>> python3 run.py
方式二、不含有build.py 文件
1. 模型量化 参考:https://github.com/NVIDIA/TensorRT-LLM/tree/main/examples/qwen
>># Build the Qwen-7B-Chat model using a single GPU and FP16.
python convert_checkpoint.py --model_dir ./tmp/Qwen/7B/
–output_dir ./tllm_checkpoint_1gpu_fp16
–dtype float16
2. 创建引擎
trtllm-build --checkpoint_dir ./tllm_checkpoint_1gpu_fp16
–output_dir ./tmp/qwen/7B/trt_engines/fp16/1-gpu
–gemm_plugin float16
- 使用
python3 …/run.py --input_text “你好,请问你叫什么?”
–max_output_len=50
–tokenizer_dir ./tmp/Qwen/7B/
–engine_dir=./tmp/Qwen/7B/trt_engines/fp16/1-gpu/
方式三、自己修改,写build.py 文件
1. 官网下载benchmarks/python下的build.py 文件, 进行修改,同时需要进一步修改模型
后续…
生成文件:
文件1:config.json 配置文件
文件2:rank0.engine 驱动引擎
6.如何选择量化类型?
训练后 量化类型:1. fp16、int8(weight only)、int4(weight only)
2. smooth quant量化:SmoothQuant 通过平滑激活层和权重后,再使用per-tensor或per-token量化,实现W8A8。根据量化方式不同,作者提出三种策略 O1、O2、O3,计算延迟依次降低。
与其他量化方法相比,该方法可以保持较高的精度,同时,具有更低的延迟。
3. int8-kv-cache量化: KV Cache 量化是指将逐 Token(Decoding)生成过程中的上下文 K 和 V 中间结果进行 INT8 量化(计算时再反量化),以降低生成过程中的显存占用。
4. int4-gptq 量化:所有权重压缩到4位量化中,通过最小化与该权重的均方误差来实现。在推理过程中,它将动态地将权重解量化为float16,以提高性能,同时保持内存较低。
5. int4-awq 量化:激活感知的权重量化。 在量化过程中,有一小部分权重将被跳过,这有助于减少量化损失。
模型越大,对仅权重和KV缓存量化的容忍度越高,而对激活量化的容忍度较低。
对于大多数NLP任务,将大多数LLM家族量化为W4、W4A8、KV4和W8KV4,性能损失可以忽略不计(<2%)。在一定的内存预算下,使用量化到W3的较大模型可以获得更优性能。
在四种突出能力(即上下文学习、指令遵循、多步推理和自校准)中,自校准和多步推理能力对量化更敏感。对于小于13B的LLMs,推荐使用W8、W8A8和KV8量化。
对于伦理任务,小型模型对量化的敏感性更高。仅权重量化会增强模型对敏感信息的判断,而KV缓存量化则有相反的效果。
LLMs在处理长文本(>4k)时,对仅权重和KV缓存量化的敏感性高于短文本(<4k),尤其是对KV缓存量化。在大多数情况下,W4、W4A8和KV8可以在长上下文任务中保持性能。
最先进的量化方法,如SmoothQuant和AWQ,在量化造成的性能损失适中时,可以有效提升性能。然而,当使用极低位宽时,AWQ和SmoothQuant无法恢复完全损坏的性能。
参考:https://zhuanlan.zhihu.com/p/695144724
- lora 大模型如何合并?
https://blog.csdn.net/BIT_666/article/details/132065177
参考:https://github.com/ymcui/Chinese-LLaMA-Alpaca-3/blob/main/scripts/merge_llama3_with_chinese_lora_low_mem.py
1. 将1 个lora模型合并到base 模型中。
import torch
from peft import PeftModel
from transformers import AutoTokenizer, AutoModelForCausalLM

model_name_or_path="/home/Meta-Llama-3-8B-Instruct"
lora_path="/home/llama-3-chinese-8b-instruct-lora"
print(f"Loading the base model from {model_name_or_path}")
base = AutoModelForCausalLM.from_pretrained(  # 加载模型
    model_name_or_path, torch_dtype=torch.float16, low_cpu_mem_usage=True
)
tokenizer = AutoTokenizer.from_pretrained(model_name_or_path)         #此处未进行tokenizer的合并,
       # 具体见https://github.com/ymcui/Chinese-LLaMA-Alpaca-3/blob/main/scripts/merge_llama3_with_chinese_lora_low_mem.py

print(f"Loading the LoRA adapter from {lora_path}")

lora_model = PeftModel.from_pretrained(  # 加载lora模型
    base,
    lora_path,
    torch_dtype=torch.float16,
)

print("Applying the LoRA")
model = lora_model.merge_and_unload()  # 合并模型,
output_path="./merge_llama3_lora"
print(f"Saving the target model to {output_path}")  # 保存
model.save_pretrained(output_path)
tokenizer.save_pretrained(output_path)
from transformers import AutoTokenizer, AutoModelForCausalLM
import torch
model_name_or_path="./merge_llama3_lora"
print(f"Loading the base model from {model_name_or_path}")
model = AutoModelForCausalLM.from_pretrained(  # 加载模型
    model_name_or_path, torch_dtype=torch.float16, low_cpu_mem_usage=True
)
tokenizer = AutoTokenizer.from_pretrained(model_name_or_path)
model=model.cuda()

DEFAULT_SYSTEM_PROMPT = """You are a helpful assistant. 你是一个乐于助人的助手。"""
system_format='<|start_header_id|>system<|end_header_id|>\n\n{content}<|eot_id|>'
user_format='<|start_header_id|>user<|end_header_id|>\n\n{content}<|eot_id|><|start_header_id|>assistant<|end_header_id|>\n\n'
assistant_format='{content}<|eot_id|>'

def generate_prompt(instruction):
    return system_format.format(content=DEFAULT_SYSTEM_PROMPT) + user_format.format(content=instruction)
tokenizer.pad_token = tokenizer.eos_token
input_ids = tokenizer(generate_prompt("介绍一下中国"), return_tensors="pt",add_special_tokens=False).input_ids
if torch.cuda.is_available():
  input_ids = input_ids.cuda()
generate_input = {
    "input_ids":input_ids,
    "max_new_tokens":512,
    "do_sample":True,
    "top_k":50,
    "top_p":0.95,
    "temperature":0.3,
    "repetition_penalty":1.3,
    "eos_token_id":tokenizer.eos_token_id,
    "bos_token_id":tokenizer.bos_token_id,
    "pad_token_id":tokenizer.pad_token_id
}
generate_ids  = model.generate(**generate_input)
text = tokenizer.decode(generate_ids[0])
print(text)
- 将多个任务lora 模型合并。
from transformers import AutoConfig, AutoTokenizer, AutoModelForCausalLM, TextIteratorStreamer, GenerationConfig
from peft import PeftModel

# 载入预训练模型
tokenizer = AutoTokenizer.from_pretrained(base_model, use_fast=True, padding_side="left", **config_kwargs)
print("Tokenizer Load Success!")
config = AutoConfig.from_pretrained(base_model, **config_kwargs)
# Load and prepare pretrained models (without valuehead).
model = AutoModelForCausalLM.from_pretrained(
    base_model,
    config=config,
    torch_dtype=torch.float16,
    low_cpu_mem_usage=True,
    trust_remote_code=True,
    revision='main'
)
print('origin config =', model.config)
# 模型合并
ckpt_list = ["checkpoint-1000", "checkpoint-2000", "checkpoint-3000"]
for checkpoint in ckpt_list:
    print('Merge checkpoint: {}'.format(checkpoint))
    model = PeftModel.from_pretrained(model, os.path.join(lora_model, checkpoint))
    model = model.merge_and_unload()                #将每一个lora 模型合并
print('merge config =', model.config)
- lora 大模型如何编译,使用?
8.1 未加载lora 模型编译。
CUDA_VISIBLE_DEVICES=0 python3 convert_checkpoint.py --model_dir /app/tensorrt_llm/examples/Meta-Llama-3-8B-Instruct \
            --output_dir ./tllm_checkpoint_1gpu_bf16 \
            --dtype bfloat16

CUDA_VISIBLE_DEVICES=0 python3 build.py --checkpoint_dir ./tllm_checkpoint_1gpu_bf16 \
            --output_dir ./tmp/llama/8B/trt_engines/bf16/1-gpu \
            --gpt_attention_plugin bfloat16 \
            --gemm_plugin bfloat16
trtllm-build 等价于build.py   build.py 为trtllm-build 指令形式。
CUDA_VISIBLE_DEVICES=0 trtllm-build --checkpoint_dir ./tllm_checkpoint_1gpu_bf16 \
            --output_dir ./tmp/llama/8B/trt_engines/bf16/1-gpu \
            --gpt_attention_plugin bfloat16 \
            --gemm_plugin bfloat16
python3  run.py --engine_dir=/app/tensorrt_llm/examples/TensorRT-LLM-0.8.0/examples/llama1/tmp/llama/8B/trt_engines/bf16/1-gpu --max_output_len 100 --tokenizer_dir /app/tensorrt_llm/examples/Meta-Llama-3-8B-Instruct --input_text "How do I count to nine in French?"
8.2 加载lora 文件编译。
CUDA_VISIBLE_DEVICES=0,1 python3 convert_checkpoint.py --model_dir /app/tensorrt_llm/examples/Meta-Llama-3-8B-Instruct \
                         --output_dir ./tllm_checkpoint_2gpu_lora \
                         --dtype bfloat16 \
                         --tp_size 1 \
                         --hf_lora_dir /app/tensorrt_llm/examples/llama-3-chinese-8b-instruct-lora

CUDA_VISIBLE_DEVICES=0,1 python3 build.py --checkpoint_dir ./tllm_checkpoint_2gpu_lora \
            --output_dir ./tmp/new_lora_13b/trt_engines/fp16/2-gpu/ \
            --gpt_attention_plugin bfloat16 \
            --gemm_plugin bfloat16 \
            --lora_plugin bfloat16 \
            --max_batch_size 1 \
            --max_input_len 512 \
            --max_output_len 50 \
            --use_fused_mlp

python3 ../run.py --engine_dir "./tmp/new_lora_13b/trt_engines/fp16/2-gpu/" \
              --max_output_len 50 \
              --tokenizer_dir "/app/tensorrt_llm/examples/llama-3-chinese-8b-instruct-lora" \
              --input_text "今天天气很好,我到公园的时后," \
              --lora_dir "/app/tensorrt_llm/examples/llama-3-chinese-8b-instruct-lora" \
              --lora_task_uids 0 \
              --no_add_special_tokens \
              --use_py_session
- 当采用float16时,编译时报类型转换错误,需要改成bfloat16.
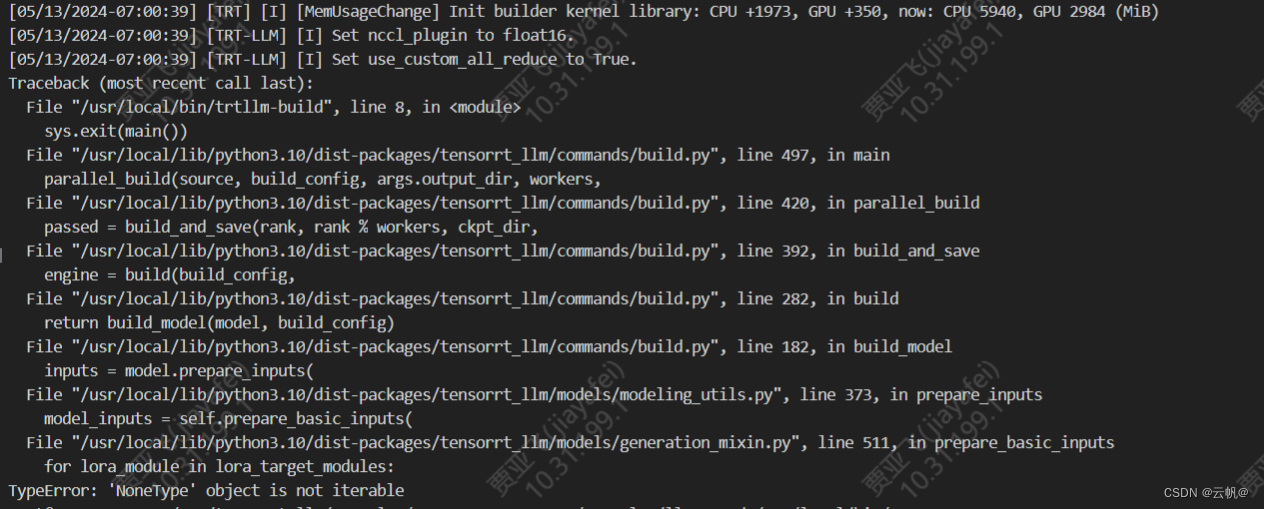
- 遇到问题: lora_target_model 为null, 即convert_checkpoint.py 量化文件报错。原因是:tensorrt-llm 架构加载lora 文件为bin 类型的数据,而本人的lora 模型文件为safetensors类型的文件。因此本人对lora_manager.py 进行了修改,使文件能够加载该文件。

- 模型量化与编译细节见代码讲解模块。
9 safetensors 、bin 数据类型 模型互相转换
from safetensors.torch import save_file,load_file
import torch
hf_lora_dir="/app/tensorrt_llm/examples/llama-3-chinese-8b-instruct-lora"
binpath=f"{hf_lora_dir}/adapter_model.bin"
safepath=f"{hf_lora_dir}/adapter_model.safetensors"
lora_weight=load_file(safepath)         #加载safetensors
torch.save(lora_weight,binpath)         #保存为bin
lora_weight1=torch.load(binpath)

keys=lora_weight.keys()
for key in keys:
    params1=lora_weight[key]
    params2=lora_weight1[key]
    if not torch.equal(params1,params2):
        print("两个模型不完全一致")

print("done!")
- 推理加速模型 tensorrRT-LLM、Vllm、TGI、fasterTransformer、BetterTransformer 的对比


开放原子开发者工作坊旨在鼓励更多人参与开源活动,与志同道合的开发者们相互交流开发经验、分享开发心得、获取前沿技术趋势。工作坊有多种形式的开发者活动,如meetup、训练营等,主打技术交流,干货满满,真诚地邀请各位开发者共同参与!
更多推荐
 已为社区贡献8条内容


所有评论(0)