两种利用matplotlib绘制无填充的多边形的方法:ax.fill()和Polygon
下面我们将使用np.rand随机生成5个多边形的顶点,使用不同的方法绘制多边形。
两种利用matplotlib绘制无填充的多边形的方法:ax.fill()和Polygon
下面我们将使用np.rand随机生成5个多边形的顶点,使用不同的方法绘制多边形。
ax.fill()绘制多边形
函数原型为:
Axes.fill(*args, data=None, **kwargs)
args参数指的是按x, y, [color]给出的x坐标列表、y坐标列表和多边形的颜色。
data参数是带标记的多边形参数,一般用不上
kwargs是Polygon类型的属性,一般也用不上
ax.fill函数的调用方式为:
# x,y是元素数量相同的list
ax.fill(x, y)                    # a polygon with default color
ax.fill(x, y, "b")               # a blue polygon
# x2,y2也是元素数量相同的list
ax.fill(x, y, x2, y2)            # two polygons
ax.fill(x, y, "b", x2, y2, "r")  # a blue and a red polygon
代码示例如下:
import numpy as np
import matplotlib.pyplot as plt

N=5# N个顶点
points1 = np.random.rand(N, 2)# 第一个多边形的顶点集
points2 = np.random.rand(N, 2)# 第二个多边形的顶点集
points3 = np.random.rand(N, 2)# 第三个多边形的顶点集
points4 = np.random.rand(N, 2)# 第四个多边形的顶点集
fig, ax1 = plt.subplots(1,1)
# 绘制
ax1.fill(points1[:,0],points1[:,1], facecolor='none', edgecolor='orangered', linewidth=2)
ax1.fill(points2[:,0],points2[:,1], facecolor='none', edgecolor='blue', linewidth=1)
ax1.fill(points3[:,0],points3[:,1], facecolor='none', edgecolor='black', linewidth=1)
ax1.fill(points4[:,0],points4[:,1], facecolor='none', edgecolor='green', linewidth=1)
# 显示
plt.show()
还可以参考官方示例绘制科赫雪花。
matplotlib.patches.Polygon + add_patch绘制
Polygon类型是patches的一个子类,专门负责存储多边形信息,包括顶点坐标和绘制属性(边色彩、填充色彩、线型等等)。其使用方式为,先构造Polygon类型对象,再通过add_patch加入绘图轴中。
Polygon类型的构造函数(详细参考):
Polygon(xy, *, closed=True, **kwargs)
    xy : 尺寸为(N,2)数组,存储了多边形的N个顶点。
    closed : bool类型,默认为True。标记是否多边形是封闭的(第一个点和最后一点坐标是否相同)
    **kwargs: 多边形的填充颜色、边颜色、边线型等属性
示例代码如下:
import numpy as np
from matplotlib.patches import Polygon
import matplotlib.pyplot as plt

my_quad = Polygon([(0,1), (1,2), (1,0), (2,1)])
my_tri  = Polygon([(3,1), (1,3), (4,2), (2,4)])

fig, ax = plt.subplots(1,1)

a = ax.add_patch( my_tri )
a.set_fill(False)
b = ax.add_patch( my_quad )

minx, maxx = ax.get_xlim()# 获取x轴上下限
ax.set_xlim(minx-5, maxx+5)# 设置x轴上下限
miny, maxy = ax.get_ylim()# 获取y轴上下限
ax.set_ylim(miny-5, maxy+5)
在上面的代码中,如果想让多边形仅绘制边界,不填充,有三种做法:
- 在Polygon构造函数中添加参数
fill=False - 使用add_patch()的返回值在绘制之前调用
a.set_fill(False) - 在绘制之前调用
my_quad.set_fill(False)
第二种、第三种方法是等价的,因为add_patch的返回值就是传入的多边形对象。
matplotlib.patches.Polygon + PatchCollection + add_collection绘制
有时,需要绘制多边形的数量众多,挨个调用add_patch速度太慢,绘制太卡,这时就更推荐使用PatchCollection将所有多边形集中到一个collection中,然后再调用add_collection,最终绘制整个collection。
PatchCollection接受的参数如下:
    patches : list类型,每个元素都是`Patch`子类的对象,例如多边形、圆、矩形等。这个list中的各元素类型可以不同

    match_original : bool类型,默认为False。设置为True时,则使用每个Patch对象设置的原始绘制属性,而不是使用PatchColleciton的 **kwargs参数指定绘制属性(facecolor,
        edgecolor, linewidths, norm or cmap)

    **kwargs 一般设置*edgecolors*, *facecolors*, *linewidths*, *antialiaseds*等参数;若它们中任意一个为None,则使用`.rcParams`中的设置
示例代码如下:
import matplotlib.pyplot as plt
import numpy as np

from matplotlib.collections import PatchCollection
from matplotlib.patches import Circle, Polygon, Wedge

# Fixing random state for reproducibility
np.random.seed(19680801)


fig, ax = plt.subplots()

resolution = 50  # the number of vertices
N = 3
x = np.random.rand(N)
y = np.random.rand(N)
radii = 0.1*np.random.rand(N)
patches = []
for x1, y1, r in zip(x, y, radii):
    circle = Circle((x1, y1), r)
    patches.append(circle)

x = np.random.rand(N)
y = np.random.rand(N)
radii = 0.1*np.random.rand(N)
theta1 = 360.0*np.random.rand(N)
theta2 = 360.0*np.random.rand(N)
for x1, y1, r, t1, t2 in zip(x, y, radii, theta1, theta2):
    wedge = Wedge((x1, y1), r, t1, t2)
    patches.append(wedge)

# Some limiting conditions on Wedge
patches += [
    Wedge((.3, .7), .1, 0, 360),             # Full circle
    Wedge((.7, .8), .2, 0, 360, width=0.05),  # Full ring
    Wedge((.8, .3), .2, 0, 45),              # Full sector
    Wedge((.8, .3), .2, 45, 90, width=0.10),  # Ring sector
]

for i in range(N):
    polygon = Polygon(np.random.rand(N, 2), closed=True)
    patches.append(polygon)

colors = 100 * np.random.rand(len(patches))
p = PatchCollection(patches, alpha=0.4)# 不透明度0.4
#p.set_array(colors)# 随机设定颜色
ax.add_collection(p)
fig.colorbar(p, ax=ax)

plt.show()
在上面的代码中,如果想让多边形仅绘制黑色边界,不填充,则需要在PatchCollection构造时加入参数facecolors='none', edgecolors='black',即:
p = PatchCollection(patches, facecolors='none', edgecolors='black')
注意,这种方式设置的绘制属性整个collection是一样的,也就是说,patches包含的所有多边形都是一样的颜色、一样的线宽。要使每个多边形具有不同的颜色,可以将edgecolors参数设置为与patches相同长度的list。假如patches包含了三个多边形,则可以如下设置绘制颜色(边的颜色):
p = PatchCollection(patches, facecolors='none', edgecolors=['black','red','blue'])
将绘制黑色、红色、蓝色边缘的三个多边形。
也可以调用p.set_array()。不再赘述,可参考
参考PatchCollection
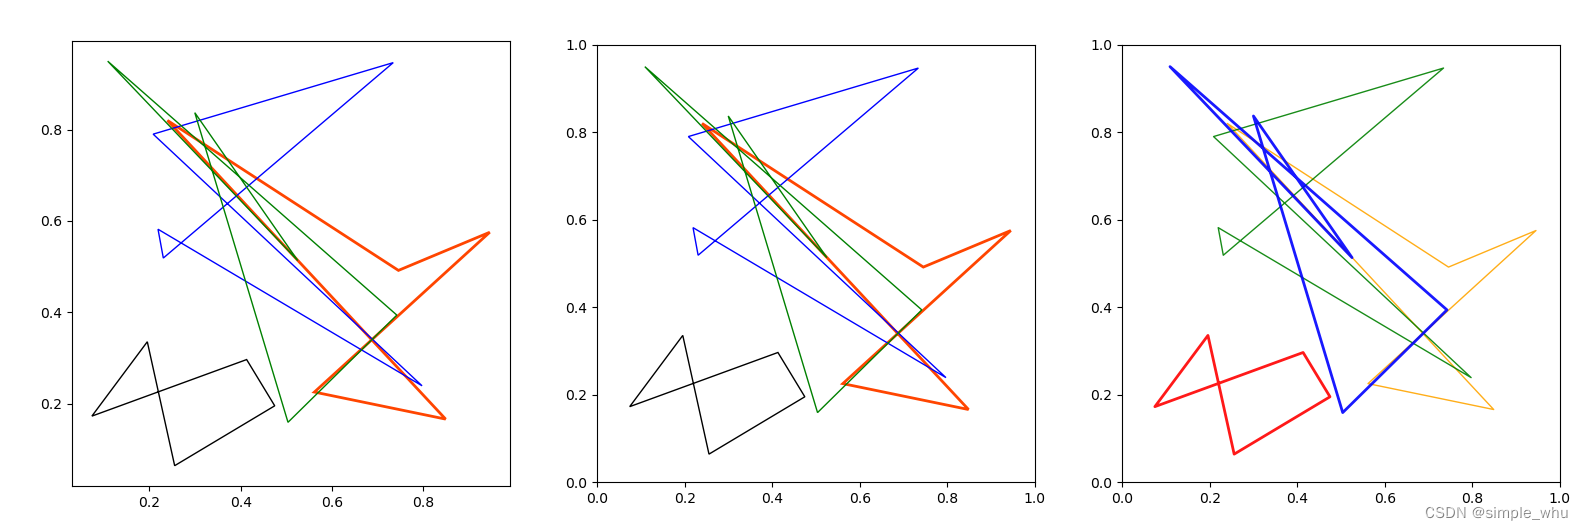
三种绘制方式效果对比
最后,在同一画布上绘制三个子图,查看效果:
import numpy as np
import matplotlib.pyplot as plt
from matplotlib.patches import Polygon
from matplotlib.collections import PatchCollection

if __name__=="__main__":
    N=5
    points1 = np.random.rand(N, 2)
    points2 = np.random.rand(N, 2)
    points3 = np.random.rand(N, 2)
    points4 = np.random.rand(N, 2)
    fig, (ax1, ax2, ax3) = plt.subplots(1,3)

    ax1.fill(points1[:,0],points1[:,1], facecolor='none', edgecolor='orangered', linewidth=2)
    ax1.fill(points2[:,0],points2[:,1], facecolor='none', edgecolor='blue', linewidth=1)
    ax1.fill(points3[:,0],points3[:,1], facecolor='none', edgecolor='black', linewidth=1)
    ax1.fill(points4[:,0],points4[:,1], facecolor='none', edgecolor='green', linewidth=1)

    plg1 = Polygon(points1, facecolor='none', ec='orangered', linewidth=2)
    plg2 = Polygon(points2, facecolor='none', ec='blue', linewidth=1)
    plg3 = Polygon(points3, facecolor='none', ec='black', linewidth=1)
    plg4 = Polygon(points4, facecolor='none', ec='green', linewidth=1)
    ax2.add_patch(plg1)
    ax2.add_patch(plg2)
    ax2.add_patch(plg3)
    ax2.add_patch(plg4)


    plg1 = Polygon(points1)
    plg2 = Polygon(points2)
    plg3 = Polygon(points3)
    plg4 = Polygon(points4)
    plg_lst1=[plg1,plg2]# 第一个collection里加两个Polygon对象
    plg_lst2=[plg3,plg4]# 第一个collection里也加两个Polygon对象
    collection1 = PatchCollection(plg_lst1, facecolors='none',ec=['orange','green'], linewidths=1, alpha=0.9)
    collection2 = PatchCollection(plg_lst2, facecolors='none',ec=['red','blue'], linewidths=2, alpha=0.9)
    ax3.add_collection(collection1)
    ax3.add_collection(collection2)

    ax1.set_aspect(1)
    ax2.set_aspect(1)
    ax3.set_aspect(1)
    plt.show()
结果如下:


开放原子开发者工作坊旨在鼓励更多人参与开源活动,与志同道合的开发者们相互交流开发经验、分享开发心得、获取前沿技术趋势。工作坊有多种形式的开发者活动,如meetup、训练营等,主打技术交流,干货满满,真诚地邀请各位开发者共同参与!
更多推荐
 已为社区贡献7条内容


所有评论(0)