NHWC和NCHW数据排布及转换(模型部署)
其中C表示的通道数可能有多种情况,例如,RGB图片格式的通道为3通道,R(红色)、G(绿色)、B(蓝色)各占一个通道,表示图片中每个像素点都有三个通道值,每个通道值范围是[0~255],三个通道的叠加呈现出一个像素的颜色。RGB图像还有四通道的表示,除了RGB三通道之外,还有一个alpha通道,表示透明度。在intel GPU加速的情况下,希望在访问同一个channel的像素是连续的,一般存储选用
1.概念
首先这是两种批量图片的数据存储方式,定义了一批图片在计算机存储空间内的数据存储layout。N表示这批图片的数量,C表示每张图片所包含的通道数,H表示这批图片的像素高度,W表示这批图片的像素宽度。其中C表示的通道数可能有多种情况,例如,RGB图片格式的通道为3通道,R(红色)、G(绿色)、B(蓝色)各占一个通道,表示图片中每个像素点都有三个通道值,每个通道值范围是[0~255],三个通道的叠加呈现出一个像素的颜色。RGB图像还有四通道的表示,除了RGB三通道之外,还有一个alpha通道,表示透明度。如果是灰度图,则只有一个通道。YUV图片也包含了三个通道,与RGB不同的是YUV的数据表现方式有多样组合。
2. 数据layout理解
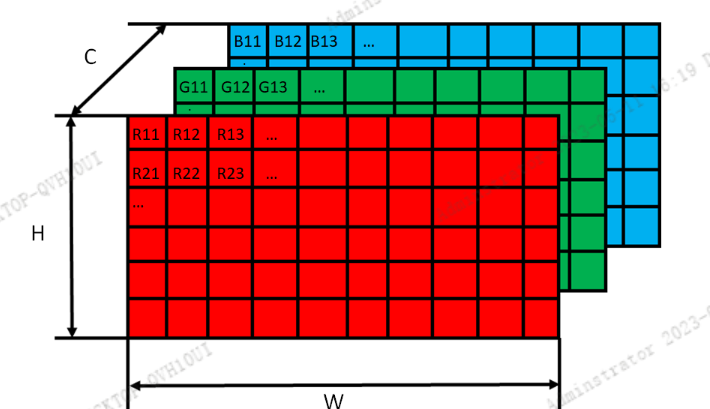
以RGB数据格式的图像为例,一张RGB图片可以由H、W、C三个参数来描述,图像的高度和宽度分别对应H和W这两个维度,而图像中每一个像素点都有3个值来表示,便是表示红色的R、绿色的G和蓝色的B,每个值的取值范围是[0~255],如下图所示:

2. 1 NCHW和NHWC在模型推理中的应用
在实际部署时,比如采用部署框架如NCNN、TensorRT、Caffe等,模型推理后会返回类型基本都是float* 的结果数据data,即存储为一维数据。此时如果知道返回data的数据排布是NCHW还是NHWC,就很容易对结果进行解析。两种格式的数据的排布如下:

(1) NCHW排布
NCHW类似于python 中numpy.array 4维数组的排布:最内层为H,W,外层是C,最外层是N 。由于返回的data是float*类型,因此将4维数据从内层向外层逐渐拆分出来(先排HW数据),排布为一维数组。
即[R11,R12,R13....R21,R22,R23,R24...G11,G12,G13....G21,G22,G23,G24...B11,B12,B13....B21,B22,B23,B24...] , 每个通道的元素会紧挨在一起 。假设RGB图像的大小为HxWx3, 对于NCHW排布的数据,[0:HxW]存储的都是R通道的像素值[HxW:2*HxW]存储的都是G通道的像素值,[HxW*2:3*HxW]存储的是B通道的像素值

(1) NHWC排布
NHWC类似于python 中numpy.array 4维数组的排布:最内层为C,W最外层是H,N。由于返回的data是float*类型,因此将4维数据从内层向外层逐渐拆分出来(先排C数据),排布为一维数组。
即[R11,G11,B11,R12,G12,B12,R13,G13,B13...R21,G21,B21,R22,G22,B22....Rij,Gij,Bij], 像素点ij位置上多个通道中的数值连续存储。

最后是多张图片的存储N,表示一共有N张图片。NHWC和NCHW表示两种图片数据存储方式,应用于不同的硬件加速场景之下。在intel GPU加速的情况下,希望在访问同一个channel的像素是连续的,一般存储选用NCHW也就是输入数据格式为NCHW,这样在做CNN的时候,在访问内存的时候就是连续的了,比较方便。
最佳实践: 设计网络时充分考虑两种格式,最好能灵活切换。在GPU上训练时,输入数据格式采用NCHW格式,在推理结果输出时,返回的数据为NHWC格式。
3. NHWC与NCHW之间转化
两种存储方式展示了图片数据在储存器中的存储方式,这两种存储方式之间可以相互转换,以NHWC转NCHW为例,可以做如下转换:
3.1 NHWC 转 NCHW
int nhwc_to_nchw(float *out_data, float *in_data, int img_h, int img_w) {
  float *hw1 = out_data;
  float *hw2 = hw1 + img_h * img_w;
  float *hw3 = hw2 + img_h * img_w;
  for (int hh = 0; hh < img_h; ++hh) {
    for (int ww = 0; ww < img_w; ++ww) {
      *hw1++ = *(in_data++);    // B
      *hw2++ = *(in_data++);    // G
      *hw3++ = *(in_data++);    // R
    }
  }
  return 0;
}
in_data为输入的NHWC 排布的数据, out_data为转换后的NCHW数据
3.2 NCHW 转 NHWC
int nchw_to_nhwc(float* out_data, float* in_data, int img_h, int img_w) {
  float *res = out_data;

  for (int i = 0; i < img_h * img_w*3 ;) {
      res[i] = *(in_data);
      res[i+1] = *(in_data + img_h * img_w);
      res[i+2] = *(in_data + 2*img_h * img_w);
      i +=3;
    }
  }
  return 0;
}
4. 图片预处理(HWC转CHW,BGR转RGB并归一化)
- 输入模型的图片,一般数据排布为
CHW,图片格式为RGB, 并且做归一化(除255)。 - 假设图片是由opencv读取,数据排布为
HWC,图片格式为BGR。因此在输入网络前,需要将HWC格式转为CHW,并且BGR转RGB,并转归一化处理 - 代码实现如下:
int img_prerpocess(cv::Mat input_image, float *out_data,int img_h, int img_w)
{
	int image_area = input_image.cols * input_image.rows;
	unsigned char* pimage = input_image.data;
	// / 将 HWC 转为 CHW/
	float *hw_r = out_data + image_area * 0;
	float *hw_g = out_data + image_area * 1;
	float *hw_b = out_data + image_area * 2;
	//BGR -> RGB ///
	for(int i = 0; i < image_area; ++i, pimage += 3){
	    *hw_r++ = pimage[2] / 255.0f;
	    *hw_g++ = pimage[1] / 255.0f;
	    *hw_b++ = pimage[0] / 255.0f;
	}

	return 0;

}
5. 后处理decode(以yolox 目标检测为例)
后处理decode 主要步骤包括如下:
- 生成grid cell
- 将预测prediction 解码输出为proposal
- NMS
本文主要介绍如何将预测输出decode为proposal, 并区分NHWC和NCHW两种格式的decode方法
5.1 模型decode(NHWC)
struct Object
{
    cv::Rect_<float> rect;
    int label;
    float prob;
};

struct GridAndStride
{
    int grid0;
    int grid1;
    int stride;
};

static void generate_grids_and_stride(const int target_size, std::vector<int>& strides, std::vector<GridAndStride>& grid_strides)
{
    for (int i = 0; i < (int)strides.size(); i++)
    {
        int stride = strides[i];
        int num_grid = target_size / stride;
        for (int g1 = 0; g1 < num_grid; g1++)
        {
            for (int g0 = 0; g0 < num_grid; g0++)
            {
                GridAndStride gs;
                gs.grid0 = g0;
                gs.grid1 = g1;
                gs.stride = stride;
                grid_strides.push_back(gs);
            }
        }
    }
}
static void generate_yolox_proposals(std::vector<GridAndStride> grid_strides, const float*bottom, float prob_threshold, std::vector<Object>& objects)
{
    int feat_h =640 / 32;    // 640 input net size h
    int feat_w =640 / 32;    // 640 input net size w
    int pred_num = 85;       // x y w h conf + 80 classes
    const int num_grid = feat_h * feat_w ;  //
    const int num_class = 80;   // coco  80 classes
    const int num_anchors = grid_strides.size();  // 等于  feat_h * feat_w

    const float* feat_ptr = bottom;
    for (int anchor_idx = 0; anchor_idx < num_anchors; anchor_idx++)
    {
        const int grid0 = grid_strides[anchor_idx].grid0;
        const int grid1 = grid_strides[anchor_idx].grid1;
        const int stride = grid_strides[anchor_idx].stride;

        // yolox/models/yolo_head.py decode logic
        //  outputs[..., :2] = (outputs[..., :2] + grids) * strides
        //  outputs[..., 2:4] = torch.exp(outputs[..., 2:4]) * strides
        float x_center = (feat_ptr[0] + grid0) * stride;
        float y_center = (feat_ptr[1] + grid1) * stride;
        float w = exp(feat_ptr[2]) * stride;
        float h = exp(feat_ptr[3]) * stride;

        float x0 = x_center - w * 0.5f;
        float y0 = y_center - h * 0.5f;

        float box_objectness = feat_ptr[4];
        for (int class_idx = 0; class_idx < num_class; class_idx++)
        {
            float box_cls_score = feat_ptr[5 + class_idx];
            float box_prob = box_objectness * box_cls_score;
            if (box_prob > prob_threshold)
            {
                Object obj;
                obj.rect.x = x0;
                obj.rect.y = y0;
                obj.rect.width = w;
                obj.rect.height = h;
                obj.label = class_idx;
                obj.prob = box_prob;

                objects.push_back(obj);
            }

        } // class loop
        feat_ptr += pred_num;

    } // point anchor loop
}
参考:https://github.com/Megvii-BaseDetection/YOLOX/blob/main/demo/ncnn/cpp/yolox.cpp
5.1 模型decode(NCHW)
static void generate_grids_and_stride(const int target_size, std::vector<int>& strides, std::vector<GridAndStride>& grid_strides)
{
    for (int i = 0; i < (int)strides.size(); i++)
    {
        int stride = strides[i];
        int num_grid = target_size / stride;
        for (int g1 = 0; g1 < num_grid; g1++)
        {
            for (int g0 = 0; g0 < num_grid; g0++)
            {
                GridAndStride gs;
                gs.grid0 = g0;
                gs.grid1 = g1;
                gs.stride = stride;
                grid_strides.push_back(gs);
            }
        }
    }
}
static void generate_yolox_proposals(std::vector<GridAndStride> grid_strides, const float*bottom, float prob_threshold, std::vector<Object>& objects)
{
    int feat_h =640 / 32;    // 640 input net size h
    int feat_w =640 / 32;    // 640 input net size w
    int pred_num = 85;       // x y w h conf + 80 classes
    const int num_grid = feat_h * feat_w ;  //
    const int num_class = 80;   // coco  80 classes
    const int num_anchors = grid_strides.size();  // 等于  feat_h * feat_w

    const float* feat_ptr = bottom;
    for (int anchor_idx = 0; anchor_idx < num_anchors; anchor_idx++)
    {
        const int grid0 = grid_strides[anchor_idx].grid0;
        const int grid1 = grid_strides[anchor_idx].grid1;
        const int stride = grid_strides[anchor_idx].stride;

        // yolox/models/yolo_head.py decode logic
        //  outputs[..., :2] = (outputs[..., :2] + grids) * strides
        //  outputs[..., 2:4] = torch.exp(outputs[..., 2:4]) * strides
        float x_center = (feat_ptr[anchor_idx + 0*feat_h * feat_w] + grid0) * stride;
        float y_center = (feat_ptr[anchor_idx + 1*feat_h * feat_w] + grid1) * stride;
        float w = exp(feat_ptr[anchor_idx + 2*feat_h * feat_w]) * stride;
        float h = exp(feat_ptr[anchor_idx + 3*feat_h * feat_w]) * stride;

        float x0 = x_center - w * 0.5f;
        float y0 = y_center - h * 0.5f;

        float box_objectness = feat_ptr[anchor_idx + 4*feat_h * feat_w];
        for (int class_idx = 0; class_idx < num_class; class_idx++)
        {
            float box_cls_score = feat_ptr[5 + class_idx];
            float box_prob = box_objectness * box_cls_score;
            if (box_prob > prob_threshold)
            {
                Object obj;
                obj.rect.x = x0;
                obj.rect.y = y0;
                obj.rect.width = w;
                obj.rect.height = h;
                obj.label = class_idx;
                obj.prob = box_prob;

                objects.push_back(obj);
            }

        } // class loop


    } // point anchor loop
}
参考
1 . https://developer.horizon.ai/forumDetail/136488103547258555

开放原子开发者工作坊旨在鼓励更多人参与开源活动,与志同道合的开发者们相互交流开发经验、分享开发心得、获取前沿技术趋势。工作坊有多种形式的开发者活动,如meetup、训练营等,主打技术交流,干货满满,真诚地邀请各位开发者共同参与!
更多推荐
 已为社区贡献22条内容


所有评论(0)