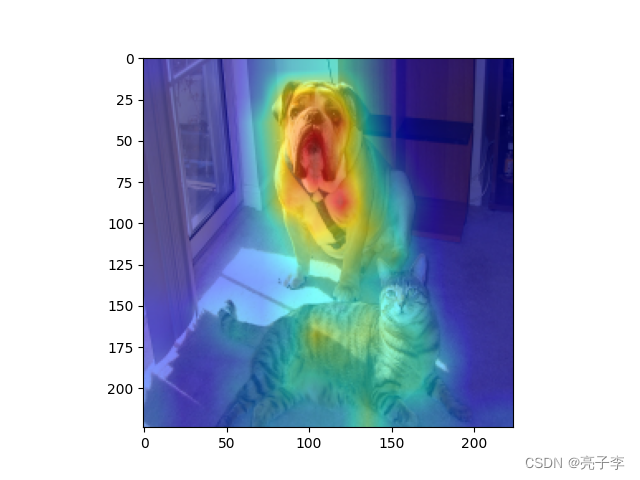
vit的cam和注意力图: VIT模型的可解释性
VIT的热力图怎么画
grad_cam就是热力图,表示模型对图片的关注部分。越关注就越红。

图是用大佬的,原理大家也请看大佬的博客。
Grad-CAM简介_太阳花的小绿豆的博客-CSDN博客_grad-cam
不得不提一句的是,在CNN中,是将多个通道的特征图加权起来。 就是B*H*W*C在C这个维度上加权。 而在vit中计算gradcam时,是将多个patch的特征图加权起来。 也就是B*(L-1)*h*w在L这个维度上加权起来。 小写的h和w 表示是一个小patch的长宽。L就是token的长度了,减1 是减的clstoken。权重都是根据分配给各自的梯度决定的。
这样看来其实vit用gradcam的解释性可能没那么的强。因为把patch的特征图resize到224*224,这样于情于理 都感觉 没那么的合适。 还有一种是官方的ViT用的方法Attention Rollout。就是按照注意力权重来给颜色, 感觉合理上许多。我们直接通过代码理解。
https://github.com/jacobgil/vit-explain 代码地址在这里。
拿到后 直接运行vit_explain 如果是在服务器上运行的 就把cv2 换成plt。 换的时候注意转通道。
    b, g, r = cv2.split(mask)
    mask = cv2.merge((r, g, b))
    plt.imshow(mask)
    plt.show()
要不然画出来 图是反着来的。

根据是否指定图片所属的类,分为带grad的atten加权和不带grad的att加权。 我们进上面看。
class VITAttentionRollout:
    def __init__(self, model, attention_layer_name='attn_drop', head_fusion="mean",
        discard_ratio=0.9):
        self.model = model
        self.head_fusion = head_fusion
        self.discard_ratio = discard_ratio
        for name, module in self.model.named_modules():
            if attention_layer_name in name:
                module.register_forward_hook(self.get_attention)

        self.attentions = []

    def get_attention(self, module, input, output):
        self.attentions.append(output.cpu())

    def __call__(self, input_tensor):
        self.attentions = []
        with torch.no_grad():
            output = self.model(input_tensor)

        return rollout(self.attentions, self.discard_ratio, self.head_fusion)
这里面有很多我平时很少用的代码写法,正好学学。
第一个是__call__ 这个方法,可以用声明的类直接当作函数名字使用。像下图 上面定义 下面就当作函数了。

第二个是hook方法,hook 钩子对吧,下面这个就是就是在模型前向过程中,把我们想要的东西勾出来。 当然是只在我们想要的层添加hook。 钩子勾到后,用定义的函数来处理。这里处理方式是把输出记录下来。
        for name, module in self.model.named_modules():
            if attention_layer_name in name:
                module.register_forward_hook(self.get_attention)
注意
attention_layer_name='attn_drop'也就是说 hook提取的是atten矩阵drop层的输出。我们找到这个层,会发现是q和k的乘积那里。
当然,这里的模型在eval,模式下, drop率都是0,所以输入输出都是一样的。记录输出即可。


也就是第一步 提取了attention矩阵, 下面用rollout函数来计算热力图。 我们进去看看。
    with torch.no_grad():
        for attention in attentions:
            if head_fusion == "mean":
                attention_heads_fused = attention.mean(axis=1)
            elif head_fusion == "max":
                attention_heads_fused = attention.max(axis=1)[0]
            elif head_fusion == "min":
                attention_heads_fused = attention.min(axis=1)[0]
            else:
                raise "Attention head fusion type Not supported"

            # Drop the lowest attentions, but
            # don't drop the class token
            flat = attention_heads_fused.view(attention_heads_fused.size(0), -1)
            _, indices = flat.topk(int(flat.size(-1)*discard_ratio), -1, False)
            indices = indices[indices != 0]
            flat[0, indices] = 0

            I = torch.eye(attention_heads_fused.size(-1))
            a = (attention_heads_fused + 1.0*I)/2
            a = a / a.sum(dim=-1)

            result = torch.matmul(a, result)

    # Look at the total attention between the class token,
    # and the image patches
    mask = result[0, 0 , 1 :]
    # In case of 224x224 image, this brings us from 196 to 14
    width = int(mask.size(-1)**0.5)
    mask = mask.reshape(width, width).numpy()
    mask = mask / np.max(mask)
    return mask
torch.eye 创建对角矩阵,长宽是token的长度,197.
然后选一个pooling方式,这里是max。这个pooling是在图片通道间pooling 彩图就是3通道。
之后去掉一定比例atten值比较小的,默认是0.9的比例。 令人惊讶的是,当把flat中的小值置为0时, attention_heads_fused 中的对应值也会变为0. 之后是归一化的过程。 对于多层atten 就通过matmul的方式叠加上去。 也就是相乘。
    mask = result[0, 0 , 1 :]
    # In case of 224x224 image, this brings us from 196 to 14
    width = int(mask.size(-1)**0.5)
    mask = mask.reshape(width, width).numpy()
    mask = mask / np.max(mask)
像分类一样, 取cls的atten加权值。 这个相当于从cls 看其他token的权重,也是一种总览。 然后归一化,
    np_img = np.array(img)[:, :, ::-1]
    mask = cv2.resize(mask, (np_img.shape[1], np_img.shape[0]))
    mask = show_mask_on_image(np_img, mask)
    # cv2.imshow("Input Image", np_img)

    b, g, r = cv2.split(mask)
    mask = cv2.merge((r, g, b))
    plt.imshow(mask)
    plt.show()
画图 得到结果

为什么是在看狗嘞? 可能这就是没有梯度的坏处吧。 没法控制?
如果用自己的模型画:
1 修改载入模型
2 修改图地址
3 看是否需要修改层名字。

开放原子开发者工作坊旨在鼓励更多人参与开源活动,与志同道合的开发者们相互交流开发经验、分享开发心得、获取前沿技术趋势。工作坊有多种形式的开发者活动,如meetup、训练营等,主打技术交流,干货满满,真诚地邀请各位开发者共同参与!
更多推荐
 已为社区贡献8条内容


所有评论(0)