Pytorch版本Swin-Transformer目标检测训练自己的数据集
linux系统的Swin-Transformer纯目标检测
Swin-Transformer目标检测
1. 环境搭建
Linux系统下搭建Swin Transformer目标检测环境
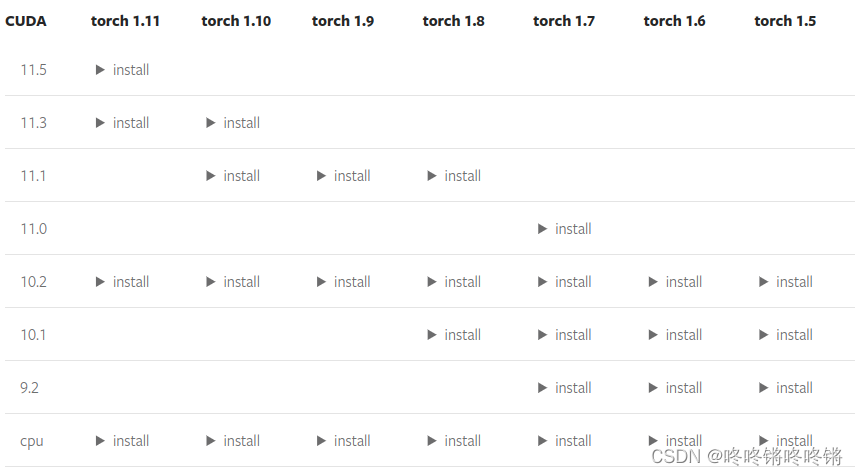
- 补充:mmcv-full在不同版本的CUDA和torch情况下的安装命令参考安装文档

2. 训练
- 例子:数据使用VOC格式,预训练模型
cascade_mask_rcnn_swin_tiny_patch4_window7.pth,纯目标检测(不进行segmentation/mask的检测)
2.1 预训练模型的准备
KeyError: "CascadeRCNN: 'SwinTransformer is not in the backbone registry'
从链接https://github.com/SwinTransformer/Swin-Transformer-Object-Detection下载的预训练模型cascade_mask_rcnn_swin_tiny_patch4_window7.pth在训练时会存在上方所显示的问题,官网也有人提过该问题,建议从链接https://github.com/microsoft/Swin-Transformer下载相对应的图像分类模型swin_tiny_patch4_window7_224.pth取代cascade_mask_rcnn_swin_tiny_patch4_window7.pth。

2.2 数据集的准备
数据集采用VOC格式,原代码中有例子tests/data/VOCdevkit,先使用它将代码跑起来,然后再照着它的格式进行自己数据集的处理。
操作:直接将tests下面的data文件夹复制到Swin-Transformer-Object-Detection目录下。
2.3 代码的修改
2.3.1 将默认的MaskRCNN调整为无mask的纯目标检测
configs/swin/mask_rcnn_swin_tiny_patch4_window7_mstrain_480-800_adamw_3x_coco.py
	# dict(type='LoadAnnotations', with_bbox=True, with_mask=True),
    dict(type='LoadAnnotations', with_bbox=True), # remove mask

    # dict(type='Collect', keys=['img', 'gt_bboxes', 'gt_labels', 'gt_masks']),
    dict(type='Collect', keys=['img', 'gt_bboxes', 'gt_labels']), # remove mask
configs/_base_/models/mask_rcnn_swin_fpn.py
		# mask_roi_extractor=dict(
        #     type='SingleRoIExtractor',
        #     roi_layer=dict(type='RoIAlign', output_size=14, sampling_ratio=0),
        #     out_channels=256,
        #     featmap_strides=[4, 8, 16, 32]),
        # mask_head=dict(
        #     type='FCNMaskHead',
        #     num_convs=4,
        #     in_channels=256,
        #     conv_out_channels=256,
        #     num_classes=80,
        #     loss_mask=dict(
        #         type='CrossEntropyLoss', use_mask=True, loss_weight=1.0)) # remove mask

            # mask_size=28, # remove mask

            # mask_thr_binary=0.5 # remove mask
2.3.2 对齐数据集
configs/swin/mask_rcnn_swin_tiny_patch4_window7_mstrain_480-800_adamw_3x_coco.py
_base_ = [
    '../_base_/models/mask_rcnn_swin_fpn.py',
    # '../_base_/datasets/coco_instance.py',
    '../_base_/datasets/voc0712.py',
    '../_base_/schedules/schedule_1x.py', '../_base_/default_runtime.py'
]
configs/_base_/models/mask_rcnn_swin_fpn.py
num_classes=20,
当使用自己的数据集时,num_classes数目则修改为自己数据集的类别数,相应的还要修改类别名:
mmdet/core/evaluation/class_names.py
def voc_classes():
    # 修改为自己的类别名
    return [
        'aeroplane', 'bicycle', 'bird', 'boat', 'bottle', 'bus', 'car', 'cat',
        'chair', 'cow', 'diningtable', 'dog', 'horse', 'motorbike', 'person',
        'pottedplant', 'sheep', 'sofa', 'train', 'tvmonitor'
    ]
mmdet/datasets/voc.py
class VOCDataset(XMLDataset):
	# 修改为自己的类别名
    CLASSES = ('aeroplane', 'bicycle', 'bird', 'boat', 'bottle', 'bus', 'car',
               'cat', 'chair', 'cow', 'diningtable', 'dog', 'horse',
               'motorbike', 'person', 'pottedplant', 'sheep', 'sofa', 'train',
               'tvmonitor')
2.4 训练命令
python tools/train.py configs/swin/mask_rcnn_swin_tiny_patch4_window7_mstrain_480-800_adamw_3x_coco.py --gpu-ids 0 --cfg-options model.pretrained=swin_tiny_patch4_window7_224.pth
需要修改batch_size和总epochs数,参考如下:
python tools/train.py configs/swin/mask_rcnn_swin_tiny_patch4_window7_mstrain_480-800_adamw_3x_coco.py --gpu-ids 0 --cfg-options model.pretrained=swin_tiny_patch4_window7_224.pth data.samples_per_gpu=8 runner.max_epochs=100
batch_size = num_gpu * data.samples_per_gpu
2.5 最终文件夹的目录

3. 其他小需求的代码修改
- 原代码中数据集的图片只能为".jpg"格式的,增加".jpeg", “.webp”, “.bmp”, ".png"几种格式读入
mmdet/datasets/xml_style.py
IMAGE_EXT = [".jpg", ".jpeg", ".webp", ".bmp", ".png"]

@DATASETS.register_module()
class XMLDataset(CustomDataset):
    # ...
    def get_image_name(self, img_id):
        for ext in IMAGE_EXT:
            if osp.exists(osp.join(self.img_prefix, img_id + ext)):
                return f'JPEGImages/{img_id + ext}'

    def load_annotations(self, ann_file):
        # ...
        for img_id in img_ids:
            filename = self.get_image_name(img_id)
            # filename = f'JPEGImages/{img_id}.jpg'
          	# ...
            if size is not None:
                width = int(size.find('width').text)
                height = int(size.find('height').text)
            else:
                # img_path = osp.join(self.img_prefix, 'JPEGImages',
                #                     '{}.jpg'.format(img_id))
                img_path = osp.join(self.img_prefix,
                                    self.get_image_name(img_id))
            	# ...
- 修改打印日志参数以及tensorboard实时查看训练情况
configs/_base_/default_runtime.py
log_config = dict(
    interval=50,
    hooks=[
        dict(type='TextLoggerHook'),
        dict(type='TensorboardLoggerHook') # 将该行取消注释
    ])
命令:
tensorboard --logdir=work_dirs/mask_rcnn_swin_tiny_patch4_window7_mstrain_480-800_adamw_3x_coco/tf_logs
- 保存best_AP50.pth
configs/base_datasets/voc0712.py
evaluation = dict(interval=1, metric='mAP', save_best='auto', rule='greater')
# evaluation = dict(interval=1, metric='mAP')


# 其中save_best和rule参数的选择参考如下:
'''
save_best (str, optional): If a metric is specified, it would measure
    the best checkpoint during evaluation. The information about best
    checkpoint would be save in best.json.
    Options are the evaluation metrics to the test dataset. e.g.,
    ``bbox_mAP``, ``segm_mAP`` for bbox detection and instance
    segmentation. ``AR@100`` for proposal recall. If ``save_best`` is
    ``auto``, the first key will be used. The interval of
    ``CheckpointHook`` should device EvalHook. Default: None.
rule (str, optional): Comparison rule for best score. If set to None,
    it will infer a reasonable rule. Keys such as 'mAP' or 'AR' will
    be inferred by 'greater' rule. Keys contain 'loss' will be inferred
        by 'less' rule. Options are 'greater', 'less'. Default: None.
'''
- 不必要每个epoch都保存一个模型,有点占空间,只保存
best_AP50.pth和latest.pth,修改下方两处位置: mmcv_custom/runner/epoch_based_runner.py
        # filename = filename_tmpl.format(self.epoch + 1)
        filename = 'latest.pth'

        # if create_symlink:
        #     dst_file = osp.join(out_dir, 'latest.pth')
        #     if platform.system() != 'Windows':
        #         mmcv.symlink(filename, dst_file)
        #     else:
        #         shutil.copy(filepath, dst_file)
mmdet/core/evaluation/eval_hooks.py
            # last_ckpt = runner.meta['hook_msgs']['last_ckpt']
            last_ckpt = osp.join(runner.work_dir, 'latest.pth')

            shutil.copy(last_ckpt,
                        osp.join(runner.work_dir, f'best_{self.key_indicator}.pth'))
            # mmcv.symlink(
            #     last_ckpt,
            #     osp.join(runner.work_dir, f'best_{self.key_indicator}.pth'))

开放原子开发者工作坊旨在鼓励更多人参与开源活动,与志同道合的开发者们相互交流开发经验、分享开发心得、获取前沿技术趋势。工作坊有多种形式的开发者活动,如meetup、训练营等,主打技术交流,干货满满,真诚地邀请各位开发者共同参与!
更多推荐
 已为社区贡献5条内容


所有评论(0)