python之pytest
pytest基础
pytest学习
一、介绍
pytest是python的一种单元测试框架,同自带的unittest测试框架类似,相比起来,pytest更简单。
特点:
1.入门简单,文档丰富
2.支持简单的单元测试和复杂的功能测试
3.支持参数化
4.执行测试过程中可以将某些测试跳过,或者对某些预期失败的case标记成失败
5.支持重复执行失败的case
6.支持运行由Nose,unittest编写的case
7.具有多个第三方插件,还可以自定义扩展
8.方便和持续集成工具集成
编写规范:
- 测试文件以test_开头或结尾
- 测试类以Test开头,并且不能带有_ _ init _ _方法
- 测试函数以test_开头
安装
pip install pytest
例子:
import pytest

def test_a():
    print('\ntesta 11111111111')
    assert 1

def test_b():
    print('\ntestb ttttttttt')
    assert 1

if __name__=='__main__':
    pytest.main('test_prac.py')
注意:
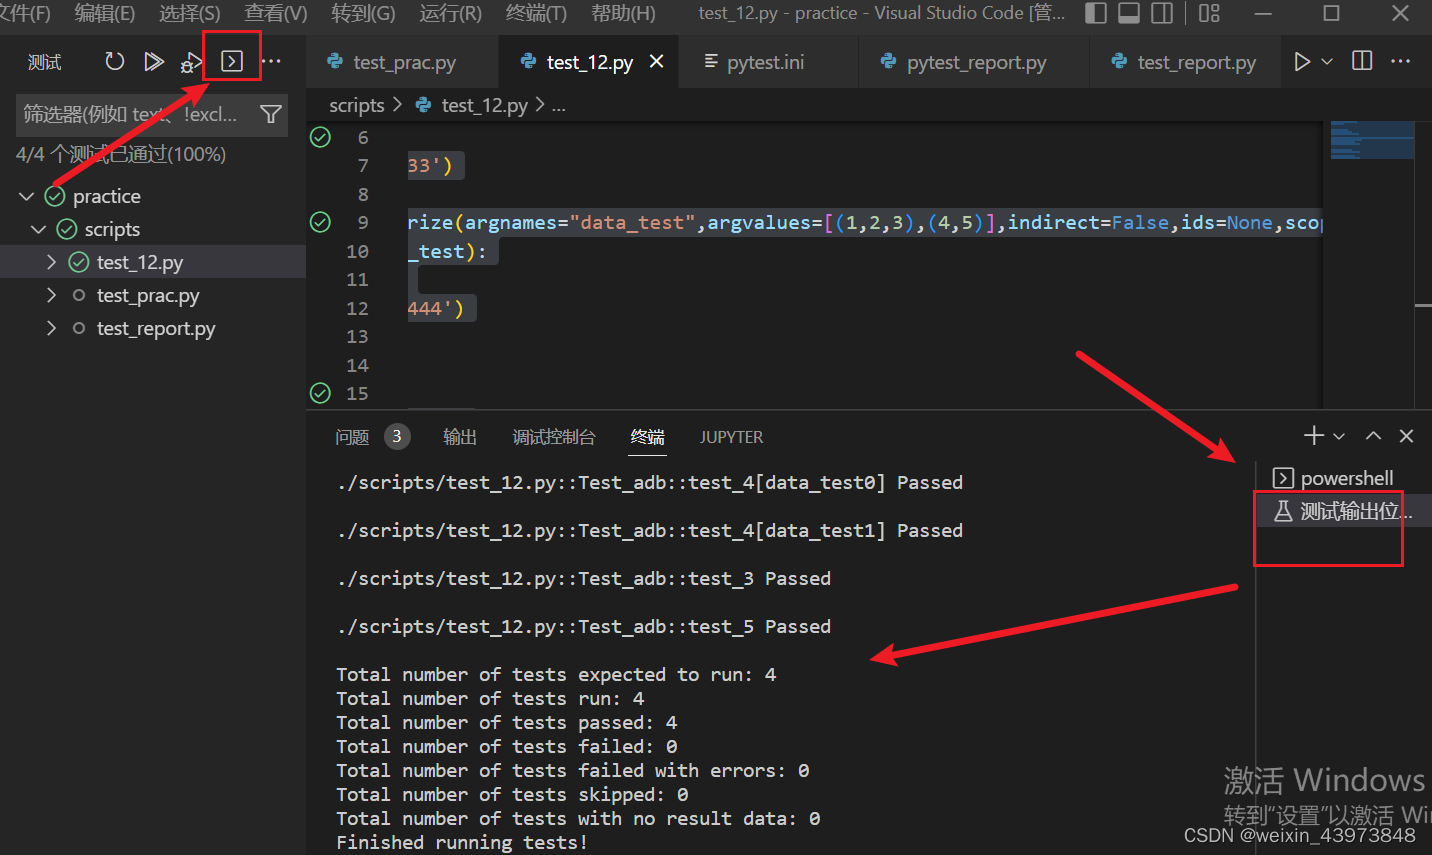
1、要先切换成pytest模式才能正常运行
2、包名、模块名都需要以test_开头才能正常执行
3、需要将打印模块开启才会将结果打印在输出栏,操作如下:
二、使用
1、setup 和teardown函数
setup和teardown函数主要分为模块级、类级、功能级、函数级别。这两个函数存在测试类的内部。
作用:在函数调用之前执行setup,在函数调用之后执行teardown
注意点:
1.类名一定要Test_开头,并且T要大写
2.在终端运行时,需要先切换到当前文件目录下。否则会报错找不到module
3.-s是输出程序运行信息。想要让setup、teardown在控制窗口打印,需要加-s 执行,如:pytest -s test_prac.py
适用场景:
比如登录,发送请求的请求头等等
函数级别
特点:
当是函数级别的时候,每执行一个函数,就会跟着执行一次setup和teardown
import pytest

#类名一定要Test_开头,并且T要大写,不然执行不了
class Test_abd():
    def setup(self):
        print('=====setup======')
    def teardown(self):
        print('=====teardown===')
    def test_a(self):
        print('\ntesta 11111111111')
        assert 1

    def test_b(self):
        print('\ntestb ttttttttt')
        assert 1

    def test_c(self):
        print('\ntestb ttttttttt')
        assert 1
result:

类级别
特点:在一个测试类,不管有多少方法,都只运行一次setup和teardown。相当于setup和teardown将其他方法包裹在内部执行。
import pytest

#类名一定要Test_开头,并且T要大写,不然执行不了
class Test_abd():
    # #类级别的使用:setup和teardown只执行一次
    def setup_class(self):
        print('=====setup======')
    def teardown_class(self):
        print('=====teardown===')
    def test_a(self):
        print('\ntesta 11111111111')
        assert 1

    def test_b(self):
        print('\ntestb ttttttttt')
        assert 1
result:

2、 pytest配置文件
pytest配置文件通常放在测试目录下,名称为pytest.ini ,命令运行时,会使用该配置文件中的配置。配置完以下配置后,可直接在控制台输入pytest即可执行所有指定的文件内容。
#配置pytest命令行运行参数 ,多个参数用空号隔开
[pytest]
addopts=-s
以下几种路径也可以单独写,比如只写python_files,那么会在当前路径下查找所有的test_*.py文件
配置测试搜索的路径 ;
[pytest]
testpaths=./scripts
#寻找当前目录下的scripts里的文件,可自定义
#配置测试搜索的文件名
[pytest]
python_files=test_*.py
寻找当前目录下的scripts文件夹下,以test_开头,.py结尾的所有文件中
#配置测试搜索的测试类名
[pytest]
python_classes=Test_*
#当前目录下的scripts文件夹下,以test_开头,.py为结尾的文件中,以Test_开头的类
配置测试搜索的测试函数名
[pytest]
python_functions=test_*
#搜索当前目录下的scripts文件夹下,以test_开头,.py为结尾的文件中,以Test_开头的类里的以test_开头的方法
3、公共类编写
公共模块要在不同文件中,大家都要能访问到,所以一般是放在根目录下。
在pytest中使用conftest.py这个文件进行数据共享,并且放在不同得位置起着不同范围的共享作用。
比如登录函数需要共享使用,那么将登录模块带@pytest.fixture写在conftest.py中。系统执行参数login的时候,会先从本文件中查找是否有该名字的变量,之后再去conftest.py中查找。
一般pytest.fixture()会和conftest.py文件一起使用,它的名字是固定的,功能很强大:
1.conftest.py文件时单独存放pytest.fixture()的方法,用处时可以在多个py文件之间共享前置配置
2.conftest.py里面的方法在调用时不需要导入,直接使用
3.conftest.py可以有多个,也可以有多个不同层级
import pytest
import readYaml

@pytest.fixture(scope="function")
def conn_database():
    print('连接数据库')
    yield
    print("关闭数据库")

def clear_yaml():
    readYaml.readYaml.clear_yaml()
4、常用插件
4.1 自动输出测试报告插件
pytest-html 插件用来生成测试报告。方便简单。
安装pip install pytest-html
1、首先创建一个简单的测试类:
import pytest
class Test_report():
    def test_12(self):
        print('121212')
    def test_34(self):
            print('343434')
2、需要将该测试结果自动生成测试报告:
可以通过命令行直接生成:pytest -s pytest_report.py --html=./pytest_report.html
另外一种更简单的方法是在配置文件中配置命令,直接生成整个项目的测试报告:
1)首先,在该项目路径下创建要测试的类包,测试报告包,配置文件pytest.ini
2)在配置文件中配置要运行的命令
[pytest]
#addopts可添加多个命令行参数
addopts=-s --html=./report/pytestreport.html #生成报告的命令
#以下是搜索定位到要执行的文件
testpaths=./scripts
python_files=test_*.py
python_classes=Test_*
3)直接在终端输入pytest回车,即可执行所有符合条件的用例,并且生成对应的测试报告,测试报告在report文件夹下。
注意:若报告要显示xml的格式,可以改为:- -html=./report/pytestreport.xml
4.2 控制函数执行顺序插件
默认情况下,pytest是根据测试方法名由小到大执行的,可以通过第三方插件包改变其运行顺序。
作用:以函数修饰符的方式标记被测函数,通过参数控制函数执行顺序
安装:pip install pytest-ordering
使用方法:
1.标记于被测函数,@pytest.mark.run(order=x) x表示执行的顺序
2.根据order传入的参数来决定运行顺序:
- order值全为正数或全为负数时,值越小,优先级越高
- 正数和负数同时存在,正数优先级高
总结:0>较小整数>较大的整数>无标记>较小的负数>较大的负数
例:
import pytest

class Test_report:
    @pytest.mark.run(order=3)
    def test_12(self):
        print('121212')

    @pytest.mark.run(order=1)
    def test_34(self):
            print('343434')

    @pytest.mark.run(order=2)
    def test_45(self):
        print('454545')

4.3 失败重试插件
pytest-rerunfailures 作用:使用命令方式控制失败函数的重试次数
安装:pip install pytest-rerunfailures
使用方法:
命令行格式: --reruns n
n 表示重试的次数
命令行运行:pytest -s test_report.py --reruns 2
对出错的用例再重新执行两次
配置文件写法:
[pytest]

addopts=-s --html=./scripts/report/pytestreport.html  --reruns 2
testpaths=./scripts
python_files=test_*.py
python_classes=Test_*

4.4 多条断言失败也都运行
场景:一个方法中多条断言,想要报错的都执行一下
安装pip install pytest-assume
调用:pytest.assume(1==4)

5、fixture装置(夹具)
fixture是pytest特有的功能,用pytest.fixture来标志,以装饰器形式定义在函数上,在编写测试用例的时候,可以将此函数名称作为传入参数,pytest将会以依赖注入方式,将该函数的返回值作为测试函数的传入参数。
fixture是基于模块来执行的,每个调用fixture的函数都可以触发一个fixture函数,自身也可以调用其他的fixture。
可以将fixture看作是资源,在执行测试用例之前需要配置这些资源,执行完后需要去释放资源。比如module类型的fixture适合于那些许多测试用例都只需要执行一次的操作。
fixture还提供参数化功能,根据配置和不同组件来选择不同的参数。
5.1 fixture函数作用
fixture修饰器来标记固定的工厂函数,在其他函数,模块,类或整个工程调用它时,会被激活并优先执行,通常会被用于完成预置处理和重复操作。
5.2 使用说明
pytest.fixture(scope=‘function’,params=None,autouse=False,ids=None,name=None)
也可以不传参数!!所有值都以默认值存在。
常用参数说明:
scope:标记方法的作用域
 1. “function":默认值,表示每个测试方法都要执行一次
 2. ”class":作用于整个类,表示每个类的所有测试方法只运行一次
 3. “module:作用域整个模块,每个module的所有测试方法只运行一次
 4. ”session":作用于整个session, 每个session只运行一次(慎用!!!)

 params:list类型,默认None,接收参数值,对于param里面的每个值,fixture都会区遍历执行一次
 autouse:是否自动运行,默认为false,为true时,此session中的所有测试函数都会调用fixture
以参数形式传递
定义一个fixture装饰的方法,然后通过参数形式传递给其他函数来实现调用该函数。
import pytest

@pytest.fixture()
def test_1():
    print('hhhhhhhhhhhhhhhhhhhhhhhh')

def test_2(test_1):
    print('222222')

def test_3(test_1):
    print('333333')

if __name__=='__main__':
    pytest.main('-s test_12.py')

作为函数应用
以装饰器的形式传递参数:@pytest.mark.usefixtures(‘test_1’)
不论给函数还是给类设置fixture装置,都可以通过@pytest.mark.usefixtures(‘test_1’)来装饰。
import pytest

@pytest.fixture()
def test_1():
    print('hhhhhhhhhhhhhhhhhhhhhhhh')

@pytest.mark.usefixtures('test_1')
def test_2():
    print('222222')

@pytest.mark.usefixtures('test_1')
class Test_adb():
    def test_3(test_1):
        print('333333')

    def test_4(test_1):
        print('4444444444')

带参数使用–设置默认启动形式
autouse:设置自动运行,为true时,此session中的所有测试函数都会调用fixture,不需要特意标识。
import pytest

@pytest.fixture(autouse=True)
def test_1():
    print('hhhhhhhhhhhhhhhhhhhhhhhh')

def test_2():
    print('222222')

class Test_adb():
    def test_3(test_1):
        print('333333')

    def test_4(test_1):
        print('4444444444')

设置作用域class
设置作用域scope="class“ 则整个类中装饰函数只在最开始执行一次。当然了,在类以外的地方还是都默认执行的。
import pytest

@pytest.fixture(scope="class",autouse=True)
def test_1():
    print('\nhhhhhhhhhhhhhhhhhhhhhhhh')

def test_2():
    print('222222')
def test_666():
    print('6666666666666666666666')

class Test_adb():
    def test_3(test_1):
        print('333333')

    def test_4(test_1):
        print('4444444444')
设置作用域为module
在整个模块中最开始的时候执行一次,并且只执行一次。尽管其他地方通过直接调用装饰函数,也不会再执行。
import pytest

@pytest.fixture(scope="module",autouse=True)
def test_1():
    print('\nhhhhhhhhhhhhhhhhhhhhhhhh')

def test_2():
    print('222222')
def test_666():
    print('6666666666666666666666')

class Test_adb():
    def test_3(test_1):
        print('333333')

    def test_4(test_1):
        print('4444444444')
设置参数化
from urllib import request
import pytest

@pytest.fixture(params=[1,2,3])
def data(request):
    return request.param

class Test_adb():
    def test_3(self,data):
        print(f'有几个?{data}个人')

    def test_4(test_1):
        print('4444444444')

if __name__=='__main__':
    pytest.main("test_12.py")

6、跳过测试函数
使用skipif函数设置,可以根据特定条件,不执行标识的测试函数。
@pytest.mark.skipif(condition=True,reason=“xxx”)
参数说明:
condition:跳过的条件,必传参数
reason:标注跳过的原因,必传参数,而且必须是string类型
import pytest

class Test_adb():
    def test_3(self):
        print('\n333333333')

    @pytest.mark.skipif(condition=True,reason="跳过")
    def test_4(self):
        print('\n4444444444')

    def test_5(self):
        print('\n5555555555')

if __name__=='__main__':
    pytest.main("test_12.py")

7、标记为预期失败函数
适用场景:标记某测试函数为失败,实际上函数执行了,只是类似手动给它设置为失败状态。
方法:
@pytest.mark.xfail(condition=2>1,reason=“不执行test_4函数”,raises=None,run=True,strict=False)
常用参数:
condition:预期失败的条件,必传参数
reason:失败的原因,必传参数
import pytest

class Test_adb():
    def test_3(self):
        print('\n333333333')

    @pytest.mark.xfail(condition=2>1,reason="不执行test_4函数",raises=None,run=True,strict=False)
    def test_4(self):
        print('\n4444444444')

    def test_5(self):
        print('\n5555555555')

if __name__=='__main__':
    pytest.main("test_12.py")

8、函数数据参数化
作用:方便测试函数对测试属性的获取
方法:
@pytest.mark.parametrize(argnames=“data_test”,argvalues=[(1,2,3),(4,5)],indirect=False,ids=None,scope=None)
常用参数:
argnames:参数名
argvalues:
- 参数对应值,类型必须为List
2.当参数为一个时,参数的格式为:[value]
3.当参数个数大于一个时,格式为:[(param_value,param_value2),(param-value,param_value2)…]
注意:当参数值为n个,测试方法就会运行N次,类似将函数嵌入for循环执行一样
import pytest

class Test_adb():
    def test_3(self):
        print('\n333333333')

    @pytest.mark.parametrize(argnames="data_test",argvalues=[(1,2,3),(4,5)])
    def test_4(self,data_test):
        print(data_test)
        print('\n4444444444')

    def test_5(self):
        print('\n5555555555')

if __name__=='__main__':
    pytest.main("test_12.py")

还可以叠加多个mark的方法:
	@pytest.mark.parametrize(argnames="data_test",argvalues=[(1,2,3),(4,5)])
    @pytest.mark.xfail(condition=2>1,reason='hahahah,搞错啦')
    def test_4(self,data_test):
        print(data_test)
        print('4444444444')
三、PO模式简介
PO模型是Page Object Mode的简写,页面对象。
作用:把测试页面和测试脚本进行分离,即把页面封装成类,供测试脚本进行调用。
优点:
- 提高代码可读性
- 减少代码的重复
- 提高代码的可维护性,特别是针对UI界面频繁变动的项目
缺点:
- 造成项目结构比较复杂,因为是根据流程进行了模块化处理
代码抽取
手机发送短信的例子:
目录:

代码:一般先抽取业务功能代码,再次再抽取业务功能中用到的信息。
抽取功能代码:
创建page目录(名字是默认的,不能更改),在该目录中创建py文件,把新增短信,输入内容等功能进行抽取
base命令包含的内容:
constants.py
appPackages="com.android.settings"
appActivity=".Settings"
base_driver.py
from . import constants
from selenium import webdriver

def base_driver(appPackages,appActivity):
    devices_info = {}
    devices_info['platformName'] = 'Android'
    devices_info['platformVersion'] = '5.1.1'
    devices_info['deviceName'] = '127.0.0.1:21503'
    # 发送中文时,自动转换
    devices_info['unicodeKeyboard'] = True
    devices_info['resetKeyboard'] = True

    devices_info['appPackage'] = constants.appPackages
    devices_info['appActivity'] = constants.appActivity

    driver = webdriver.Remote('http://127.0.0.1:4723/wd/hub', devices_info)
    driver.implicitly_wait(30)
    return driver
page包含的内容:
send_msg.py
class send_msg():
    def __init__(self,driver):
        self.driver=driver

    def add(self):
        # 先一步一步打开短信编辑发送界面
        self.driver.find_element_by_xpath("//*[contains(@text,'短信')]").click()
        self.driver.find_element_by_xpath("//*[contains(@text,'新增')]").click()

    def receiver(self):
        # 然后定位到收件人、收件内容
        receive_data = self.driver.find_element_by_xpath("//*[contains(@text,'接收者')]")
        receive_data.clear()
        receive_data.send_keys('13357578462')

    def send_msgmtd(self,driver):
        send_list = ['1212', 'hhhhahaa', '哈哈哈啊哈哈😄']
        send_msg = driver.find_element_by_xpath("//*[contains(@text,'发送内容')]")
        send_btn = driver.find_element_by_xpath("//*[contains(@text,'发送')]")
        # 遍历写入数据并发送
        for data in send_list:
            send_msg.clear()
            send_msg.send_keys(data)
            send_btn.click()
script包含的内容:
test_sendmsg.py
from selenium import webdriver
from page.send_msg import *
from base  import *
class test_sendmsg():
    def setup_class(self):
        self.driver = base_driver()
        self.sendmsg=send_msg(self.driver)

    def teardown_class(self):
        self.driver.close_app()
        self.driver.close()

    def test_send_msg(self):
        self.sendmsg.add()
        self.sendmsg.receiver()
        self.sendmsg.send_msgmtd()
分布式


四、allure报告
调试
控制台输入:pytest -k test_测试类.py --log-level=debug
通过调整log等级查看日志情况
FAQ
- 报错:不合法得字符转换:‘gbk’ codec can’t decode byte 0xaf in position 76: illegal multibyte sequence
原因:pytest.ini文件有问题,可能是有中文或者其他内容出问题。

开放原子开发者工作坊旨在鼓励更多人参与开源活动,与志同道合的开发者们相互交流开发经验、分享开发心得、获取前沿技术趋势。工作坊有多种形式的开发者活动,如meetup、训练营等,主打技术交流,干货满满,真诚地邀请各位开发者共同参与!
更多推荐
 已为社区贡献5条内容


所有评论(0)