Swig超详细入门教程(Python3调用C/C++, CMake)——更新于2023.11
使用CMake的例子(C语言)使用CMake的例子(C++)swig官网教程:http://www.swig.org/tutorial.htmlswigwin下载地址:https://sourceforge.net/projects/swig/files/swigwin/
·
博主踩过很多很多坑,许多教程是Visual Studio构建的(非CMake工程),很多教程是Python2的,还有一些常见的错误(主要都是来自环境配置问题)。本文主要是手把手教萌新们如何用官方用例构建(有许多本人亲身踩坑血泪史)
相关教程
- Swig超详细入门教程(Java调用C/C++, CMake)——更新于2021.12
- Swig超详细入门教程(Python3调用C/C++, CMake)——更新于2023.11
- 【从零开始】C++调用python(CMake,Clion,windows,包含一些常见错误)
相关文献
环境配置
Windows
- swig官网教程:http://www.swig.org/tutorial.html
swigwin下载地址:https://sourceforge.net/projects/swig/files/swigwin/
安装后为了方便,可以添加安装目录到环境变量path。
SWIG_DIR = C:\swigwin-4.0.2
SWIG_EXECUTABLE = C:\swigwin-4.0.2\swig.exe
- C++:我使用的是Mingw-w64(GCC 9.3.0),如果使用高版本的python,gcc版本不能太低,否则会报错。记得配置环境变量哦! 超详细教程:windows安装MSYS2(mingw && gcc)——更新于2021.11
$ gcc --version
Copyright (C) 2019 Free Software Foundation, Inc.
This is free software; see the source for copying conditions.  There is NO
warranty; not even for MERCHANTABILITY or FITNESS FOR A PARTICULAR PURPOSE.
- Python:我使用的是Anaconda(Python 3.9.7)。配置环境变量
PYTHONHOME = C:\ProgramData\Anaconda3。https://www.anaconda.com/ - Clion:正常安装配置好Toolchains就可以了。(当然也可以选用其他IDE)
- 把
C:/ProgramData/Anaconda3/libs/python39.lib复制并重命名为C:/ProgramData/Anaconda3/libs/python39_d.lib,主要为了增加debug场景。 - 重启电脑(环境变量生效必须重启,其实很多场景不需要重启就能生效,但这个case是必须的,不重启一定会发生奇怪的bug)
Ubuntu
sudo apt update
sudo apt upgrade -y
sudo apt install cmake gcc clang gdb build-essential python3-dev swig -y
使用CMake的例子(C语言)
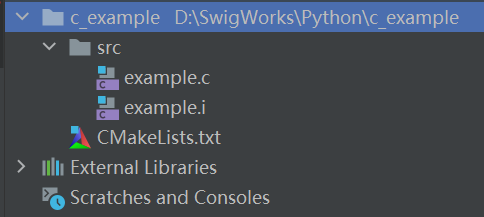
项目工程目录结构:

我们首先构建如下example.c文件
/* File : example.c */

/* A global variable */
double Foo = 3.0;

/* Compute the greatest common divisor of positive integers */
int gcd(int x, int y) {
    int g;
    g = y;
    while (x > 0) {
        g = x;
        x = y % x;
        y = g;
    }
    return g;
}
之后构建example.i文件
/* File : example.i */
%module example

%inline %{
extern int    gcd(int x, int y);
extern double Foo;
%}
我们创建CMakeLists.txt:
#/* File : CMakeLists.txt */
#指定CMake的最小版本
cmake_minimum_required(VERSION 3.17)
project(Example)

set(CMAKE_CXX_STANDARD 20)

#寻找PYTHONHOME的环境变量
find_package (Python3 COMPONENTS Interpreter Development)
include_directories(${Python3_INCLUDE_DIRS})
link_libraries(${Python3_LIBRARIES})

#指定你的.cxx等文件的目录
include_directories(${PROJECT_SOURCE_DIR}/src)

#寻找安装好的swig,其实就是去电脑中找你安装好的Swig环境,所以我们需要提前安装环境。
find_package(SWIG REQUIRED)
include(${SWIG_USE_FILE})
#Python文件输出目录 -outdir
set(CMAKE_SWIG_OUTDIR ${CMAKE_CURRENT_BINARY_DIR}/python)
#指定一个输出目录名,用于放置生成的源文件。例如输出的examplePTYHON_wrap.cxx文件等的位置
set(SWIG_OUTFILE_DIR ${CMAKE_CURRENT_BINARY_DIR}/cpp)
#开始生成
swig_add_library(example LANGUAGE python SOURCES src/example.i src/example.c)
之后我们重载CMake项目

然后点击build:

之后会生成:

把这几个文件复制到一个新建的文件夹里,然后再新建runme.py:

# file: runme.py

import example

# Call our gcd() function

x = 42
y = 105
g = example.gcd(x, y)
print("The gcd of %d and %d is %d" % (x, y, g))

# Manipulate the Foo global variable

# Output its current value
print("Foo = ", example.cvar.Foo)

# Change its value
example.cvar.Foo = 3.1415926

# See if the change took effect
print("Foo = ", example.cvar.Foo)
运行runme:
The gcd of 42 and 105 is 21
Foo =  3.0
Foo =  3.1415926
使用CMake的例子(C++)
项目工程目录结构:

我们首先构建如下example.cxx文件
/* File : example.cxx */

#include "example.h"

#define M_PI 3.14159265358979323846

/* Move the shape to a new location */
void Shape::move(double dx, double dy) {
    x += dx;
    y += dy;
}

int Shape::nshapes = 0;

double Circle::area() {
    return M_PI * radius * radius;
}

double Circle::perimeter() {
    return 2 * M_PI * radius;
}

double Square::area() {
    return width * width;
}

double Square::perimeter() {
    return 4 * width;
}
之后构建example.i文件
/* File : example.i */
%module example

%{
#include "example.h"
%}

/* Let's just grab the original header file here */
%include "example.h"
之后构建example.h文件
/* File : example.h */

class Shape {
public:
    Shape() {
        nshapes++;
    }

    virtual ~Shape() {
        nshapes--;
    }

    double x, y;

    void move(double dx, double dy);

    virtual double area() = 0;

    virtual double perimeter() = 0;

    static int nshapes;
};

class Circle : public Shape {
private:
    double radius;
public:
    Circle(double r) : radius(r) {}

    virtual double area();

    virtual double perimeter();
};

class Square : public Shape {
private:
    double width;
public:
    Square(double w) : width(w) {}

    virtual double area();

    virtual double perimeter();
};
我们创建CMakeLists.txt(注意这里和C语言的CMakeLists.txt的区别):
#/* File : CMakeLists.txt */
#指定CMake的最小版本
cmake_minimum_required(VERSION 3.17)
project(Example)

set(CMAKE_CXX_STANDARD 20)

#寻找PYTHONHOME的环境变量
find_package (Python3 COMPONENTS Interpreter Development)
include_directories(${Python3_INCLUDE_DIRS})
link_libraries(${Python3_LIBRARIES})

#指定你的.cxx等文件的目录
include_directories(${PROJECT_SOURCE_DIR}/src)

#寻找安装好的swig,其实就是去电脑中找你安装好的Swig环境,所以我们需要提前安装环境。
find_package(SWIG REQUIRED)
include(${SWIG_USE_FILE})
#Python文件输出目录 -outdir
set(CMAKE_SWIG_OUTDIR ${CMAKE_CURRENT_BINARY_DIR}/python)
#指定一个输出目录名,用于放置生成的源文件。例如输出的examplePTYHON_wrap.cxx文件等的位置
set(SWIG_OUTFILE_DIR ${CMAKE_CURRENT_BINARY_DIR}/cpp)
#c ++模式
set_property(SOURCE src/example.i PROPERTY CPLUSPLUS ON)
#开始生成
swig_add_library(example LANGUAGE python SOURCES src/example.i src/example.cxx)
之后我们重载CMake项目

然后点击build:

之后会生成:

把这几个文件复制到一个新建的文件夹里,然后再新建runme.py:

# file: runme.py

# This file illustrates the proxy class C++ interface generated
# by SWIG.

import example

# ----- Object creation -----

print("Creating some objects:")
c = example.Circle(10)
print("    Created circle", c)
s = example.Square(10)
print("    Created square", s)

# ----- Access a static member -----

print("\nA total of", example.cvar.Shape_nshapes, "shapes were created")

# ----- Member data access -----

# Set the location of the object

c.x = 20
c.y = 30

s.x = -10
s.y = 5

print("\nHere is their current position:")
print("    Circle = (%f, %f)" % (c.x, c.y))
print("    Square = (%f, %f)" % (s.x, s.y))

# ----- Call some methods -----

print("\nHere are some properties of the shapes:")

for o in [c, s]:
    print("   ", o)
    print("        area      = ", o.area())
    print("        perimeter = ", o.perimeter())
# prevent o from holding a reference to the last object looked at
o = None

print("\nGuess I'll clean up now")

# Note: this invokes the virtual destructor
del c
del s

print(example.cvar.Shape_nshapes, "shapes remain")
print("Goodbye")
运行runme:
Creating some objects:
    Created circle <example.Circle; proxy of <Swig Object of type 'Circle *' at 0x000002241AD71E70> >
    Created square <example.Square; proxy of <Swig Object of type 'Square *' at 0x000002241AD71BD0> >

A total of 2 shapes were created

Here is their current position:
    Circle = (20.000000, 30.000000)
    Square = (-10.000000, 5.000000)

Here are some properties of the shapes:
    <example.Circle; proxy of <Swig Object of type 'Circle *' at 0x000002241AD71E70> >
        area      =  314.1592653589793
        perimeter =  62.83185307179586
    <example.Square; proxy of <Swig Object of type 'Square *' at 0x000002241AD71BD0> >
        area      =  100.0
        perimeter =  40.0

Guess I'll clean up now
0 shapes remain
Goodbye

Process finished with exit code 0

开放原子开发者工作坊旨在鼓励更多人参与开源活动,与志同道合的开发者们相互交流开发经验、分享开发心得、获取前沿技术趋势。工作坊有多种形式的开发者活动,如meetup、训练营等,主打技术交流,干货满满,真诚地邀请各位开发者共同参与!
更多推荐
 已为社区贡献6条内容


所有评论(0)