如何使用wxPython GUI平台插件,快速实现开发python简单Application桌面应用程序
目前市面上大部分的桌面应用都是C#、C++、Java进行开发,这边的话,不推荐大家使用wxPython进行开发桌面应用,当然纯属兴趣可以尝试。wxPython 是什么?官方介绍给出了介绍wxPython是一个用于Python编程语言的跨平台GUI工具包。它允许Python程序员创建具有健壮、功能强大的图形用户界面的程序,简单而容易。它被实现为一组Python扩展模块,用来包装流行的wxWidget
1. wxPython前景介绍
目前市面上大部分的桌面应用都是C#、C++、Java进行开发,这边的话,不推荐大家使用wxPython进行开发桌面应用,当然纯属兴趣可以尝试。
wxPython 官网:https://wxpython.org/
wxPython 是什么?官方介绍给出了介绍
wxPython is a cross-platform GUI toolkit for the Python programming language. It allows Python programmers to create programs with a robust, highly functional graphical user interface, simply and easily.
wxPython是一个用于Python编程语言的跨平台GUI工具包。它允许Python程序员创建具有健壮、功能强大的图形用户界面的程序,简单而容易。
It is implemented as a set of Python extension modules that wrap the GUI components of the popular wxWidgets cross platform library, which is written in C++.
它被实现为一组Python扩展模块,用来包装流行的wxWidgets跨平台库的GUI组件,它是使用C++语言编写的。
2. wxPython工具包下载
安装 wxpython 第三方的库,国外的网站下载,速度肯定会很慢,建议使用镜像站进行下载。
常见 pip 镜像源 Mirror source(国内源)
清华镜像源:https://pypi.tuna.tsinghua.edu.cn/simple
阿里云镜像源:http://mirrors.aliyun.com/pypi/simple/
中国科技大学镜像源: https://pypi.mirrors.ustc.edu.cn/simple/
华中理工大学镜像源:http://pypi.hustunique.com/
山东理工大学镜像源:http://pypi.sdutlinux.org/
豆瓣镜像源:http://pypi.douban.com/simple/
临时使用 pip 镜像源可以在使用 pip 的时候加参数:-i https://pypi.tuna.tsinghua.edu.cn/simple
举例使用清华镜像源进行下载 wxPython
pip3 install wxPython -i https://pypi.tuna.tsinghua.edu.cn/simple
3. 创建HelloWorld案例
Every programming language and UI toolkit needs to have a Hello World example. I think it’s the law in most jurisdictions. Their intent is obviously to tell you everything you need to know in order to select the language or toolkit for your own use.
每种编程语言和UI工具包都需要有一个HelloWorld的示例。我认为这是大多数管辖的规范。他们的目的是清楚地去告诉你需要知道的一切,以便选择你自己使用的语言或工具包。
安装好界面库以后,我们先实现入门程序的制作:
# 先创建一个程序
app = wx.App()
# 创建完程序,下一步就是创建一个窗口(Frame)
frame = wx.Frame(None, title='helloworld', size=(300, 200))
# 创建完成窗口,我们想要显示结果怎么办?(Show)
frame.Show()
# 最后运行主程序MainLoop(),事件循环
app.MainLoop()
这边就是介绍下 Frame 类初始化的相关参数,这是类__init__的源码:
Param:title 生成GUI窗口的名称
Param:size 生成GUI窗口的尺寸,参数类型是 Turple 元组类型(窗口宽度,窗口高度)
def __init__(self, parent=None, id=None, title=None, pos=None, size=None, style=None, name=None):
	pass
# real signature unknown; restored from __doc__ with multiple overloads
运行结果展示如下所示:

Five lines of code to create and show a window, and run an event handler. That’s really all it takes.
What, you think 5 lines is too many? Okay, fine. Here it is in one line 😛 :
用于创建和显示一个窗口,并运行一个事件处理程序的五行代码。这就够了。什么,你觉得 5 行话太多了吗?好的,好的。这里是在一行😛:
import wx; a=wx.App(); wx.Frame(None, title='helloworld', size=(300, 200)).Show(); a.MainLoop()
4. 拓展HelloWorld案例
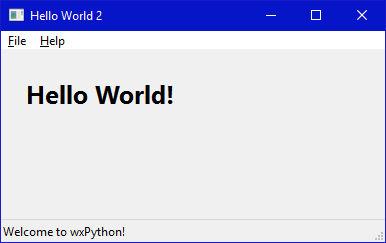
Okay, now let’s put a little more flesh on the bones of that Hello World sample to give a little better idea of what creating a wxPython application is all about. The finished application looks like these screenshots when run:
好了,现在让我们在HelloWorld示例的骨骼上多加一些肉,以便更好地了解创建wxPython应用程序是什么。完成的应用程序在运行时看起来像这些屏幕截图:

And here is the source code. The docstrings and the comments in the code will help you understand what it is doing.
然后这边就是源代码,代码中的文档字符串和其中的注释将帮助您理解它在做什么。
#!/usr/bin/env python
"""
Hello World, but with more meat.
"""

import wx

class HelloFrame(wx.Frame):
    """
    A Frame that says Hello World
    """

    def __init__(self, *args, **kw):
        # ensure the parent's __init__ is called
        super(HelloFrame, self).__init__(*args, **kw)

        # create a panel in the frame 在框架中创建一个面板
        pnl = wx.Panel(self)

        # put some text with a larger bold font on it 在他上面放一些加粗的文字
        st = wx.StaticText(pnl, label="Hello World!")
        font = st.GetFont()
        font.PointSize += 10
        font = font.Bold()
        st.SetFont(font)

        # and create a sizer to manage the layout of child widgets
        sizer = wx.BoxSizer(wx.VERTICAL)
        sizer.Add(st, wx.SizerFlags().Border(wx.TOP|wx.LEFT, 25))
        pnl.SetSizer(sizer)

        # create a menu bar
        self.makeMenuBar()

        # and a status bar
        self.CreateStatusBar()
        self.SetStatusText("Welcome to wxPython!")


    def makeMenuBar(self):
        """
        A menu bar is composed of menus, which are composed of menu items.
        This method builds a set of menus and binds handlers to be called
        when the menu item is selected.
        菜单栏由菜单组成,菜单由菜单项组成。此方法构建一组菜单,
        并绑定在选择菜单项时调用的处理程序。
        """

        # Make a file menu with Hello and Exit items
        fileMenu = wx.Menu()
        # The "\t..." syntax defines an accelerator key that also triggers
        # the same event
        helloItem = fileMenu.Append(-1, "&Hello...\tCtrl-H",
                "Help string shown in status bar for this menu item")
        fileMenu.AppendSeparator()
        # When using a stock ID we don't need to specify the menu item's
        # label
        exitItem = fileMenu.Append(wx.ID_EXIT)

        # Now a help menu for the about item
        helpMenu = wx.Menu()
        aboutItem = helpMenu.Append(wx.ID_ABOUT)

        # Make the menu bar and add the two menus to it. The '&' defines
        # that the next letter is the "mnemonic" for the menu item. On the
        # platforms that support it those letters are underlined and can be
        # triggered from the keyboard.
        menuBar = wx.MenuBar()
        menuBar.Append(fileMenu, "&File")
        menuBar.Append(helpMenu, "&Help")

        # Give the menu bar to the frame
        self.SetMenuBar(menuBar)

        # Finally, associate a handler function with the EVT_MENU event for
        # each of the menu items. That means that when that menu item is
        # activated then the associated handler function will be called.
        self.Bind(wx.EVT_MENU, self.OnHello, helloItem)
        self.Bind(wx.EVT_MENU, self.OnExit,  exitItem)
        self.Bind(wx.EVT_MENU, self.OnAbout, aboutItem)


    def OnExit(self, event):
        """Close the frame, terminating the application."""
        self.Close(True)


    def OnHello(self, event):
        """Say hello to the user."""
        wx.MessageBox("Hello again from wxPython")


    def OnAbout(self, event):
        """Display an About Dialog"""
        wx.MessageBox("This is a wxPython Hello World sample",
                      "About Hello World 2",
                      wx.OK|wx.ICON_INFORMATION)


if __name__ == '__main__':
    # When this module is run (not imported) then create the app, the
    # frame, show it, and start the event loop.
    app = wx.App()
    frm = HelloFrame(None, title='Hello World 2')
    frm.Show()
    app.MainLoop()
之前有评论区留言super().__init__()方法的作用,这边介绍下:
class Person(object):
    def __init__(self,name,gender,age):
        self.name = name
        self.gender = gender
        self.age = age

class Student(Person):
    def __init__(self,name,gender,age,school,score):
        super(Student,self).__init__(name,gender,age)
        self.school = school
        self.age = age

s = Student('Alice','female',18,'Middle school',87)
print (s.school) # Middle school
print (s.name) # Alice
可见
super().__init__()可以继承父类的初始化方式,也就是不只是运行子类,还运行了父类。
5. Frame类中的事件介绍
上面 拓展 HelloWorld 案例中的相关函数,简单的介绍下,具体是什么意思,如何去使用。
我们可以独立去写相关的GUI组件,这些组件采用函数定义的形式,并且需要在__init__初始化中被调用。

事件是一个图形界面程序的核心部分,任何图形界面程序都是事件驱动的。
事件可以有多重产生方式,大部分是用户触发的,也有可能由其他方式产生,比如网络连接、窗口管理和计时器调用等。
关于事件,这里面有几个过程和要素:
事件循环Event Loop(比如 wxPython 的 MainLoop() 方法),它一直在寻找和捕获事件Event(比如 wx.EVT_SIZE 、wx.EVT_CLOSE 等);
当捕获到事件后,就通过分发器 dispatcher 将事件分发到事件句柄 Event Handler(事件句柄是对事件进行响应的动作方法);
事件本身与事件句柄的映射由 Event Binder 来完成(即 Bind() 方法)。
对用户编程来说,最常打交道的就是Bind()方法:
Bind(event, handler, source=None, id=wx.ID_ANY, id2=wx.ID_ANY)
6. wxPython控件介绍
首先开发都有有个模板方便我们代码的编写,我这边已经写好了,代码如下所示:
import wx  # 导入wx

class HelloFrame(wx.Frame):
    def __init__(self, *args, **kw):
        # ensure the parent's __init__ is called
        super(HelloFrame, self).__init__(*args, **kw)
        """
        	进行功能的拓展区域
		"""

if __name__ == '__main__':
    # When this module is run (not imported) then create the app, the
    # frame, show it, and start the event loop.
    app = wx.App()
    frm = HelloFrame(None, title='Hello World')
    frm.Show()
    app.MainLoop()
那么想要装饰GUI的功能与内容,就需要我们的空间来完成了,这边举例了我们在日常开发中所需要的常见一些控件,我们在进行pythonGUI开发中会用到的。
| 控件名称 | 控件使用介绍 |
|---|---|
| wx.Frame | wx.Frame类是不带参数的默认构造函数。 |
| wx.Panel | wx.Panel类通常是一个放入wxFrame中的对象。 这个类也继承自wxWindow类。 |
| wx.StaticText | wx.StaticText类对象提供了一个控制持有比如只读文本。它可以被称作被动控制,因为它不产生任何事件。 |
| wx.TextCtrl | wx.TextCtrl类对象用于此目的。它控制在其中可以显示文本和编辑。 |
| wx.RadioButton & wx.RadioBox | 每个按钮,wx.RadioButton类的一个对象携带旁边有一个圆形按钮文本标签。wxPython的API还包括wx.RadioBox类。它的对象提供了一个边框和标签组。 |
| wx.CheckBox | wx.CheckBox是一个复选框显示一个小标记的矩形框。单击时,复选标记出现在矩形内,指示作出选择。 |
| wx.ComboBox & wx.Choice | 一个wx.ComboBox对象提供选择项目列表。它可以配置为一个下拉列表或永久性的显示。wxPython的API包含一个wx.Choice类,其目的也是一个下拉列表中,这是永久只读。 |
| wx.Gauge | wx.Gauge类对象表示垂直或水平条,其中以图形方式显示递增量。 |
| wx.Slider | wxPython的API包含wx.Slider类。它提供了滚动条相同的功能。滑动器提供了一个方便的方式来处理由滑块具体wx.EVT_SLIDER事件绑定拖动句柄。 |
| wx.MenuBar | 略低于顶层窗口的标题栏中的横条保留,以显示一系列菜单。这是wx.MenuBar类在wxPython API的对象。 |
| wx.Toolbar | 如果wx.Toolbar对象的样式参数设置为wx.TB_DOCKABLE,它成为可停靠。浮动工具栏还可以用wxPython中的AUIToolBar类构造。 |
| wx.Dialog | 虽然一个对话框Dialog类对象出现像Frame,它通常被用作上的父框架的顶部上的弹出窗口。一个对话框(Dialog)的目的是从用户收集一些数据并将其发送到父帧(frame)。 |
| wx.Notebook | wx.Notebook小部件提供了一个标签式的控制。在一个帧(Frame)中的一个笔记本对象具有一个或多个切换标签(称为页),其中每一个具有一个面板显示出的控制布局。 |
| wx.SplitterWindow | 这个类的对象是一个布局管理器,它拥有两个子窗口,大小可以通过拖动它们之间的边界动态变化。分离器控制给出了可拖动来调整控件的句柄。 |
| wx.HTMLWindow | wxHTML库中包含用于解析和显示HTML内容。 虽然这不打算成为一个全功能的浏览器,wx.HtmlWindow对象是一个通用的HTML浏览器。 |
| wx.ListBox & wx.ListCtrl | 一个wx.ListBox控件呈现字符串的垂直滚动列表。 默认情况下,在列表中的单个产品选择。ListCtrl控件是一个高度增强列表显示和选择工具。多个列的列表可以显示在报表视图,列表视图或图标视图。 |
7. 制作记事本GUI程序
接下来,我们制作一些简单的桌面应用小案例,方便大家的学习与测试,首先我们制作一个记事本功能的gui案例,实现和Notepad类似功能的小程序。
记事本GUI桌面应用制作如下:
class HelloFrame(wx.Frame):
    def __init__(self, *args, **kw):
        # ensure the parent's __init__ is called
        super(HelloFrame, self).__init__(*args, **kw)
        self.input = wx.TextCtrl(self, style=wx.TE_MULTILINE)
        self.Show(True)
在这个例子中,我们生成一个wx.Frame的子类,并重写它的__init__ 方法。我们用wx.TextCtrl来声明一个简单的文本编辑器。注意,因为在MyFrame.__init__中已经运行了self.Show() ,所以在创建MyFrame的实例之后,就不用再调用frame.Show()了。

为记事本添加菜单栏MenuBar
所有的应用程序都会有一个菜单栏,和一个状态栏。让我们来给这个记事本程序添加一个:
class HelloFrame(wx.Frame):
    def __init__(self, *args, **kw):
        # ensure the parent's __init__ is called
        super(HelloFrame, self).__init__(*args, **kw)
        self.input = wx.TextCtrl(self, style=wx.TE_MULTILINE)
        self.CreateStatusBar()  # 创建位于窗口的底部的状态栏

        # 设置菜单
        filemenu = wx.Menu()

        # wx.ID_ABOUT和wx.ID_EXIT是wxWidgets提供的标准ID
        filemenu.Append(wx.ID_ABOUT, "关于", "关于程序的信息")
        filemenu.Append(wx.ID_EXIT, "退出", "终止应用程序")

        # 创建菜单栏
        menuBar = wx.MenuBar()
        menuBar.Append(filemenu, "文件")
        self.SetMenuBar(menuBar)
        self.Show(True)
代码运行结果展示如下所示:当我们鼠标点击文件,光标选中“关于”,在底部状态栏会出现相关的信息“关于程序的信息”,大家可以运行自己测试。


开放原子开发者工作坊旨在鼓励更多人参与开源活动,与志同道合的开发者们相互交流开发经验、分享开发心得、获取前沿技术趋势。工作坊有多种形式的开发者活动,如meetup、训练营等,主打技术交流,干货满满,真诚地邀请各位开发者共同参与!
更多推荐
 1
1 0
0- 0


 已为社区贡献19条内容

所有评论(0)