
VOC数据集和COCO数据集直接的相互转换
VOC数据集(xml格式)和COCO数据集(json格式)的相互转换我们先来看看voc和coco数据集的目录结构:以VOC2012数据集为例,下载下来有如下五个文件夹:Annotations文件夹是存放图片对应的xml文件,比如“2007_000027.xml"存放的是图片2007_000027.jpg对应的信息,用记事本打开可以看到,这是xml格式的数据。ImageSets文件夹里存放了官方为我
VOC数据集(xml格式)和COCO数据集(json格式)的相互转换
我们先来看看voc和coco数据集的目录结构:
以VOC2012数据集为例,下载下来有如下五个文件夹:
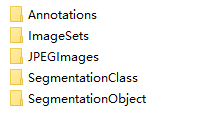
Annotations文件夹是存放图片对应的xml文件,比如“2007_000027.xml"存放的是图片2007_000027.jpg对应的信息,用记事本打开可以看到,这是xml格式的数据。
ImageSets文件夹里存放了官方为我们划分好的训练集和验证集的txt文件。我们主要使用“ImageSets/Main/"文件夹下的train.txt和val.txt文件,train.txt文件存放了官方划分的训练集的图片名称,val.txt文件存放了验证集图片的名称。
还有一个需要关注的文件夹就是JEPGImages,里面存放了对应图片名称的原始图片。剩下的两个文件夹我们就不需要特别关注了。
接下来我们来看看voc数据集的xml文件里面都有哪些信息。
<annotation>
    <folder>文件夹目录</folder>
    <filename>图片名.jpg</filename>
    <path>path_to\at002eg001.jpg</path>
    <source>
        <database>Unknown</database>
    </source>
    <size>
        <width>550</width>
        <height>518</height>
        <depth>3</depth>
    </size>
    <segmented>0</segmented>
    <object>
        <name>Apple</name>
        <pose>Unspecified</pose>
        <truncated>0</truncated>
        <difficult>0</difficult>
        <bndbox>
            <xmin>292</xmin>
            <ymin>218</ymin>
            <xmax>410</xmax>
            <ymax>331</ymax>
        </bndbox>
    </object>
    <object>
        ...
    </object>
</annotation>
可以看到一个xml文件包含如下信息:
- folder: 文件夹
- filename:文件名
- path:路径
- source:来源
- size:图片大小
- segmented:图像分割会用到,本文仅以目标检测(bounding box为例进行介绍)
- object:一个xml文件可以有多个object,每个object表示一个box,每个box有如下信息组成:
- name:改box框出来的object属于哪一类,例如Apple
- bndbox:给出左上角和右下角的坐标
- truncated:是否被截
- difficult:是否为检测困难物体
不同于VOC,一张图片对应一个xml文件,coco是直接将所有图片以及对应的box信息写在了一个json文件里。通常整个coco目录长这样:
coco
|______annotations # 存放标注信息
|        |__train.json
|        |__val.json
|        |__test.json
|______trainset # 存放训练集图像
|______valset   # 存放验证集图像
|______testset  # 存放测试集图像
一个标准的json文件包含如下信息:
{
    "info" : info,
    "licenses" : [license],
    "images" : [image],
    "annotations" : [annataton],
    "categories" : [category]
}
通过上面的json整体结构可以看出,info这个key对应的值的类型是一个字典;licenses、images、annotations和categories这四个key对应的值的类型都是一个列表,列表当中存储的数据类型依旧是字典。
我们可以通过len(List)的方式得到images、annotations、categories这三个列表的长度,也就得到了以下内容。
(1)images字段列表元素的长度 = 划入训练集(或者测试集)的图片的数量;
(2)annotations字段列表元素的数量 = 训练集(或者测试集)中bounding box的数量;
(3)categories字段列表元素的数量 = 类别的数量
接下来我们看每个key对应的内容:
(1)info
info{
"year" : int,                # 年份
"version" : str,             # 版本
"description" : str,         # 详细描述信息
"contributor" : str,         # 作者
"url" : str,                 # 协议链接
"date_created" : datetime,   # 生成日期
}
(2)images
"images": [
{"id": 0,                                                # int 图像id,可从0开始
 "file_name": "0.jpg",                                   # str 文件名
 "width": 512,                                           # int 图像的宽
 "height": 512,                                          # int 图像的高
 "date_captured": "2020-04-14 01:45:07.508146",          # datatime 获取日期
 "license": 1,                                           # int 遵循哪个协议
 "coco_url": "",                                         # str coco图片链接url
 "flickr_url": ""                                        # str flick图片链接url
}]
(3)licenses
 "licenses": [
{
 "id": 1,                                            # int 协议id号      在images中遵循的license即1
 "name": null,                                       # str 协议名
 "url": null                                         # str 协议链接
}]
(4)annotations
"annotations": [
{
 "id": 0,                                   # int 图片中每个被标记物体的id编号
 "image_id": 0,                             # int 该物体所在图片的编号
 "category_id": 2,                          # int 被标记物体的类别id编号
 "iscrowd": 0,                              # 0 or 1 目标是否被遮盖,默认为0
 "area": 4095.9999999999986,                # float 被检测物体的面积(64 * 64 = 4096)
 "bbox": [200.0, 416.0, 64.0, 64.0],        # [x, y, width, height] 目标检测框的坐标信息
 "segmentation": [[200.0, 416.0, 264.0, 416.0, 264.0, 480.0, 200.0, 480.0]]
}]
"bbox"里[x, y, width, height]x, y代表的是物体的左上角的x, y的坐标值。
"segmentation"里[x1, y1, x2, y2, x3, y3, x4, y4]是以左上角坐标为起始,顺时针依次选取的另外三个坐标点。及[左上x, 左上y, 右上x,右上y,右下x,右下y,左下x,左下y]。
(5)categories
"categories":[
{
 "id": 1,                                 # int 类别id编号
 "name": "rectangle",                     # str 类别名字
 "supercategory": "None"                  # str 类别所属的大类,如卡车和轿车都属于机动车这个class
},
{
 "id": 2,
 "name": "circle",
 "supercategory": "None"
 }
]
一、将voc数据集的xml转化为coco数据集的json格式
开始转换前,得先将要转化的所有.xml文件名保存在xml_list.txt列表中。如果是自己制作的voc数据集,在输入标签名的时候记得不要把类别名name打错了。
# create_xml_list.py
import os
xml_list = os.listdir('C:/Users/user/Desktop/train')
with open('C:/Users/user/Desktop/xml_list.txt','a') as f:
    for i in xml_list:
        if i[-3:]=='xml':
            f.write(str(i)+'\n')
执行python voc2coco.py xml_list.txt的文件路径 .xml文件的真实存放路径 转化后的.json存放路径即可将xml转化为一个.json文件。
# voc2coco.py

# pip install lxml

import sys
import os
import json
import xml.etree.ElementTree as ET

START_BOUNDING_BOX_ID = 1
PRE_DEFINE_CATEGORIES = {}
# If necessary, pre-define category and its id
#  PRE_DEFINE_CATEGORIES = {"aeroplane": 1, "bicycle": 2, "bird": 3, "boat": 4,
                         #  "bottle":5, "bus": 6, "car": 7, "cat": 8, "chair": 9,
                         #  "cow": 10, "diningtable": 11, "dog": 12, "horse": 13,
                         #  "motorbike": 14, "person": 15, "pottedplant": 16,
                         #  "sheep": 17, "sofa": 18, "train": 19, "tvmonitor": 20}


def get(root, name):
    vars = root.findall(name)
    return vars


def get_and_check(root, name, length):
    vars = root.findall(name)
    if len(vars) == 0:
        raise NotImplementedError('Can not find %s in %s.'%(name, root.tag))
    if length > 0 and len(vars) != length:
        raise NotImplementedError('The size of %s is supposed to be %d, but is %d.'%(name, length, len(vars)))
    if length == 1:
        vars = vars[0]
    return vars


def get_filename_as_int(filename):
    try:
        filename = os.path.splitext(filename)[0]
        return int(filename)
    except:
        raise NotImplementedError('Filename %s is supposed to be an integer.'%(filename))


def convert(xml_list, xml_dir, json_file):
    list_fp = open(xml_list, 'r')
    json_dict = {"images":[], "type": "instances", "annotations": [],
                 "categories": []}
    categories = PRE_DEFINE_CATEGORIES
    bnd_id = START_BOUNDING_BOX_ID
    for line in list_fp:
        line = line.strip()
        print("Processing %s"%(line))
        xml_f = os.path.join(xml_dir, line)
        tree = ET.parse(xml_f)
        root = tree.getroot()
        path = get(root, 'path')
        if len(path) == 1:
            filename = os.path.basename(path[0].text)
        elif len(path) == 0:
            filename = get_and_check(root, 'filename', 1).text
        else:
            raise NotImplementedError('%d paths found in %s'%(len(path), line))
        ## The filename must be a number
        image_id = get_filename_as_int(filename)
        size = get_and_check(root, 'size', 1)
        width = int(get_and_check(size, 'width', 1).text)
        height = int(get_and_check(size, 'height', 1).text)
        image = {'file_name': filename, 'height': height, 'width': width,
                 'id':image_id}
        json_dict['images'].append(image)
        ## Cruuently we do not support segmentation
        #  segmented = get_and_check(root, 'segmented', 1).text
        #  assert segmented == '0'
        for obj in get(root, 'object'):
            category = get_and_check(obj, 'name', 1).text
            if category not in categories:
                new_id = len(categories)
                categories[category] = new_id
            category_id = categories[category]
            bndbox = get_and_check(obj, 'bndbox', 1)
            xmin = int(get_and_check(bndbox, 'xmin', 1).text) - 1
            ymin = int(get_and_check(bndbox, 'ymin', 1).text) - 1
            xmax = int(get_and_check(bndbox, 'xmax', 1).text)
            ymax = int(get_and_check(bndbox, 'ymax', 1).text)
            assert(xmax > xmin)
            assert(ymax > ymin)
            o_width = abs(xmax - xmin)
            o_height = abs(ymax - ymin)
            ann = {'area': o_width*o_height, 'iscrowd': 0, 'image_id':
                   image_id, 'bbox':[xmin, ymin, o_width, o_height],
                   'category_id': category_id, 'id': bnd_id, 'ignore': 0,
                   'segmentation': []}
            json_dict['annotations'].append(ann)
            bnd_id = bnd_id + 1

    for cate, cid in categories.items():
        cat = {'supercategory': 'none', 'id': cid, 'name': cate}
        json_dict['categories'].append(cat)
    json_fp = open(json_file, 'w')
    json_str = json.dumps(json_dict)
    json_fp.write(json_str)
    json_fp.close()
    list_fp.close()


if __name__ == '__main__':
    if len(sys.argv) <= 1:
        print('3 auguments are need.')
        print('Usage: %s XML_LIST.txt XML_DIR OUTPU_JSON.json'%(sys.argv[0]))
        exit(1)

    convert(sys.argv[1], sys.argv[2], sys.argv[3])
注意这里的image_id用的是图片名称去掉.jpg,所以图片名必须是数字,如果不是,先将所有图片和label名称改成数字,再转coco。
import os
img_dir='F:/Billboard/dataset/images/'
lab_dir='F:/Billboard/dataset/labels/'
name_list = os.listdir(img_dir)
for i,name in enumerate(name_list):
    os.rename(img_dir+name,img_dir+str(i)+'.jpg')
    os.rename(lab_dir+name[:-4]+'.txt',lab_dir+str(i)+'.txt')
如果报错ValueError: invalid literal for int() with base 10: '99.2',原因是我们的坐标值是浮点数字符串,而int只能转化整型字符串,这时坐标值得先用float将浮点数字符串转成浮点数,再用int将浮点数转成整数。
xmin = int(float(get_and_check(bndbox, 'xmin', 1).text)) - 1
ymin = int(float(get_and_check(bndbox, 'ymin', 1).text)) - 1
xmax = int(float(get_and_check(bndbox, 'xmax', 1).text))
ymax = int(float(get_and_check(bndbox, 'ymax', 1).text))
二、将COCO格式的json文件转化为VOC格式的xml文件
如果是要将COCO格式的json文件转化为VOC格式的xml文件,将anno和xml_dir改成json文件路径和转化后的xml文件保存路径,执行下面代码即可完成转化。
# coco2voc.py

# pip install pycocotools
import os
import time
import json
import pandas as pd
from tqdm import tqdm
from pycocotools.coco import COCO

#json文件路径和用于存放xml文件的路径
anno = 'C:/Users/user/Desktop/val/instances_val2017.json'
xml_dir = 'C:/Users/user/Desktop/val/xml/'

coco = COCO(anno)  # 读文件
cats = coco.loadCats(coco.getCatIds())  # 这里loadCats就是coco提供的接口,获取类别

# Create anno dir
dttm = time.strftime("%Y%m%d%H%M%S", time.localtime())

def trans_id(category_id):
    names = []
    namesid = []
    for i in range(0, len(cats)):
        names.append(cats[i]['name'])
        namesid.append(cats[i]['id'])
    index = namesid.index(category_id)
    return index


def convert(anno,xml_dir):

    with open(anno, 'r') as load_f:
        f = json.load(load_f)

    imgs = f['images']  #json文件的img_id和图片对应关系 imgs列表表示多少张图

    cat = f['categories']
    df_cate = pd.DataFrame(f['categories'])                     # json中的类别
    df_cate_sort = df_cate.sort_values(["id"], ascending=True)  # 按照类别id排序
    categories = list(df_cate_sort['name'])                     # 获取所有类别名称
    print('categories = ', categories)
    df_anno = pd.DataFrame(f['annotations'])                    # json中的annotation

    for i in tqdm(range(len(imgs))):  # 大循环是images所有图片,Tqdm是可扩展的Python进度条,可以在长循环中添加一个进度提示信息
        xml_content = []
        file_name = imgs[i]['file_name']    # 通过img_id找到图片的信息
        height = imgs[i]['height']
        img_id = imgs[i]['id']
        width = imgs[i]['width']

        version =['"1.0"','"utf-8"']

        # xml文件添加属性
        xml_content.append("<?xml version=" + version[0] +" "+ "encoding="+ version[1] + "?>")
        xml_content.append("<annotation>")
        xml_content.append("    <filename>" + file_name + "</filename>")
        xml_content.append("    <size>")
        xml_content.append("        <width>" + str(width) + "</width>")
        xml_content.append("        <height>" + str(height) + "</height>")
        xml_content.append("        <depth>"+ "3" + "</depth>")
        xml_content.append("    </size>")

        # 通过img_id找到annotations
        annos = df_anno[df_anno["image_id"].isin([img_id])]  # (2,8)表示一张图有两个框

        for index, row in annos.iterrows():  # 一张图的所有annotation信息
            bbox = row["bbox"]
            category_id = row["category_id"]
            cate_name = categories[trans_id(category_id)]

            # add new object
            xml_content.append("    <object>")
            xml_content.append("        <name>" + cate_name + "</name>")
            xml_content.append("        <truncated>0</truncated>")
            xml_content.append("        <difficult>0</difficult>")
            xml_content.append("        <bndbox>")
            xml_content.append("            <xmin>" + str(int(bbox[0])) + "</xmin>")
            xml_content.append("            <ymin>" + str(int(bbox[1])) + "</ymin>")
            xml_content.append("            <xmax>" + str(int(bbox[0] + bbox[2])) + "</xmax>")
            xml_content.append("            <ymax>" + str(int(bbox[1] + bbox[3])) + "</ymax>")
            xml_content.append("        </bndbox>")
            xml_content.append("    </object>")
        xml_content.append("</annotation>")

        x = xml_content
        xml_content = [x[i] for i in range(0, len(x)) if x[i] != "\n"]
        ### list存入文件
        #xml_path = os.path.join(xml_dir, file_name.replace('.xml', '.jpg'))
        xml_path = os.path.join(xml_dir, file_name.split('j')[0]+'xml')
        print(xml_path)
        with open(xml_path, 'w+', encoding="utf8") as f:
            f.write('\n'.join(xml_content))
        xml_content[:] = []

if __name__ == '__main__':
    convert(anno,xml_dir)
三、将 txt 文件转换为 Pascal VOC 的 XML 格式
比如从OpenImageV5下载下来的BIllboard数据集,目录如下:
Billboard
|______images # 存放训练集图像
|        |__train
		       |__train.jpg
|        |__val
               |__val.jpg
|______labels # 存放标注信息
|        |__train
		       |__train.txt
|        |__val
               |__val.txt
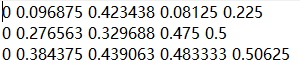
每一副图像所对应的txt里面的内容对应目标的坐标信息。这里0后面四个值为用长宽归一化了的x1,x2,y1,y2。如下图所示,0表示只有billboard一个类别。
将 txt 文件转换为 Pascal VOC 的 XML 格式的代码如下:
#! /usr/bin/python
# -*- coding:UTF-8 -*-
import os, sys
import glob
from PIL import Image

# VEDAI 图像存储位置
src_img_dir = "F:/Billboard/dataset/images/val"
# VEDAI 图像的 ground truth 的 txt 文件存放位置
src_txt_dir = "F:/Billboard/dataset/labels/val"
src_xml_dir = "F:/Billboard/dataset/xml/val"
name=['billboard']

img_Lists = glob.glob(src_img_dir + '/*.jpg')

img_basenames = [] # e.g. 100.jpg
for item in img_Lists:
    img_basenames.append(os.path.basename(item))

img_names = [] # e.g. 100
for item in img_basenames:
    temp1, temp2 = os.path.splitext(item)
    img_names.append(temp1)

for img in img_names:
    im = Image.open((src_img_dir + '/' + img + '.jpg'))
    width, height = im.size

    # open the crospronding txt file
    gt = open(src_txt_dir + '/' + img + '.txt').read().splitlines()
    #gt = open(src_txt_dir + '/gt_' + img + '.txt').read().splitlines()

    # write in xml file
    #os.mknod(src_xml_dir + '/' + img + '.xml')
    xml_file = open((src_xml_dir + '/' + img + '.xml'), 'w')
    xml_file.write('<annotation>\n')
    xml_file.write('    <folder>VOC2007</folder>\n')
    xml_file.write('    <filename>' + str(img) + '.jpg' + '</filename>\n')
    xml_file.write('    <size>\n')
    xml_file.write('        <width>' + str(width) + '</width>\n')
    xml_file.write('        <height>' + str(height) + '</height>\n')
    xml_file.write('        <depth>3</depth>\n')
    xml_file.write('    </size>\n')

    # write the region of image on xml file
    for img_each_label in gt:
        spt = img_each_label.split(' ') #这里如果txt里面是以逗号‘,’隔开的,那么就改为spt = img_each_label.split(',')。
        xml_file.write('    <object>\n')
        xml_file.write('        <name>' + str(name[int(spt[0])]) + '</name>\n')
        xml_file.write('        <pose>Unspecified</pose>\n')
        xml_file.write('        <truncated>0</truncated>\n')
        xml_file.write('        <difficult>0</difficult>\n')
        xml_file.write('        <bndbox>\n')
        xml_file.write('            <xmin>' + str(float(spt[1])*width) + '</xmin>\n')
        xml_file.write('            <ymin>' + str(float(spt[3])*height) + '</ymin>\n')
        xml_file.write('            <xmax>' + str(float(spt[2])*width) + '</xmax>\n')
        xml_file.write('            <ymax>' + str(float(spt[4])*height) + '</ymax>\n')
        xml_file.write('        </bndbox>\n')
        xml_file.write('    </object>\n')

    xml_file.write('</annotation>')
至此,我们基本能够应对目标检测常用到的数据转化了,不管我们拿到的是什么数据集,VOC也好,COCO也罢,亦或是各种txt格式,我们都可以用上面的方法转成我们所需要的数据集。至于自己制作数据集,也很简单,篇幅有限,下一篇再总结了。。。

瓜分20万奖金 获得内推名额 丰厚实物奖励 易参与易上手
更多推荐

 18
18 0
0- 0


 已为社区贡献1条内容

所有评论(0)