C++网络编程 - Boost::asio异步网络编程 - 01- boost库源码编译安装
知识的学习在于点滴记录,坚持不懈;知识的学习要有深度和广度,不能只流于表面,坐井观天;知识要善于总结,不仅能够理解,更知道如何表达!目录如果需要录屏资料,请私信邮箱shitou3000@qq.com获取。...
Boost::asio还没有正式的成为C++标准库,因此如果使用Boost::asio进行网络I/O编程,需要先在当前系统平台上安装boost库相关的头文件和lib库文件,我们采用的是boost库源码编译安装,这篇文章主要介绍在Windows和Linux环境下安装boost库。
WIndows和Linux平台的boost源码包下载云盘链接(zip是Windows版,tar.gz是Linux版,你也可以去boost官网下载最新版本):
链接:https://pan.baidu.com/s/11tNt-GNmt1xw_fGQ-tARgA 提取码:7yb9
Boost开发环境搭建
Windows VS2017 Boost库环境搭建
下载boost库的源码压缩包boost_1_69_0.zip,解压后,打开VS的工具命令行(注意不是Windows的cmd),切换到boost源码包路径下,执行bootstrap.bat这个批处理文件,等待一会儿,打印如下:
D:\资料\c++资料\boost_1_69_0>bootstrap.bat
Building Boost.Build engine
Bootstrapping is done. To build, run:
.\b2
To adjust configuration, edit ‘project-config.jam’.
Further information:
- Command line help:
.\b2 --help

- Getting started guide:
http://boost.org/more/getting_started/windows.html

- Boost.Build documentation:
http://www.boost.org/build/doc/html/index.html
会在boost源码路径下生成b2.exe文件,默认执行b2.exe(它有很多参数,简单起见这里直接默认执行,不带任何参数),如下:
D:\资料\c++资料\boost_1_69_0>b2.exe
Performing configuration checks
- default address-model    : 32-bit
- default architecture     : x86
… 然后就开始boost库源代码编译工作,源码比较大,这里编译时间较长,编译完成打印如下:
…updated 2411 targets…
The Boost C++ Libraries were successfully built!
The following directory should be added to compiler include paths:
D:\资料\c++资料\boost_1_69_0
The following directory should be added to linker library paths:
D:\资料\c++资料\boost_1_69_0\stage\lib
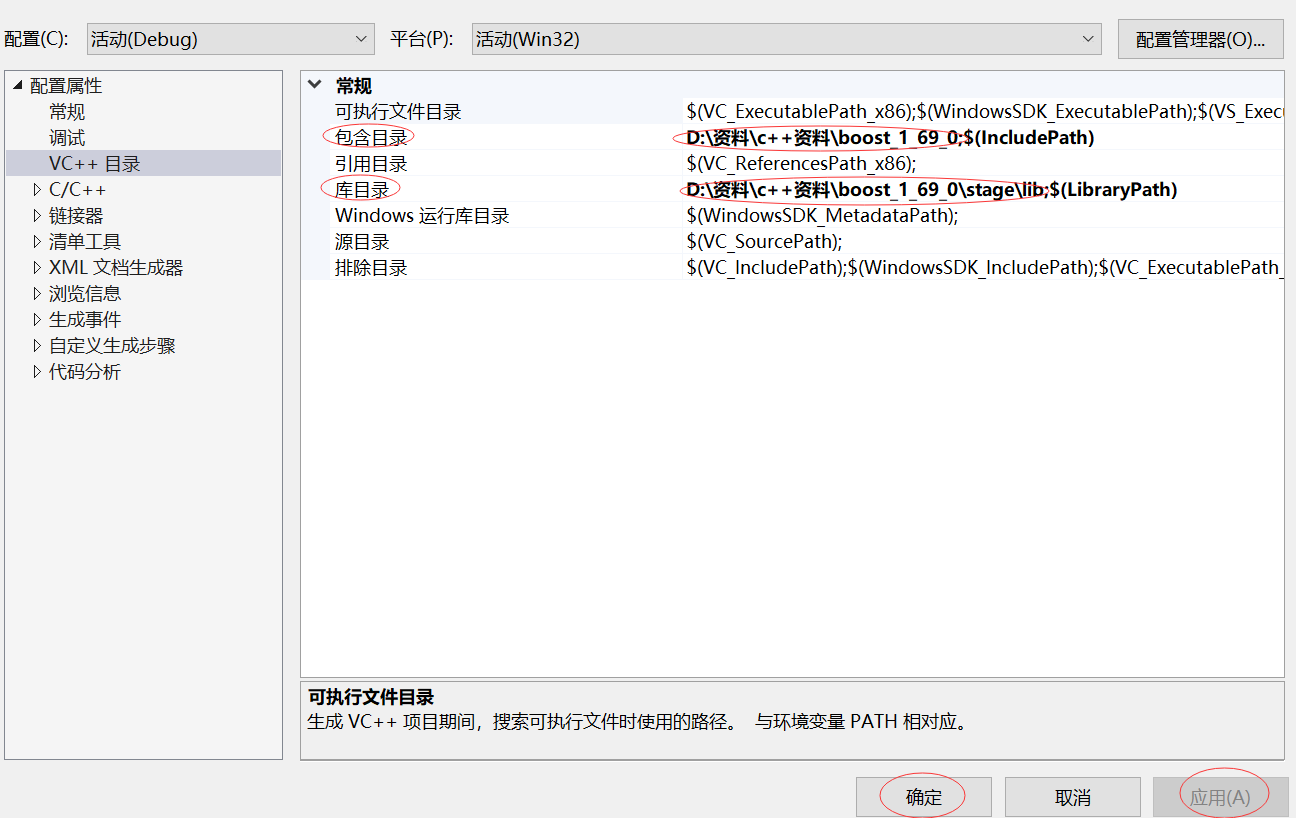
注意上面的两个路径,我们在VS的C++工程上开发Boost相关的项目需要进行一些配置,需要上面的这两个路径信息,第一个是boost库头文件的路径,第二个是boost lib库文件的路径,默认编译出来的是静态链接库。
验证安装boost是否成功,通过下面的代码验证一下:
VS创建C++项目,打开项目“属性”,把上面的两条路径信息添加到项目属性的包含目录和库目录里面,如下:

然后编写如下代码,测试boost库是否能够正常使用:
#include <iostream>
#include <boost/bind.hpp>
#include <string>
using namespace std;

class Hello
{
public:
	void say(string name)
	{ cout << name << " say: hello world!" << endl; }
};

int main()
{
	Hello h;
	auto func = boost::bind(&Hello::say, &h, "zhang san");
	func();
	return 0;
}
打印如下:
zhang san say: hello world!
至此,Windows下的boost库安装成功,可以正常使用!
Linux下 Boost库环境搭建
Linux上安装boost库的步骤大致和Windows系统上一样。先把Linux系统下的boost源码包boost_1_69_0.tar.gz拷贝到某一指定路径下,然后解压,如下:
tony@tony-virtual-machine:~/package$ ls
boost_1_69_0.tar.gz
tony@tony-virtual-machine:~/package$ tar -zxvf boost_1_69_0.tar.gz
tar解压完成后,进入源码文件目录,查看内容:
tony@tony-virtual-machine:~/package$ ls
boost_1_69_0  boost_1_69_0.tar.gz
tony@tony-virtual-machine:~/package$ cd boost_1_69_0/
tony@tony-virtual-machine:~/package/boost_1_69_0$ ls
boost            boostcpp.jam  boost.png      bootstrap.sh  index.htm   INSTALL  libs             more     status
boost-build.jam  boost.css     bootstrap.bat  doc           index.html  Jamroot  LICENSE_1_0.txt  rst.css  tools
运行bootstrap.sh工程编译构建程序,需要等待一会儿,查看目录:
tony@tony-virtual-machine:~/package/boost_1_69_0$ ./bootstrap.sh
Building Boost.Build engine with toolset gcc... tools/build/src/engine/bin.linuxx86_64/b2
Unicode/ICU support for Boost.Regex?... not found.
Generating Boost.Build configuration in project-config.jam...

Bootstrapping is done. To build, run:

    ./b2

To adjust configuration, edit 'project-config.jam'.
Further information:

   - Command line help:
     ./b2 --help

   - Getting started guide:
     http://www.boost.org/more/getting_started/unix-variants.html

   - Boost.Build documentation:
     http://www.boost.org/build/doc/html/index.html

tony@tony-virtual-machine:~/package/boost_1_69_0$ ls
b2     boost-build.jam  boost.png      bootstrap.sh  index.html  libs             project-config.jam  tools
bjam   boostcpp.jam     bootstrap.bat  doc           INSTALL     LICENSE_1_0.txt  rst.css
boost  boost.css        bootstrap.log  index.htm     Jamroot     more             status
源码根目录下生成了b2程序,运行b2程序如下(boost源码比较大,这里编译需要花费一些时间):
【注意】:如果Linux系统没有安装g++编译器,需要先安装g++,建议g++4.6版本以上,能比较好的支持C++新标准,可以通过命令 g++ --version 查看g++版本号。
tony@tony-virtual-machine:~/package/boost_1_69_0$ ./b2
编译完成后,会有如下打印:
The Boost C++ Libraries were successfully built!
The following directory should be added to compiler include paths:
/home/tony/package/boost_1_69_0
The following directory should be added to linker library paths:
/home/tony/package/boost_1_69_0/stage/lib
最后,再把上面的boost库头文件和lib库文件安装在默认的Linux系统头文件和库文件的搜索路径下,运行下面命令(因为要给/usr目录下拷贝文件,需要先进入root用户):
root@tony-virtual-machine:/home/tony/package/boost_1_69_0# ./b2 install
安装完成后,最后会有如下信息打印出来:
ln-UNIX /usr/local/lib/libboost_wave.so
common.copy /usr/local/lib/libboost_exception.a
common.copy /usr/local/lib/libboost_system.a
common.copy /usr/local/lib/libboost_chrono.a
common.copy /usr/local/lib/libboost_timer.a
common.copy /usr/local/lib/libboost_test_exec_monitor.a
...updated 14831 targets...
验证安装boost是否成功,通过下面的代码验证一下:
#include <iostream>
#include <boost/bind.hpp>
#include <string>
using namespace std;

class Hello
{
public:
	void say(string name)
	{ cout << name << " say: hello world!" << endl; }
};

int main()
{
	Hello h;
	auto func = boost::bind(&Hello::say, &h, "zhang san");
	func();
	return 0;
}
通过g++编译上面的代码,运行打印如下:
zhang san say: hello world!
至此,Linux下的boost库安装成功!


开放原子开发者工作坊旨在鼓励更多人参与开源活动,与志同道合的开发者们相互交流开发经验、分享开发心得、获取前沿技术趋势。工作坊有多种形式的开发者活动,如meetup、训练营等,主打技术交流,干货满满,真诚地邀请各位开发者共同参与!
更多推荐
 已为社区贡献7条内容


所有评论(0)