CoordinatorLayout(一)—— 基本使用
CoordinatorLayoutCoordinatorLayout 是一个功能强大的 FrameLayout,它遵循 Material Design 风格,可以用作一个或多个子 View 间交互的容器。通过为 CoordinatorLayout 的子 View 设置 Behavior,可以实现不同的交互效果。通常会与 AppbarLayout、CollapsingToolbarLayout 结合
一、CoordinatorLayout
CoordinatorLayout 是一个功能强大的 FrameLayout,它遵循 Material Design 风格,可以用作一个或多个子 View 间交互的容器。通过为 CoordinatorLayout 的子 View 设置 Behavior,可以实现不同的交互效果。通常会与 AppbarLayout、CollapsingToolbarLayout 结合使用。
Behavior
Behavior 是 CoordinatorLayout 的子 View 之间交互的一个插件,它指定了 CoordinatorLayout 的直接子 View(必须是直接的,间接的即使指定了也无效)在交互时的行为,如拖动、滑动、闪动或任何其它手势,并且是以非侵入式的方式实现这种交互。
指定 CoordinatorLayout 直接子 View 的 Behavior 通常有三种方式:通过代码绑定(LayoutParams 的 setBehavior())、通过 XML 绑定、通过注解自动绑定(在类上打 @CoordinatorLayout.DefaultBehavior(Behavior.class) 注解)。通常我们使用 XML 绑定的方式指定,如 app:layout_behavior=“@string/appbar_scrolling_view_behavior” 其实就是指定了对应 AppBarLayout.ScrollingViewBehavior 这个类的行为。
二、AppBarLayout
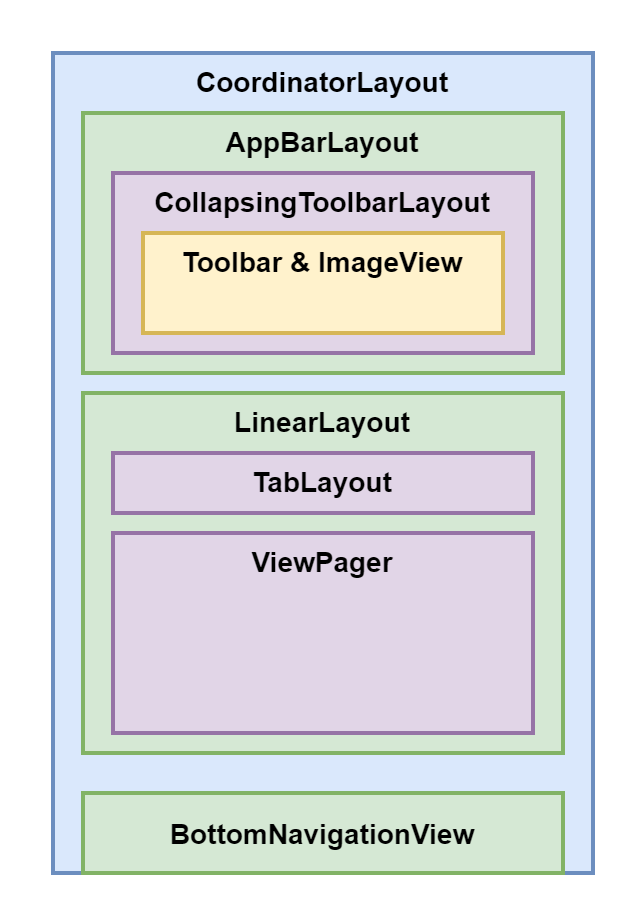
AppBarLayout 是 LinearLayout 的子类,必须在它的子 View 上设置 app:layout_scrollFlags 属性或者是在代码中调用 setScrollFlags() 设置这个属性。该属性有 7 个值:noScroll(0x0)、scroll(0x1)、enterAlwaysCollapsed(0x2)、enterAlways(0x4)、exitUntilCollapsed(0x8)、snap(0x10) 和 snapMargins(0x20),下面我们分别介绍这几个值的效果。
先介绍一下布局情况:

布局代码:
<?xml version="1.0" encoding="utf-8"?>
<androidx.coordinatorlayout.widget.CoordinatorLayout xmlns:android="http://schemas.android.com/apk/res/android"
    xmlns:app="http://schemas.android.com/apk/res-auto"
    android:layout_width="match_parent"
    android:layout_height="match_parent">

    <com.google.android.material.appbar.AppBarLayout
        android:id="@+id/appbar"
        android:layout_width="match_parent"
        android:layout_height="wrap_content"
        android:theme="@style/ThemeOverlay.AppCompat.Dark.ActionBar">

        <com.google.android.material.appbar.CollapsingToolbarLayout
            android:id="@+id/collapsing_toolbar_layout"
            android:layout_width="match_parent"
            android:layout_height="wrap_content"
            app:contentScrim="@color/color_005eaa"
            app:expandedTitleGravity="center"
            app:layout_scrollFlags="scroll|exitUntilCollapsed|snap"
            app:statusBarScrim="@android:color/holo_red_dark"
            app:titleEnabled="true">

            <ImageView
                android:id="@+id/banner"
                android:layout_width="match_parent"
                android:layout_height="250dp"
                android:background="@color/color_31c27c" />

            <androidx.appcompat.widget.Toolbar
                android:id="@+id/toolbar"
                android:layout_width="match_parent"
                android:layout_height="?attr/actionBarSize"
                app:layout_collapseMode="parallax"
                app:layout_collapseParallaxMultiplier="0.1"
                app:popupTheme="@style/AppTheme.AppBarOverlay" />
        </com.google.android.material.appbar.CollapsingToolbarLayout>
    </com.google.android.material.appbar.AppBarLayout>

    <LinearLayout
        android:layout_width="match_parent"
        android:layout_height="match_parent"
        android:orientation="vertical"
        app:layout_behavior="@string/appbar_scrolling_view_behavior">

        <com.google.android.material.tabs.TabLayout
            android:id="@+id/tab"
            android:layout_width="match_parent"
            android:layout_height="wrap_content"
            app:tabIndicatorColor="@color/colorAccent"
            app:tabIndicatorHeight="4dp"
            app:tabSelectedTextColor="@color/color_005eaa"
            app:tabTextColor="@color/color_43d28d" />

        <androidx.viewpager.widget.ViewPager
            android:id="@+id/view_pager"
            android:layout_width="match_parent"
            android:layout_height="match_parent" />
    </LinearLayout>

    <com.google.android.material.bottomnavigation.BottomNavigationView
        android:id="@+id/bottom_nav"
        android:layout_width="match_parent"
        android:layout_height="?attr/actionBarSize"
        android:layout_gravity="bottom"
        app:itemIconTint="@drawable/bottom_nav"
        app:itemTextColor="@drawable/bottom_nav"
        app:layout_behavior=".coordinator.BottomNavBehavior"
        app:menu="@menu/bottom_nav" />
</androidx.coordinatorlayout.widget.CoordinatorLayout>
noScroll & scroll
noScroll:会禁用掉该 View 的滑动,这个 flag 不能与其它任何 flag 搭配使用。
scroll:所有想滚动出屏幕的 View 都需要设置这个 flag, 没有设置这个 flag 的 View 将被固定在屏幕顶部。
给 AppBarLayout 的子 View CollapsingToolbarLayout 设置了 app:layout_scrollFlags=“scroll”,才能使得其可以滚动出屏幕:

假如我们在 AppBarLayout 内部,CollapsingToolbarLayout 的下面增加一个 TextView,并且不给它设置 app:layout_scrollFlags 属性,那么它就不会滚动出屏幕,而是停留在屏幕顶端:

可以借助这一点实现 View 的吸顶效果。
enterAlways
让任意向下的滚动都会导致该 View 变为可见,启用快速“返回模式”(enter 理解为进入屏幕,只有在下滑的时候才能体现出完全不可见 -> 部分可见 -> 完全可见这个进入屏幕的过程,always 表示总是,合在一起就是只要下滑就可见的意思)。
给 CollapsingToolbarLayout 设置 app:layout_scrollFlags=“scroll|enterAlways”,效果如下:

在向下拉的过程中,是设置了 enterAlways 属性的 CollapsingToolbarLayout 先向下展示出来,完全展现之后,才继续向下拉 RecyclerView。跟前面的图对比一下,向下拉的时候是先下拉 RecyclerView,滑到顶之后再滑 CollapsingToolbarLayout。
可以理解为一个滑动优先级,没有设置 enterAlways 属性,按照默认顺序滑动(先 RecyclerView 再 CollapsingToolbarLayout),设置了 enterAlways 之后,CollapsingToolbarLayout 先开始滑动。
enterAlwaysCollapsed
enterAlwaysCollapsed 是 enterAlways 的附加状态,使用该属性需要先使用 enterAlways 作为前提。向下滑动时分为两个阶段,先将该 View 滑动到预先设定好的“折叠高度”(一个阈值),然后去滑动其它的 Scrolling View,当 Scrolling View 滑到尽头后,再回头向下滑动设置了 enterAlwaysCollapsed 的 View 到完全展现。效果图:

“折叠高度”如何设置?看过很多资料都说是 minHeight 这个值,本质上这句话应该也不算错吧,但是在做过测试和查看源码后发现这里有个陷阱需要注意。基于前面贴出的布局文件代码,给 CollapsingToolbarLayout 设置 android:minHeight 属性为各种值,你会发现向下滑时并没有效果变化,还是与上面的效果一样。但是把 CollapsingToolbarLayout 内的 Toolbar 移除掉,android:minHeight 设置的值才发挥作用:

造成这种现象的原因要看下源码,在 CollapsingToolbarLayout 内有 Toolbar 的情况下,先看它是如何找到 Toolbar 的:
#CollapsingToolbarLayout:

	private int toolbarId;
    @Nullable private Toolbar toolbar;
    @Nullable private View toolbarDirectChild;

	private void ensureToolbar() {
        if (!refreshToolbar) {
            return;
        }

        // First clear out the current Toolbar
        this.toolbar = null;
        toolbarDirectChild = null;

		// 如果在布局文件中给 CollapsingToolbarLayout 通过 app:toolbarId 属性指定了 Toolbar 的
		// 话,那么就通过 findViewById() 找到这个 Toolbar,并且找到它的直接父容器(是父,不是子)
        if (toolbarId != -1) {
            this.toolbar = findViewById(toolbarId);
            if (this.toolbar != null) {
                toolbarDirectChild = findDirectChild(this.toolbar);
            }
        }

		// 如果没有通过 app:toolbarId 指定 Toolbar,那么就遍历所有直接子 View 找出 Toolbar
        if (this.toolbar == null) {
            Toolbar toolbar = null;
            // 一层循环,只找直接子 View 中是否有 Toolbar
            for (int i = 0, count = getChildCount(); i < count; i++) {
                final View child = getChildAt(i);
                if (child instanceof Toolbar) {
                    toolbar = (Toolbar) child;
                    break;
                }
            }
            this.toolbar = toolbar;
        }

        updateDummyView();
        refreshToolbar = false;
    }

	/**
     * Returns the direct child of this layout, which itself is the ancestor of the given view.
     */
    @NonNull
    private View findDirectChild(@NonNull final View descendant) {
        View directChild = descendant;
        // 传进来一个 Toolbar,如果 Toolbar 的直接父容器就是 CollapsingToolbarLayout,不满足
        // p != this 这个条件,所以这种情况下 for 循环压根就没走,方法返回的就是传入的 Toolbar
        for (ViewParent p = descendant.getParent(); p != this && p != null; p = p.getParent()) {
            if (p instanceof View) {
                directChild = (View) p;
            }
        }
        return directChild;
    }
findDirectChild() 从名字上看似乎是找直接子 View,但实际上它是向上找参数 descendant 的父容器甚至祖先容器,如果没有 p != this && p != null 这个限制条件可能就直接得到 DecorView 了……那么在我们使用了 AppBarLayout -> CollapsingToolbarLayout -> Toolbar 这种布局的条件下,通过 findDirectChild() 得到的 toolbarDirectChild 还是那个 Toolbar(具体原因看上面注释)。
接下来看 onLayout():
	@Override
    protected void onLayout(boolean changed, int left, int top, int right, int bottom) {
        super.onLayout(changed, left, top, right, bottom);
        ......
        // Set our minimum height to enable proper AppBarLayout collapsing
        if (toolbar != null) {
        	// collapsingTitleEnabled 通过 app:titleEnabled 设置,默认为 true,
        	// collapsingTextHelper.getText() 在通过 CollapsingToolbarLayout 的
			// setTitle(title) 设置过之后就不为空了,例子中已经设置了。
            if (collapsingTitleEnabled && TextUtils.isEmpty(collapsingTextHelper.getText())) {
                // 如果 CollapsingToolbarLayout 还没设置 title,就用 Toolbar 上的设置
                setTitle(toolbar.getTitle());
            }

			// 给 CollapsingToolbarLayout 设置最小高度为 Toolbar/toolbarDirectChild 的高度
            if (toolbarDirectChild == null || toolbarDirectChild == this) {
                setMinimumHeight(getHeightWithMargins(toolbar));
            } else {
                setMinimumHeight(getHeightWithMargins(toolbarDirectChild));
            }
        }
    }
在 Toolbar 是 CollapsingToolbarLayout 的直接子 View 时,相当于将 CollapsingToolbarLayout 的最小高度设置成 Toolbar 的高度了,这就是为什么在有 Toolbar 的情况下,无论怎样给 CollapsingToolbarLayout 设置 minHeight 都无效的原因了。
exitUntilCollapsed
exit 与前面的 enter 相对,表示退出,其实就是向上滑动,一直(Until)滑动到折叠(Collapsed)时的高度,即向上滑动直到折叠。
被设置了 exitUntilCollapsed 的 View,当向上滑动退出屏幕时,滑动到“折叠高度”后,就停止滑动。“折叠高度”的含义与 enterAlwaysCollapsed 中的相同,如果设置了 minHeight 那么“折叠高度”就取 minHeight 的值,否则系统内部会自己计算出一个合适的高度。效果如下:

snap & snapMargins
当一个滚动事件结束,如果视图是部分可见的,那么它将被自动滚动到完全收缩或完全展开。例如,如果视图只有底部25%显示,它将折叠。相反,如果它的底部75%可见,那么它将完全展开。效果图:

注意观察 CollapsingToolbarLayout 在自动回弹时,鼠标并没有滑动的动作,处于静止状态,当鼠标松开后,它自动完成了“完全展现”、“完全隐藏”的操作。
snapMargins 则是 snap 的附加 flag,需要与 snap 一同使用,自动回弹到 marginTop 或 marginBottom 的位置。
监听器
除了以上属性,还可以给 AppBarLayout 设置监听器 AppBarLayout.OnOffsetChangedListener,根据 AppBarLayout 内部的位移变化设置不同的 UI 效果。比如在完全折叠的情况下才显示标题,否则就隐藏标题:
		mAppBarLayout.addOnOffsetChangedListener(new AppBarLayout.OnOffsetChangedListener() {
            @Override
            public void onOffsetChanged(AppBarLayout appBarLayout, int verticalOffset) {
                // verticalOffset 取值范围[0,-appBarLayout.getTotalScrollRange()],展开时取0,
                // 折叠时取 -appBarLayout.getTotalScrollRange()
                Log.d("Frank", "onOffsetChanged: " + verticalOffset + "/" + appBarLayout.getTotalScrollRange());
                if (Math.abs(verticalOffset) < appBarLayout.getTotalScrollRange()) {
                    mCollapsingToolbarLayout.setTitle("");
                } else {
                    mCollapsingToolbarLayout.setTitle("CollapsingToolbarLayout 标题");
                }
            }
        });
三、CollapsingToolbarLayout
CollapsingToolbarLayout 继承自 FrameLayout,它是作为 AppBarLayout 的直接子 View 被设计出来的,作用是提供一个可折叠的 Toolbar。给 CollapsingToolbarLayout 设置 layout_scrollFlags,它可以控制包含在 CollapsingToolbarLayout 中的控件在响应 layout_behavior 事件时作出相应的 scrollFlags 滚动事件(移出屏幕或固定在屏幕顶端)。这些通过上面的演示已经看的非常清楚了。
属性设置
除了上述功能之外,它还可以通过 app:contentScrim 设置折叠时工具栏布局的颜色(默认为 colorPrimary),通过 app:statusBarScrim 设置折叠时状态栏的颜色(默认为colorPrimaryDark)。通过 app:expandedTitleGravity、app:expandedTitleMargin 等属性设置扩展标题(就是那个 ToolbarLayout 标题)的位置。
折叠模式
此外,CollapsingToolbarLayout 的子布局有3种折叠模式,通过 app:layout_collapseMode 来设置:
- off:默认属性,布局将正常显示,无折叠行为。
- pin:CollapsingToolbarLayout 折叠后,此布局将固定在顶部。
- parallax:CollapsingToolbarLayout 折叠时,此布局也会有视差折叠效果。如果设置了此值,还可以使用 app:layout_collapseParallaxMultiplier 设置视差滚动因子,值为 0~1。
先演示 pin 的折叠效果,先调用 setDisplayHomeAsUpEnabled(true) 和 setLogo() 两个方法分别使能 Toolbar 的 navigation 并添加了 Logo 图片:
 app:layout_collapseMode="none" app:layout_collapseMode="none"
|
 app:layout_collapseMode="pin" app:layout_collapseMode="pin"
|
左图是为 Toolbar 添加了 navigation 和 logo 后的滑动效果,可以看到 Toolbar 上的图标在刚一开始向上滑动的时候就滑出了屏幕,而右侧给 Toolbar 设置了 app:layout_collapseMode=“pin” 的 Toolbar 在滑动初始阶段是固定在屏幕顶部的,直到整个 CollapsingToolbarLayout 滑出屏幕时它才跟随者滑出屏幕。
至于 parallax 的视差折叠效果,需要与 app:layout_collapseParallaxMultiplier 属性结合使用。我们给 CollapsingToolbarLayout 的子 ImageView 换一个背景图片,因为纯色背景无法看出视差效果。然后设置其 app:layout_collapseMode=“parallax”,app:layout_collapseParallaxMultiplier 分别为 1.0、0.5、0.0,效果如下:
 1.0 1.0
|
 0.5 0.5
|
 0.0 0.0
|
图1与其它两幅图片的差别显而易见,在手指向上滑动时,图1并没有跟随向上滑动,而另外两幅图是跟随向上滑动了。而图3的跟随滑动速度要比图2快(背景图消失时,图2是大概滑动到皮卡丘眼睛的位置,而图3中皮卡丘的眼睛已经滑出屏幕,说明图3更快一点)。
至于 app:layout_collapseParallaxMultiplier 设置的这个视差滚动因子具体是什么,可以看一下这篇文章 layout_collapseParallaxMultiplier的含义,以及里面贴的 StackOverflow 的帖子连接。提炼一下,就是我们需要将这个背景图片分成两部分看,上半部分是随着手指滑动,滑出屏幕顶端的那部分,其余的下半部分则是没有滚出屏幕但是被隐藏的部分。视差因子正是下半部分占整个图片高度的百分比,即:
视差因子 = 下半部分高度 / 整个背景图高度
所以在图1中我们设置 app:layout_collapseParallaxMultiplier=“1.0” 时,下半部分占满了整个背景图,并没有出现滚动。
以上关于视差因子的描述肯定还有不够准确的地方,如果想要完全准确的掌握它,可以去看看源码。在 CollapsingToolbarLayout 中的 onOffsetChanged() 中,偏移量发生变化时会对所有子 View 偏移量进行重新设置,当子 View 的 collapseMode 是 COLLAPSE_MODE_PARALLAX 时(就是设置了 app:layout_collapseMode=“parallax”),会通过 ViewOffsetHelper 的 setTopAndBottomOffset(offset) 对该子 View 的偏移量进行设置,其中参数 offset 就需要用视差因子进行计算。有兴趣的可以自己去看看源码,这里就不再展开了。
下一篇将介绍 CoordinatorLayout 的工作原理以及如何自定义 Behavior CoordinatorLayout(二)—— 原理分析与自定义 Behavior

开放原子开发者工作坊旨在鼓励更多人参与开源活动,与志同道合的开发者们相互交流开发经验、分享开发心得、获取前沿技术趋势。工作坊有多种形式的开发者活动,如meetup、训练营等,主打技术交流,干货满满,真诚地邀请各位开发者共同参与!
更多推荐
 已为社区贡献4条内容


所有评论(0)