
【开源库剖析】Shadow v2.3.0 源码解析
Shadow是19年腾讯开源的自研Android插件化框架,经过线上亿级用户量检验。Shadow不仅开源分享了插件技术的关键代码,还完整的分享了上线部署所需要的所有设计。优点1)复用独立安装app源码。2)少反射、0hook。侵入性低,系统兼容性好;3)全动态框架设计(runtime的动态化有1处hook)。框架本身迭代也支持动态化,宿主增量极小(15K左右);4)插件支持运行在独立进程。与宿主运
作者:Stan_Z
一、框架介绍
Shadow是19年腾讯开源的自研Android插件化框架,经过线上亿级用户量检验。 Shadow不仅开源分享了插件技术的关键代码,还完整的分享了上线部署所需要的所有设计。
优点:
1)复用独立安装app源码。
2)少反射、0hook。侵入性低,系统兼容性好;
3)全动态框架设计(runtime的动态化有1处hook)。框架本身迭代也支持动态化,宿主增量极小(15K左右);
4)插件支持运行在独立进程。与宿主运行环境隔离,稳定性高。
缺点:
1)接入成本高。没有完善的接入文档,demo也过于复杂;没有官方maven依赖,需要开发者自行发布维护;
2)目前框架已经没有迭代维护,虽然目前功能已经比较完整稳定性也很高,但是特定业务场景下还是会遇到功能不完善的情况,需要自行迭代;
3)全动态化设计版本控制更复杂了;
4)宿主环境隔离带来的插件多进程限制。
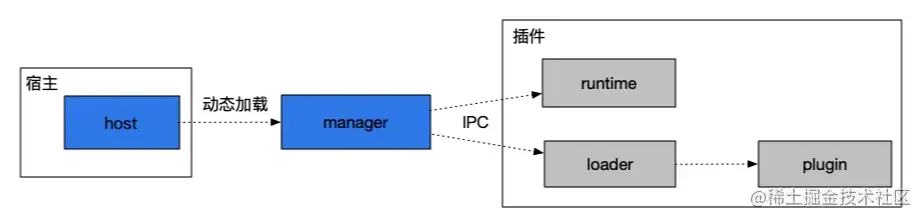
二、Shadow框架整体设计

宿主
- host: 加载manager插件;
- manager: 跨进程实现插件包整体的加载;
插件
- runtime: activity代理转发整体实现方案;
- loader: 负责加载插件;
- plugin: 业务插件(支持多个);
整体流程:宿主负责下载manager和插件,先动态加载manager,通过它再ipc动态加载插件中的runtime和loader,再通过loader加载插件。其中插件整体打包为一个zip包,zip包结构:

三、框架加载插件流程
3.1 宿主通过host加载manager:

核心方法:
final class ManagerImplLoader extends ImplLoader {

    PluginManagerImpl load() {
        ApkClassLoader apkClassLoader = new ApkClassLoader(
                installedApk,
                getClass().getClassLoader(),
                loadWhiteList(installedApk),
                1
        );

        Context pluginManagerContext = new ChangeApkContextWrapper(
                applicationContext,
                installedApk.apkFilePath,
                apkClassLoader
        );

        try {
            ManagerFactory managerFactory = apkClassLoader.getInterface(
                    ManagerFactory.class,
                    MANAGER_FACTORY_CLASS_NAME
            );
            return managerFactory.buildManager(pluginManagerContext);
        } catch (Exception e) {
            throw new RuntimeException(e);
        }
    }
}
这里主要功能是加载manager插件,核心实现主要3块:
- 1)manager专用插件加载器ApkClassLoader的类加载实现;
- 2)上下文封装
- 3)加载插件入口类实现.
1)manager专用插件加载器ApkClassLoader的类加载实现;
    protected Class<?> loadClass(String className, boolean resolve) throws ClassNotFoundException {
        String packageName;
        int dot = className.lastIndexOf('.');
        if (dot != -1) {
            packageName = className.substring(0, dot);
        } else {
            packageName = "";
        }

        boolean isInterface = false;
        for (String interfacePackageName : mInterfacePackageNames) {
            if (packageName.equals(interfacePackageName)) {
                isInterface = true;
                break;
            }
        }

        if (isInterface) {
            // 白名单,则通过父类(即:宿主ClassLoader加载)
            return super.loadClass(className, resolve);
        } else {
            // 查询是否被插件ClassLoader已经加载,已加载则直接获取返回
            Class<?> clazz = findLoadedClass(className);

            if (clazz == null) {
                ClassNotFoundException suppressed = null;
                try {
                    // 插件ClassLoader从自己类路径中查找
                    clazz = findClass(className);
                } catch (ClassNotFoundException e) {
                    suppressed = e;
                }

                if (clazz == null) {
                    try {
                        // 从parent的parent ClassLoader中查找
                        clazz = mGrandParent.loadClass(className);
                    } catch (ClassNotFoundException e) {
                        if (Build.VERSION.SDK_INT >= Build.VERSION_CODES.KITKAT) {
                            e.addSuppressed(suppressed);
                        }
                        throw e;
                    }
                }
            }

            return clazz;
        }
    }

这里插件加载设计主要解决两个问题:
-
插件如何访问宿主类? 插件如何访问宿主的类,主要遵循类加载双亲委派原则,这里把宿主ClassLoader设置为ApkClassLoader的父类来实现。
-
插件如果有类和宿主同名,如果解决类冲突,保持插件加载自己的类? 引入白名单,在白名单中走正常双亲委派(即:宿主优先),不在白名单,则从宿主classLoader的父classLoader中查找,查找不到再从自己中查找(即:插件优先)。
2)上下文封装

其中Resource获取是通过:
  private Resources createResources(String apkPath, Context base) {
        PackageManager packageManager = base.getPackageManager();
        PackageInfo packageArchiveInfo = packageManager.getPackageArchiveInfo(apkPath, GET_META_DATA);
        packageArchiveInfo.applicationInfo.publicSourceDir = apkPath;
        packageArchiveInfo.applicationInfo.sourceDir = apkPath;
        try {
            return packageManager.getResourcesForApplication(packageArchiveInfo.applicationInfo);
        } catch (PackageManager.NameNotFoundException e) {
            throw new RuntimeException(e);
        }

    }
3)加载插件入口类实现
  private static final String MANAGER_FACTORY_CLASS_NAME = "com.tencent.shadow.dynamic.impl.ManagerFactoryImpl";

  try {
            ManagerFactory managerFactory = apkClassLoader.getInterface(
                    ManagerFactory.class,
                    MANAGER_FACTORY_CLASS_NAME
            );
            return managerFactory.buildManager(pluginManagerContext);
        } catch (Exception e) {
            throw new RuntimeException(e);
        }

    // 从插件manager apk中读取入口类接口实现
    public <T> T getInterface(Class<T> clazz, String className) throws Exception {
        try {
            Class<?> interfaceImplementClass = loadClass(className);
            Object interfaceImplement = interfaceImplementClass.newInstance();
            return clazz.cast(interfaceImplement);
        } catch (ClassNotFoundException | InstantiationException
                | ClassCastException | IllegalAccessException e) {
            throw new Exception(e);
        }
    }
其中:ManagerFactory是宿主中的类,它的实现类ManagerFactoryImpl在插件manager中,他们的实现分别是:
// host
public interface ManagerFactory {
    PluginManagerImpl buildManager(Context context);
}

// manager插件
public final class ManagerFactoryImpl implements ManagerFactory {
    @Override
    public PluginManagerImpl buildManager(Context context) {
        return new SamplePluginManager(context);
    }
}
至此,通过host的DynamicPluginManager enter 加载了manager插件入口类SamplePluginManager,然后以它作为代理实现类,真正执行enter。
public final class DynamicPluginManager implements PluginManager {

    private PluginManagerImpl mManagerImpl;

    @Override
    public void enter(Context context, long fromId, Bundle bundle, EnterCallback callback) {
        if (mLogger.isInfoEnabled()) {
            mLogger.info("enter fromId:" + fromId + " callback:" + callback);
        }
        updateManagerImpl(context);
        mManagerImpl.enter(context, fromId, bundle, callback);
        mUpdater.update();
    }
3.2 manager解析插件包
SamplePluginManager enter方法进入后核心实现流程如下:
    private void onStartActivity(final Context context, Bundle bundle, final EnterCallback callback) {
        final String pluginZipPath = bundle.getString(Constant.KEY_PLUGIN_ZIP_PATH);
        final String partKey = bundle.getString(Constant.KEY_PLUGIN_PART_KEY);
        final String className = bundle.getString(Constant.KEY_ACTIVITY_CLASSNAME);
        if (className == null) {
            throw new NullPointerException("className == null");
        }
        final Bundle extras = bundle.getBundle(Constant.KEY_EXTRAS);

        if (callback != null) {
            final View view = LayoutInflater.from(mCurrentContext).inflate(R.layout.activity_load_plugin, null);
            callback.onShowLoadingView(view);
        }

        executorService.execute(new Runnable() {
            @Override
            public void run() {
                try {
                    // 1解析插件包
                    InstalledPlugin installedPlugin = installPlugin(pluginZipPath, null, true);

                    // 2加载插件
                    loadPlugin(installedPlugin.UUID, PART_KEY_PLUGIN_BASE);

                    // 3拉起插件application及入口activity
                    callApplicationOnCreate(PART_KEY_PLUGIN_BASE);

                    Intent pluginIntent = new Intent();
                    pluginIntent.setClassName(
                            context.getPackageName(),
                            className
                    );
                    if (extras != null) {
                        pluginIntent.replaceExtras(extras);
                    }
                    Intent intent = mPluginLoader.convertActivityIntent(pluginIntent);
                    intent.setFlags(Intent.FLAG_ACTIVITY_NEW_TASK);
                    mPluginLoader.startActivityInPluginProcess(intent);
                } catch (Exception e) {
                    throw new RuntimeException(e);
                }
                if (callback != null) {
                    callback.onCloseLoadingView();
                }
            }
        });
    }
这里先看installPlugin方法实现的插件包解析,主要有3块:
- 1)解析插件zip包
- 2)尝试对插件dex进行预编译
- 3)解压apk中so
1)解析插件zip包

这里主要是解析config.json配置文件,封装PluginConfig
2)尝试对插件dex进行odex预编译 编译的apk包括:runtime、loader、plugin(可能有多个) 触发编译条件:< android 8.1 预编译实现:
com.tencent.shadow.core.manager.installplugin.ODexBloc#oDexPlugin
    public static void oDexPlugin(File apkFile, File oDexDir, File copiedTagFile) throws InstallPluginException {
 ...
            new DexClassLoader(apkFile.getAbsolutePath(), oDexDir.getAbsolutePath(), null, ODexBloc.class.getClassLoader());
 ...
    }
编译实现流程参考:

DexClassLoader初始化会触发Dex加载,Dex加载在android 10以下版本会强行走odex预编译。
3)解压apk中so 核心方法: com.tencent.shadow.core.manager.installplugin.CopySoBloc#copySo 将so解压到如下目录: /data/user/0/com.tencent.shadow.sample.host/files/ShadowPluginManager/UnpackedPlugin/test-dynamic-manager
这里dex编译和so提取均通过Feature来做异步处理,所有结果都返回后才进行后续流程。
经过插件包解析,最终构建InstalledPlugin数据结构保存插件相关信息,这里分别通过pluginLoaderFile、plugins、runtimeFile分别保存loader、plugin、runtime插件信息详情

3.3 manager跨进程加载插件设计
在正式加载插件之前,会拉起一个插件环境的服务,该服务配置在宿主androidManifest.xml中
<service
     android:name="com.tencent.shadow.sample.host.PluginProcessPPS"
     android:process=":plugin" />
manager插件通过getPluginProcessServiceName配置匹配的插件环境服务,然后通过bindPluginProcessService绑定服务。
if (mPpsController == null) {
    bindPluginProcessService(getPluginProcessServiceName(partKey));
    // 服务绑定超时处理
    waitServiceConnected(10, TimeUnit.SECONDS);
}
PluginProcessPPS继承自PluginProgressService,核心功能实现在PluginProgressService,主要跨进程加载插件的runtime和loader两个部分。
这里跨进程设计方案如下:

1)宿主binder call触发插件进程发起runtime、loader插件加载,而插件加载需要binder call到宿主要解析后的插件信息;
2)宿主binder call触发插件进程发起经由loader的plugin加载;
核心类介绍: PpsController: 宿主进程持有的插件进程中插件环境服务PluginProcessService的代理; BinderUuidManager: 插件进程中持有的宿主进程中UuidManagerImpl代理; PluginLoader:宿主进程持有的插件进程DynamicPluginLoader代理;
对端实现类核心能力:

3.4 manager加载runtime
这里首要要知道runtime是什么,它的设计解决什么问题? shadow是通过预埋壳activity,通过代理分发的方式来拉起并管理插件生命周期,runtime做的其实就是把这套Container组件代理实现方案从host剥离出来,原因是由于Activity组件有大量的方法需要代理实现,直接由宿主集成会造成宿主的方法数增量较多。这里动态化的目的主要是追求极致方法数增量。
接下来看看代码实现:
com.tencent.shadow.dynamic.host.PluginProcessService#loadRuntime
void loadRuntime(String uuid) throws FailedException {
    ...
    // 从宿主拿包信息
    installedApk = mUuidManager.getRuntime(uuid);
    ...
    // 加载runtime插件
    boolean loaded = DynamicRuntime.loadRuntime(installedRuntimeApk);
}
这里先思考一个问题: 壳activity注册在宿主的AndroidManifest.xml,而对应的类文件却在插件里。当动态加载runtime插件后,直接调用系统的startActivity来启动一个代理组件,是否可行呢?答案是否定的,执行方法后,系统直接就抛出了ClassNotFundException。为什么我们明明已经加载了Container代理组件,系统却找不到呢?原因是系统在找一个Activity组件时,总是从加载宿主的classLoader中开始查找(通用是PathClassLoader),如果查找不到,则抛异常。
host:
 <activity
            android:name="com.tencent.shadow.sample.plugin.runtime.PluginDefaultProxyActivity"
            android:launchMode="standard"
            android:screenOrientation="portrait"
          android:configChanges="mcc|mnc|locale|touchscreen|keyboard|keyboardHidden|navigation|screenLayout|fontScale|uiMode|orientation|screenSize|smallestScreenSize|layoutDirection"
            android:hardwareAccelerated="true"
            android:theme="@android:style/Theme.Translucent.NoTitleBar.Fullscreen"
            android:multiprocess="true" />
plugin:
@SuppressLint("Registered")//无需注册在这个模块的Manifest中,要注册在宿主的Manifest中。
public class PluginDefaultProxyActivity extends PluginContainerActivity {

    @Override
    protected String getDelegateProviderKey() {
        return "SAMPLE";
    }
}
shadow给出的解决方案是:

将RuntimeClassLoader插入到PathClassLoader和BootClassLoader之间,根据双亲委派原则,宿主可以拿到Runtime容器相关类。
接下来看loadRuntime的具体实现:
    private static void hackParentToRuntime(InstalledApk installedRuntimeApk, ClassLoader contextClassLoader) throws Exception {
        RuntimeClassLoader runtimeClassLoader = new RuntimeClassLoader(installedRuntimeApk.apkFilePath, installedRuntimeApk.oDexPath,
                installedRuntimeApk.libraryPath, contextClassLoader.getParent());
        hackParentClassLoader(contextClassLoader, runtimeClassLoader);
    }


    /**
     * 修改ClassLoader的parent
     *
     * @param classLoader          需要修改的ClassLoader
     * @param newParentClassLoader classLoader的新的parent
     * @throws Exception 失败时抛出
     */
    static void hackParentClassLoader(ClassLoader classLoader,
                                      ClassLoader newParentClassLoader) throws Exception {
        Field field = getParentField();
        if (field == null) {
            throw new RuntimeException("在ClassLoader.class中没找到类型为ClassLoader的parent域");
        }
        field.setAccessible(true);
        field.set(classLoader, newParentClassLoader);
    }

    /**
     * 安全地获取到ClassLoader类的parent域
     *
     * @return ClassLoader类的parent域.或不能通过反射访问该域时返回null.
     */
    private static Field getParentField() {
        ClassLoader classLoader = DynamicRuntime.class.getClassLoader();
        ClassLoader parent = classLoader.getParent();
        Field field = null;
        for (Field f : ClassLoader.class.getDeclaredFields()) {
            try {
                boolean accessible = f.isAccessible();
                f.setAccessible(true);
                Object o = f.get(classLoader);
                f.setAccessible(accessible);
                if (o == parent) {
                    field = f;
                    break;
                }
            } catch (IllegalAccessException ignore) {
            }
        }
        return field;
    }
分析ClassLoader类,发现ClassLoader的双亲委派关系是由ClassLoader的一个私有属性parent来决定的,所以我们只要反射的修改这个属性,就能形成上述的ClassLoader结构。可能有同学会关心,这个修改是否安全。ClassLoader这个类不在Android P的限制名单中,并且是属于JDK的类,后续出现在限制名单中的概率也不大,而且这部分动态化是可选的,所以我们评估这一处修改是安全的。
3.5 manager加载loader
com.tencent.shadow.dynamic.host.LoaderImplLoader#load

    PluginLoaderImpl load(InstalledApk installedApk, String uuid, Context appContext) throws Exception {
        ApkClassLoader pluginLoaderClassLoader = new ApkClassLoader(
                installedApk,
                LoaderImplLoader.class.getClassLoader(),
                loadWhiteList(installedApk),
                1
        );
        LoaderFactory loaderFactory = pluginLoaderClassLoader.getInterface(
                LoaderFactory.class,
                sLoaderFactoryImplClassName
        );

        return loaderFactory.buildLoader(uuid, appContext);
    }

    open class LoaderFactoryImpl : LoaderFactory {
    override fun buildLoader(p0: String, p2: Context): PluginLoaderImpl {
        return PluginLoaderBinder(DynamicPluginLoader(p2, p0))
    }
}
类似于manager插件加载,这里同样是通过工厂接口去加载loader入口实现类。但是这里返回的是一个binder,宿主持有这个binder的代理来触发插件的加载。
这里PluginLoaderBinder在插件端通过DynamicPluginLoader来执行具体插件操作,而它的具体操作又是通过ShadowPluginLoader代理来实现的, 而ShadowPluginLoader的初始化又是通过factory接口的方式加载的。
internal class DynamicPluginLoader(hostContext: Context, uuid: String) {

private val mPluginLoader: ShadowPluginLoader

    init {
        try {
            val coreLoaderFactory = mDynamicLoaderClassLoader.getInterface(
                CoreLoaderFactory::class.java,
                CORE_LOADER_FACTORY_IMPL_NAME
            )
            mPluginLoader = coreLoaderFactory.build(hostContext)
            DelegateProviderHolder.setDelegateProvider(
                mPluginLoader.delegateProviderKey,
                mPluginLoader
            )
            ContentProviderDelegateProviderHolder.setContentProviderDelegateProvider(mPluginLoader)
            mPluginLoader.onCreate()
        } catch (e: Exception) {
            throw RuntimeException("当前的classLoader找不到PluginLoader的实现", e)
        }
        mContext = hostContext
        mUuid = uuid
    }

}
所以宿主通过PluginLoader执行的插件操作,最终插件端通过ShadowPluginLoader来实现的。
3.6 loader加载plugin
回到manager的loadPlugin,这里loadPluginLoaderAndRuntime加载完runtime和loader后,开始通过PluginLoader发起插件加载
com.tencent.shadow.sample.manager.FastPluginManager#loadPlugin
    protected void loadPlugin(String uuid, String partKey) throws RemoteException, TimeoutException, FailedException {
        loadPluginLoaderAndRuntime(uuid, partKey);
        Map map = mPluginLoader.getLoadedPlugin();
        if (!map.containsKey(partKey)) {
            mPluginLoader.loadPlugin(partKey);
        }
    }
loadPlugin最终是通过LoadPluginBloc实现插件加载:
com.tencent.shadow.core.loader.blocs.LoadPluginBloc#loadPlugin
    fun loadPlugin(
        executorService: ExecutorService,
        componentManager: ComponentManager,
        lock: ReentrantLock,
        pluginPartsMap: MutableMap<String, PluginParts>,
        hostAppContext: Context,
        installedApk: InstalledApk,
        loadParameters: LoadParameters
    ): Future<*> {
        if (installedApk.apkFilePath == null) {
            throw LoadPluginException("apkFilePath==null")
        } else {
            // 加载插件
            val buildClassLoader = executorService.submit(Callable {
                lock.withLock {
                    LoadApkBloc.loadPlugin(installedApk, loadParameters, pluginPartsMap)
                }
            })

            val buildPluginManifest = executorService.submit(Callable {
                val pluginClassLoader = buildClassLoader.get()
               // 解析插件manifest
                val pluginManifest = pluginClassLoader.loadPluginManifest()
                // 检查插件和宿主包名一致
                CheckPackageNameBloc.check(pluginManifest, hostAppContext)
                pluginManifest
            })

            val buildPluginApplicationInfo = executorService.submit(Callable {
                val pluginManifest = buildPluginManifest.get()
                //  初始化ApplicationInfo
                val pluginApplicationInfo = CreatePluginApplicationInfoBloc.create(
                    installedApk,
                    loadParameters,
                    pluginManifest,
                    hostAppContext
                )
                pluginApplicationInfo
            })

            val buildPackageManager = executorService.submit(Callable {
                val pluginApplicationInfo = buildPluginApplicationInfo.get()
                val hostPackageManager = hostAppContext.packageManager
                // 通过宿主context获PackageManager并封装相关信息类
                PluginPackageManagerImpl(
                    pluginApplicationInfo,
                    installedApk.apkFilePath,
                    componentManager,
                    hostPackageManager,
                )
            })

            val buildResources = executorService.submit(Callable {
                // 创建插件Resource
                CreateResourceBloc.create(installedApk.apkFilePath, hostAppContext)
            })

            // 封装组件信息
            val buildAppComponentFactory = executorService.submit(Callable {
                val pluginClassLoader = buildClassLoader.get()
                val pluginManifest = buildPluginManifest.get()
                val appComponentFactory = pluginManifest.appComponentFactory
                if (appComponentFactory != null) {
                    val clazz = pluginClassLoader.loadClass(appComponentFactory)
                    ShadowAppComponentFactory::class.java.cast(clazz.newInstance())
                } else ShadowAppComponentFactory()
            })

            // 初始化插件ShadowApplication,它是插件Application替换的普通父类
            val buildApplication = executorService.submit(Callable {
                val pluginClassLoader = buildClassLoader.get()
                val resources = buildResources.get()
                val appComponentFactory = buildAppComponentFactory.get()
                val pluginManifest = buildPluginManifest.get()
                val pluginApplicationInfo = buildPluginApplicationInfo.get()

                CreateApplicationBloc.createShadowApplication(
                    pluginClassLoader,
                    loadParameters,
                    pluginManifest,
                    resources,
                    hostAppContext,
                    componentManager,
                    pluginApplicationInfo,
                    appComponentFactory
                )
            })

            val buildRunningPlugin = executorService.submit {
                if (File(installedApk.apkFilePath).exists().not()) {
                    throw LoadPluginException("插件文件不存在.pluginFile==" + installedApk.apkFilePath)
                }
                val pluginPackageManager = buildPackageManager.get()
                val pluginClassLoader = buildClassLoader.get()
                val resources = buildResources.get()
                val shadowApplication = buildApplication.get()
                val appComponentFactory = buildAppComponentFactory.get()
                val pluginManifest = buildPluginManifest.get()
                lock.withLock {
                    componentManager.addPluginApkInfo(
                        pluginManifest,
                        loadParameters,
                        installedApk.apkFilePath,
                    )
                    pluginPartsMap[loadParameters.partKey] = PluginParts(
                        appComponentFactory,
                        shadowApplication,
                        pluginClassLoader,
                        resources,
                        pluginPackageManager
                    )
                    PluginPartInfoManager.addPluginInfo(
                        pluginClassLoader, PluginPartInfo(
                            shadowApplication, resources,
                            pluginClassLoader, pluginPackageManager
                        )
                    )
                }
            }

            return buildRunningPlugin
        }
    }
解析完最终的产出:

3.7 manager拉起插件application onCreate
com.tencent.shadow.sample.manager.FastPluginManager#callApplicationOnCreate
    protected void callApplicationOnCreate(String partKey) throws RemoteException {
        Map map = mPluginLoader.getLoadedPlugin();
        Boolean isCall = (Boolean) map.get(partKey);
        if (isCall == null || !isCall) {
            mPluginLoader.callApplicationOnCreate(partKey);
        }
    }

com.tencent.shadow.core.loader.ShadowPluginLoader#callApplicationOnCreate
    fun callApplicationOnCreate(partKey: String) {
        fun realAction() {
            val pluginParts = getPluginParts(partKey)
            pluginParts?.let {
                val application = pluginParts.application
                application.attachBaseContext(mHostAppContext)
                mPluginContentProviderManager.createContentProviderAndCallOnCreate(
                    application, partKey, pluginParts
                )
                // 获取ShadowApplication,调用它的onCreate方法
                application.onCreate()
            }
        }
        if (isUiThread()) {
            realAction()
        } else {
            val waitUiLock = CountDownLatch(1)
            mUiHandler.post {
                realAction()
                waitUiLock.countDown()
            }
            waitUiLock.await();
        }
    }
直接获取插件对应的Application替换的父类:ShadowApplication,调用它的onCreate方法
3.8 manager拉起插件的入口activity

通过convertActivityIntent发起插件入口activity的启动,这里目标activity是插件内的SplashActivity,但是我们知道在AndroidManifest.xml里注册的壳Activity是PluginDefaultProxyActivity。 另外,在看下壳Activity和插件入口Activity的代理设计:

那这里加载插件Activity最终流程会拆成2步走:
1)拉起SplashActivity的intent转换为拉起PluginDefaultProxyActivity;
2)由PluginDefaultProxyActivity代理转发,执行SplashActivity对应的生命周期,进而间接实现拉起插件入口Activity。
1)拉起SplashActivity的intent转换为拉起PluginDefaultProxyActivity;
com.tencent.shadow.dynamic.loader.impl.DynamicPluginLoader#convertActivityIntent

   fun convertActivityIntent(pluginActivityIntent: Intent): Intent? {
        return mPluginLoader.mComponentManager.convertPluginActivityIntent(pluginActivityIntent)
    }
最终在ComponentManager中转换为启动PluginDefaultProxyActivity,并将插件入口activity配置在intent bundle中。

其中插件Activity和壳Activity的映射关系配置在:
com.tencent.shadow.sample.plugin.loader.SampleComponentManager#onBindContainerActivity

private static final String DEFAULT_ACTIVITY = "com.tencent.shadow.sample.plugin.runtime.PluginDefaultProxyActivity";
public ComponentName onBindContainerActivity(ComponentName pluginActivity) {
        switch (pluginActivity.getClassName()) {
            /**
             * 这里配置对应的对应关系
             */
        }
        return new ComponentName(context, DEFAULT_ACTIVITY);
}
2)由PluginDefaultProxyActivity代理转发,执行SplashActivity对应的生命周期,进而间接实现拉起插件入口Activity 以onCreate分发为例:
public class PluginContainerActivity extends GeneratedPluginContainerActivity implements HostActivity, HostActivityDelegator {
    HostActivityDelegate hostActivityDelegate;

   public PluginContainerActivity() {
        HostActivityDelegate delegate;
        DelegateProvider delegateProvider = DelegateProviderHolder.getDelegateProvider(getDelegateProviderKey());
        if (delegateProvider != null) {
            delegate = delegateProvider.getHostActivityDelegate(this.getClass());
            delegate.setDelegator(this);
        } else {
            Log.e(TAG, "PluginContainerActivity: DelegateProviderHolder没有初始化");
            delegate = null;
        }
        super.hostActivityDelegate = delegate;
        hostActivityDelegate = delegate;
    }

    @Override
    final protected void onCreate(Bundle savedInstanceState) {
        isBeforeOnCreate = false;
        mHostTheme = null;//释放资源

        boolean illegalIntent = isIllegalIntent(savedInstanceState);
        if (illegalIntent) {
            super.hostActivityDelegate = null;
            hostActivityDelegate = null;
            Log.e(TAG, "illegalIntent savedInstanceState==" + savedInstanceState + " getIntent().getExtras()==" + getIntent().getExtras());
        }

        if (hostActivityDelegate != null) {
            hostActivityDelegate.onCreate(savedInstanceState);
        } else {
            //这里是进程被杀后重启后走到,当需要恢复fragment状态的时候,由于系统保留了TAG,会因为找不到fragment引起crash
            super.onCreate(null);
            Log.e(TAG, "onCreate: hostActivityDelegate==null finish activity");
            finish();
            System.exit(0);
        }
    }
}
之前插件加载把ShadowPluginLoader存到了DelegateProviderHolder中,这里delegateProvider.getHostActivityDelegate最终取出的是:
com.tencent.shadow.core.loader.ShadowPluginLoader#getHostActivityDelegate

  override fun getHostActivityDelegate(aClass: Class<out HostActivityDelegator>): HostActivityDelegate {
        return if (HostNativeActivityDelegator::class.java.isAssignableFrom(aClass)) {
            ShadowNativeActivityDelegate(this)
        } else {
            ShadowActivityDelegate(this)
        }
    }
最终PluginContainerActivity.onCreate是调用的ShadowActivityDelegate.onCreate,这里看下具体实现:
    override fun onCreate(savedInstanceState: Bundle?) {
  ...
            // 向插件注入上下文相关信息
            mDI.inject(this, partKey)
  ...
           // 加载插件父类ShadowActivity
            val pluginActivity = mAppComponentFactory.instantiateActivity(
                mPluginClassLoader,
                pluginActivityClassName,
                mHostActivityDelegator.intent
            )
            // 初始化ShadowActivity
            initPluginActivity(pluginActivity, pluginActivityInfo)
...
           // 执行对应生命周期回调
            pluginActivity.onCreate(pluginSavedInstanceState)
...
    }
总结宿主拉起插件activity代理流程:

3.9 gradle transform 编译期替换基础组件
对应gradle插件为ShadowPlugin
gradlePlugin {
    plugins {
        shadow {
            id = "com.tencent.shadow.plugin"
            implementationClass = "com.tencent.shadow.core.gradle.ShadowPlugin"
        }
    }
}
com.tencent.shadow.core.gradle.ShadowPlugin#apply
   val shadowExtension = project.extensions.create("shadow", ShadowExtension::class.java)
        if (!project.hasProperty("disable_shadow_transform")) {
            baseExtension.registerTransform(ShadowTransform(
                project,
                lateInitBuilder,
                { shadowExtension.transformConfig.useHostContext },
                { shadowExtension.transformConfig.keepClassNames }
            ))
        }
com.tencent.shadow.core.transform.ShadowTransform
_mTransformManager = TransformManager(mCtClassInputMap, classPool, useHostContext, keepClassNames)
这里主要看看TransformManager具体实现:
class TransformManager(
    ctClassInputMap: Map<CtClass, InputClass>,
    classPool: ClassPool,
    useHostContext: () -> Array<String>,
    keepClassNames: () -> List<String>
) : AbstractTransformManager(ctClassInputMap, classPool) {

    /**
     * 按这个列表的顺序应用各子Transform逻辑。
     *
     * 注意这个列表的顺序是有关系的,
     * 比如在ActivityTransform之前的Transform可以看到原本的Activity类型,
     * 在其之后的Transform在插件中就看不到Activity类型了,
     * 所有有些Transform在获取方法时要将原本的Activity类型改为ShadowActivity类型,
     * 因为ActivityTransform在它之前已经生效了。
     */
    override val mTransformList: List<SpecificTransform> = listOf(
        ApplicationTransform(keepClassNames()),
        ActivityTransform(keepClassNames()),
        ServiceTransform(),
        IntentServiceTransform(),
        InstrumentationTransform(),
        FragmentSupportTransform(),
        DialogSupportTransform(),
        WebViewTransform(),
        ContentProviderTransform(),
        PackageManagerTransform(),
        PackageItemInfoTransform(),
        AppComponentFactoryTransform(),
        LayoutInflaterTransform(),
        KeepHostContextTransform(useHostContext()),
        ActivityOptionsSupportTransform(),
    )
}
以ActivityTransform为例:
class ActivityTransform(
    keepClassNames: List<String> = emptyList()
) : SimpleRenameTransform(
    mapOf(
        "android.app.Activity"
                to "com.tencent.shadow.core.runtime.ShadowActivity",
        "android.app.NativeActivity"
                to "com.tencent.shadow.core.runtime.ShadowNativeActivity"
    ),
    keepClassNames
)

open class SimpleRenameTransform(
    private val fromToMap: Map<String, String>,
    private val keepClassNames: List<String> = emptyList()
) : SpecificTransform() {
    final override fun setup(allInputClass: Set<CtClass>) {
        newStep(object : TransformStep {
            override fun filter(allInputClass: Set<CtClass>) =
                allInputClass.filterNot { keepClassNames.contains(it.name) }.toSet()

            override fun transform(ctClass: CtClass) {
                if (keepClassNames.contains(ctClass.name)) {
                    System.err.println("${ctClass.name} is in keepClassNames, which should not be transformed.")
                }
                fromToMap.forEach {
                    ReplaceClassName.replaceClassName(ctClass, it.key, it.value)
                }
            }
        })
    }
}
全局扫描,将原生Activity替换为普通类。
3.10 插件四大组件之Service的实现
插件Service父类会被替换为ShadowService普通类,与Activity类似, 同样继承于ShadowContext,这里跟Activity实现的区别是:Activity是依赖于真正注册在manifest中的壳activity代理转发生命周期,而Service并不是,这里Shadow只是代码简单模拟了生命周期的调用。
com.tencent.shadow.core.loader.ShadowPluginLoader#loadPlugin
     // 在这里初始化PluginServiceManager
        mPluginServiceManagerLock.withLock {
            if (!::mPluginServiceManager.isInitialized) {
                mPluginServiceManager = PluginServiceManager(this, mHostAppContext)
            }

            mComponentManager.setPluginServiceManager(mPluginServiceManager)
        }
在加载插件环境初始化了一个PluginServiceManager类,由他作为组件Service的代理实现
com.tencent.shadow.core.loader.managers.ComponentManager#startService

    override fun startService(
        context: ShadowContext,
        service: Intent
    ): Pair<Boolean, ComponentName?> {
        if (service.isPluginComponent()) {
            // 插件service intent不需要转换成container service intent,直接使用intent
            val component = mPluginServiceManager!!.startPluginService(service)
            if (component != null) {
                return Pair(true, component)
            }
        }

        return Pair(false, service.component)
    }

    override fun bindService(
        context: ShadowContext,
        intent: Intent,
        conn: ServiceConnection,
        flags: Int
    ): Pair<Boolean, Boolean> {
        return if (intent.isPluginComponent()) {
            // 插件service intent不需要转换成container service intent,直接使用intent
            mPluginServiceManager!!.bindPluginService(intent, conn, flags)
            Pair(true, true)
        } else {
            Pair(false, false)
        }
    }
这里并没有通过delegate分发真正系统Service的生命周期,而是PluginServiceManager模拟Service自己实现了一套
1)startPluginService实现
// 核心方法
private fun createServiceAndCallOnCreate(intent: Intent): ShadowService {
        val service = newServiceInstance(intent)
        service.onCreate()
        return service
    }
createServiceAndCallOnCreate主要就是加载对应的插件Service类并初始化,然后调用其onStart方法。
2)bindPluginService
   fun bindPluginService(intent: Intent, conn: ServiceConnection, flags: Int): Boolean {
        // todo #25 目前实现未处理flags,后续实现补上

        val componentName = intent.component!!

        // 1. 看要bind的service是否创建并在运行了
        if (!mAliveServicesMap.containsKey(componentName)) {
            // 如果还没创建,则创建,并保持
            val service = createServiceAndCallOnCreate(intent)
            mAliveServicesMap[componentName] = service
        }

        val service = mAliveServicesMap[componentName]!!

        // 2. 检查是否该Service之前是否被绑定过了
        if (!mServiceBinderMap.containsKey(componentName)) {
            // 还没调用过onBinder,在这里调用
            mServiceBinderMap[componentName] = service.onBind(intent)
        }

        // 3. 如果binder不为空,则要回调onServiceConnected
        mServiceBinderMap[componentName]?.let {


            // 检查该connections是否存在了
            if (mServiceConnectionMap.containsKey(componentName)) {

                if (!mServiceConnectionMap[componentName]!!.contains(conn)) {
                    // 如果service的bind connection集合中不包含该connection,则加入
                    mServiceConnectionMap[componentName]!!.add(conn)
                    mConnectionIntentMap[conn] = intent


                    // 回调onServiceConnected
                    conn.onServiceConnected(componentName, it)
                } else {
                    // 已经包含该connection了,说明onServiceConnected已经回调过了,所以这里什么也不用干
                }

            } else {
                // 该connection是第一个bind connection
                val connectionSet = HashSet<ServiceConnection>()
                connectionSet.add(conn)
                mServiceConnectionMap[componentName] = connectionSet
                mConnectionIntentMap[conn] = intent

                // 回调onServiceConnected
                conn.onServiceConnected(componentName, it)
            }
        }

        return true

    }
3.11 插件四大组件之ContentProvider实现
与Activity类似,由注册在宿主manifest中的ContentProvider来代理回调。
这里宿主中对应的是PluginContainerContentProvider,它直接继承自ContentProvider,插件通过Delegate代理回调,现类:PluginContentProviderManager
3.12 插件四大组件之BroadcastReceiver实现
只支持动态广播,静态广播不支持。动态广播不需要在宿主manifest中注册,只需要处理onReceive()回调的context类型为ShadowContext,这里只需要包一层即可:
public class BroadcastReceiverWrapper extends BroadcastReceiver {

    final private BroadcastReceiver mRealBroadcastReceiver;

    final private ShadowContext mShadowContext;

    public BroadcastReceiverWrapper(BroadcastReceiver broadcastReceiver, ShadowContext shadowContext) {
        mRealBroadcastReceiver = broadcastReceiver;
        mShadowContext = shadowContext;
    }

    @Override
    public void onReceive(Context context, Intent intent) {
        intent.setExtrasClassLoader(mShadowContext.mPluginClassLoader);
        mRealBroadcastReceiver.onReceive(mShadowContext, intent);
    }
}
最后总结一张框架加载插件流程核心类UML图:

为了帮助到大家快速掌握好:Shadow插件化、组件化、热修复等架构相关知识点,整理了《Android 架构学习手册》+《深入理解Gradle框架》学习笔记,根据自己学习中所做的一些笔录来整的,主要也是方便后续好复习翻阅,省掉在去网上查找的时间,以免在度踩坑,如果大家有需要的可以 直接通过点击此处↓↓↓ 进行参考学习!!!
Shadow学习参考文档
Android 架构学习手册
如果大家有需要的可以 直接通过点击此处↓↓↓ 进行参考学习!!!
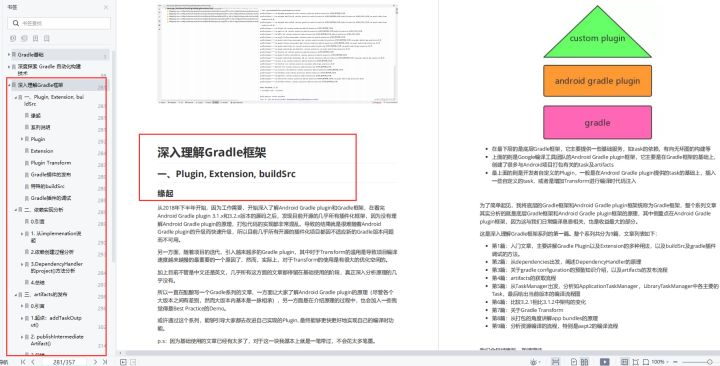
深入理解Gradle框架

瓜分20万奖金 获得内推名额 丰厚实物奖励 易参与易上手
更多推荐


 0
0 0
0- 0


 已为社区贡献1条内容

所有评论(0)