在Jetson Nano上实现单目相机 apritag_ros识别
教程主要是参考 apriltag_ros官方git并根据自己实际使用的情况,作为笔记进行记录一,apritag_ros安装最开始采用克隆源码编译的方式进行安装,后来在Jetson nano上有opencv4与opencv3的依赖问题,后来索性直接采用二进制安装:sudo apt-get install ros-melodic-apriltag-ros二,单目相机标定安装标定包:sudo apt-g
一,apritag_ros安装
最开始采用克隆源码编译的方式进行安装,后来在Jetson nano上有opencv4与opencv3的依赖问题,后来索性直接采用二进制安装:
sudo apt-get install ros-melodic-apriltag-ros
二,单目相机数据读取
这里使用的是uvc_camera包:
launch文件:
这里使用了命名空间head_camera
head_camera为相机标定参数存放位置
  <launch>
  <group ns="head_camera">
    <node pkg="uvc_camera" type="uvc_camera_node" name="head_camera" output="screen">
	<param name="width" type="int" value="640" />
	<param name="height" type="int" value="480" />
	<param name="fps" type="int" value="30" />
    <param name="frame_id" type="string" value="head_camera" />
	<param name="auto_focus" type="bool" value="False" />
	<param name="focus_absolute" type="int" value="0" />
	<param name="device" type="string" value="/dev/video1" />
	<param name="camera_info_url" type="string" value="file://$(find cyrobot)/param/camera/head_camera.yaml" />
   </node>
 </group>
</launch>
三,单目相机标定
安装标定包:
sudo apt-get install ros-melodic-camera-calibration
标定命令:
rosrun camera_calibration cameracalibrator.py --size 7x5 --square 0.0245 image:=/image_raw camera:=/camera --no-service-check
(1)–size 7x5 为棋盘内部角点的个数,方格几列几行(需要减1),比如我的标定板方格是8X6,则siez为7x5。
(2)–square 0.0245为每个棋盘格的边长
(3)image:=/image_raw 为当前订阅的图像来自名为/image_raw的topic
(4)camera:=/head_camera为摄像机名 主要用于COMMIT时自动更新内参参数
- 移动标定板:
为了达到良好的标定效果,需要在摄像机周围移动标定板,并完成以下基本需求:
(1)移动标定板到画面的最左、右,最上、下方。
(2)移动标定板到视野的最近和最远处。
(3)移动标定板使其充满整个画面。
(4)保持标定板倾斜状态并使其移动到画面的最左、右,最上、下方 。
当标定板移动到画面的最左、右方时,此时,窗口的x会达到最小或满值。同理,y指示标定板的在画面的上下位置,size表示标定板在视野中的距离,也可以理解为标定板离摄像头的远近。skew为标定板在视野中的倾斜位置。每次移动之后,请保持标定板不动直到窗口出现高亮提示。
直到条形变为绿色。当calibration按钮亮起时,代表已经有足够的数据进行摄像头的标定,此时请按下calibration并等待一分钟左右,标定界面会变成灰色,无法进行操作,属于正常情况。

界面灰色恢复后,点击save,就会自动保存在tmp目录:

进入tmp目录解压:

解压出的ost.yaml即为标定结果
接着转换格式:
rosrun camera_calibration_parsers convert ost.yaml camera.yaml

转换出的camera.yaml即为标准的ROS内参格式
接着填入内参yaml参数:
需要注意的是我这里使用的uvc_camera功能包貌似只支持的camera_name 为camera的单目相机类型,写为front_camera或back_camera均会报错
image_width: 640
image_height: 480
camera_name: camera
camera_matrix:
  rows: 3
  cols: 3
  data: [626.3262036036353, 0, 300.5591565230002, 0, 627.3720075547461, 244.4302177150301, 0, 0, 1]
distortion_model: plumb_bob
distortion_coefficients:
  rows: 1
  cols: 5
  data: [0.1367930342496266, -0.1715444663163723, 0.001436032994469869, -0.00732797305912324, 0]
rectification_matrix:
  rows: 3
  cols: 3
  data: [1, 0, 0, 0, 1, 0, 0, 0, 1]
projection_matrix:
  rows: 3
  cols: 4
  data: [643.0006713867188, 0, 296.6836730995783, 0, 0, 648.4296875, 244.9678966293577, 0, 0, 0, 1, 0]
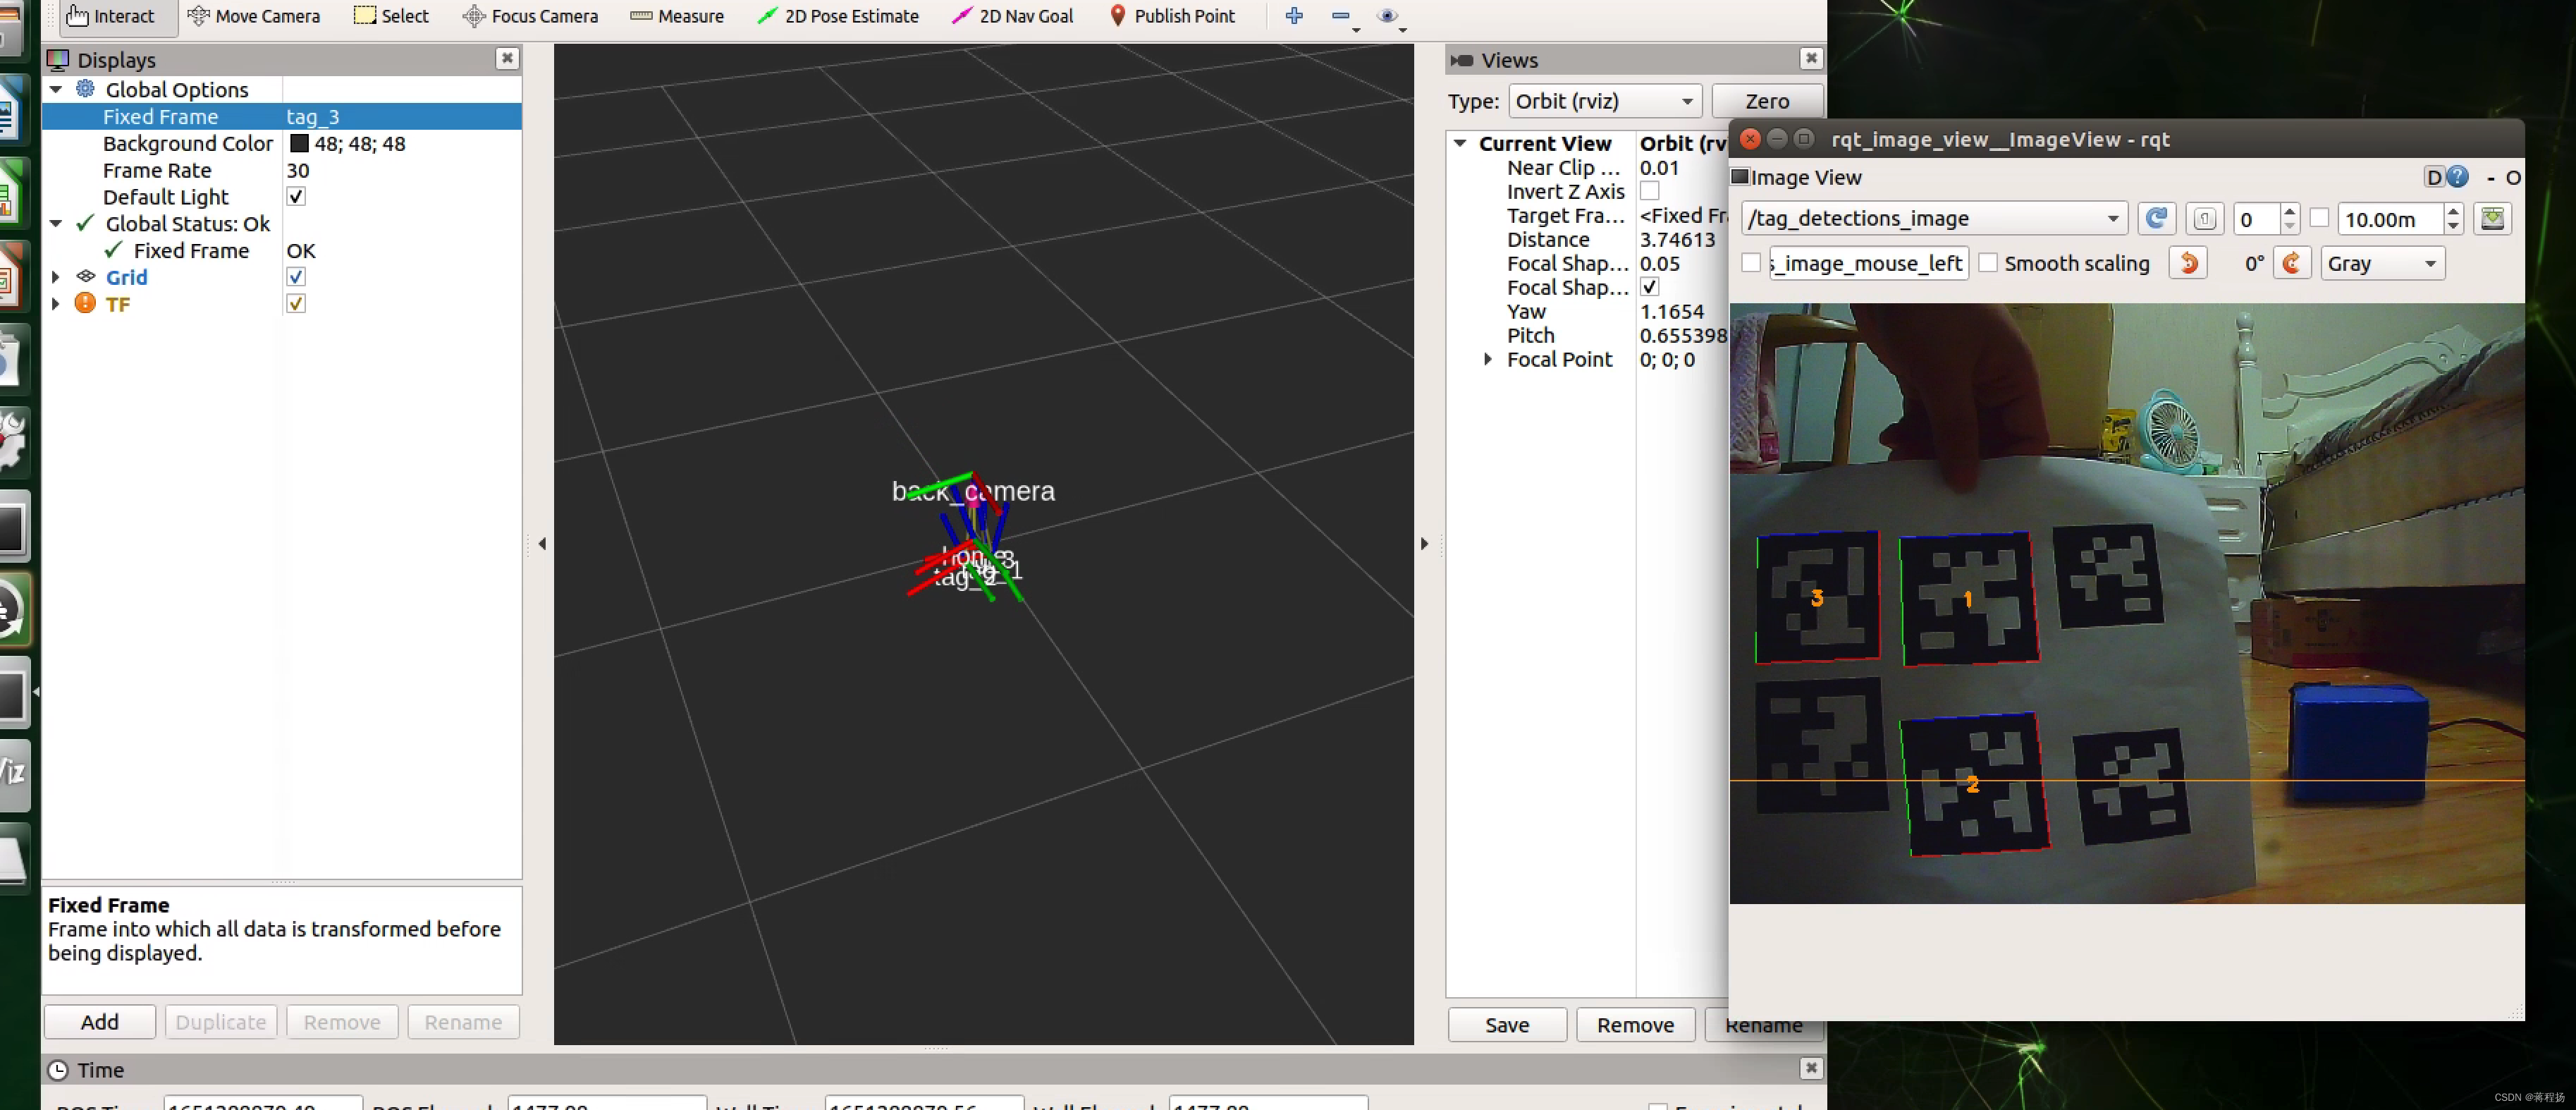
四,apriltag识别:
启动功能包:
roslaunch apriltag_ros continuous_detection.launch
查看launch内容,发现需要配置如下:
修改camera_name与image_topic为自己实际使用的
<launch>
  <arg name="launch_prefix" default="" /> <!-- set to value="gdbserver localhost:10000" for remote debugging -->
  <arg name="node_namespace" default="apriltag_ros_continuous_node" />
  <arg name="camera_name" default="/camera_rect" />
  <arg name="image_topic" default="image_rect" />

  <!-- Set parameters -->
  <rosparam command="load" file="$(find apriltag_ros)/config/settings.yaml" ns="$(arg node_namespace)" />
  <rosparam command="load" file="$(find apriltag_ros)/config/tags.yaml" ns="$(arg node_namespace)" />

  <node pkg="apriltag_ros" type="apriltag_ros_continuous_node" name="$(arg node_namespace)" clear_params="true" output="screen" launch-prefix="$(arg launch_prefix)" >
    <!-- Remap topics from those used in code to those on the ROS network -->
    <remap from="image_rect" to="$(arg camera_name)/$(arg image_topic)" />
    <remap from="camera_info" to="$(arg camera_name)/camera_info" />

    <param name="publish_tag_detections_image" type="bool" value="true" />      <!-- default: false -->
  </node>
</launch>
其中还要修改两个识别配置文件:
找到apriltag的安装目录,更改config:

settings.yaml:
我这里打印的为tag36h11类型的
tag_family:        'tag36h11' # options: tagStandard52h13, tagStandard41h12, tag36h11, tag25h9, tag16h5, tagCustom48h12, tagCircle21h7, tagCircle49h12  #支持单一标签类型
tag_threads:       2          # default: 2           # 设置Tag_Threads允许核心APRILTAG 2算法的某些部分运行并行计算。 典型的多线程优点和限制适用
tag_decimate:      1.0        # default: 1.0       #减小图像分辨率
tag_blur:          0.0        # default: 0.0            #设置tag_blur> 0模糊图像,tag_blur  < 0锐化图像
tag_refine_edges:  1          # default: 1       #增强了计算精度,但消耗了算力
tag_debug:         0          # default: 0            #1为保存中间图像到~/.ros
max_hamming_dist:  2          # default: 2 (Tunable parameter with 2 being a good choice - values >=3 consume large amounts of memory. Choose the largest value possible.)
# Other parameters
publish_tf:        true       # default: false       #发布tf坐标
tags.yaml
standalone_tags中需要依次填入所有需要识别的tag对应的id与size,size的话填边长,需要尽量准确,可以提高识别准确率
standalone_tags:
  [
    {id: 0, size: 0.033,name: "home"},   #size对应标签的大小
    {id: 1, size: 0.066},
    {id: 2, size: 0.04},
    {id: 3, size: 0.07},
    {id: 4, size: 0.045}
  ]
tag_bundles:
  [
  ]
接下来运行launch,即可进行识别

参考:
https://blog.csdn.net/lemonxiaoxiao/article/details/107719348
https://blog.csdn.net/qq_25241325/article/details/82705003

开放原子开发者工作坊旨在鼓励更多人参与开源活动,与志同道合的开发者们相互交流开发经验、分享开发心得、获取前沿技术趋势。工作坊有多种形式的开发者活动,如meetup、训练营等,主打技术交流,干货满满,真诚地邀请各位开发者共同参与!
更多推荐

 1
1 0
0- 0


 已为社区贡献3条内容

所有评论(0)