
(六)Vue项目——轻社区:完成邮件激活+激活账号+修改邮箱等
Vue项目“轻社区”,实现用户登录注册+用户中心+邮件激活+分类管理+点赞+回复操作等功能。打造微一站式互动轻社区。
目录
邮件激活
1.激活页面
在src\router\index.js中添加路由。
{
path: '/user', name: 'user', redirect: '/user/profile', component: resolve => require(['@/pages/User.vue'], resolve),
children: [
……(原有代码)
{ path: 'send_activate_email', name: 'user/send_activate_email', component: resolve => require(['@/pages/user/SendActivateEmail.vue'], resolve), meta: { title: '发送激活邮件' } }
]
},
创建src\pages\user\SendActivateEmail.vue。
<template>
<div>
<div>
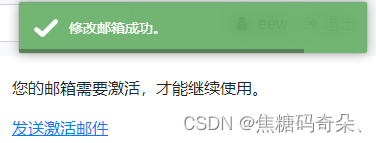
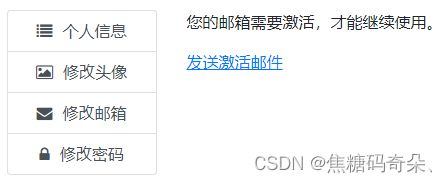
<p>您的邮箱需要激活,才能继续使用。</p>
<p><span @click="active" class="link">发送激活邮件</span></p>
</div>
</div>
</template>
<script>
export default {
data () {
return {
wait: false
}
},
methods: {
active () {
if (this.wait) {
return
}
this.wait = true
this.$http.post('user/sendActivateEmail').then(res => {
this.wait = false
if (res.data.code === 0) {
this.$toastr.e(res.data.msg)
} else if (res.data.code === 1) {
this.$toastr.s(res.data.msg)
}
}).catch(() => {
this.$toastr.e('操作失败,服务器异常。')
})
}
}
}
</script>
<style scoped>
.link {
color: #007BFF;
text-decoration: underline;
cursor: pointer;
}
</style>
在src\pages\user\Profile.vue个人信息页面添加路由链接。
<span v-if="user.is_active !== undefined">
<span v-if="user.is_active" class="text-success">已激活</span>
<span v-else>
未激活
<router-link :to="{ name: 'user/send_activate_email' }">立即激活</router-link>
</span>
</span>
页面效果如下
2.自动跳转
打开src\pages\Register.vue,在注册成功后自动跳转到激活页面。
this.$http.post('user/register', this.form).then(res => {
if (res.data.code === 0) {
this.$toastr.e(res.data.msg)
} else if (res.data.code === 1) {
……(原有代码)
this.$router.replace({ name: 'user/send_activate_email' })
}
}).catch(() => {
this.$toastr.e('操作失败,服务器异常。')
})
打开src\pages\Login.vue,在登录成功后自动跳转到激活页面。
this.$http.post('user/login', this.form).then(res => {
if (res.data.code === 0) {
this.$toastr.e(res.data.msg)
} else if (res.data.code === 1) {
this.$store.commit('setUser', res.data.data)
this.$config.setAuthorization(res.data.data.session_id)
if (res.data.data.is_active) {
this.$router.replace({ name: 'home' })
} else {
this.$router.replace({ name: 'user/send_activate_email' })
}
}
}).catch(() => {
this.$toastr.e('登录失败,服务器异常。')
})
3.发送激活邮件
打开route\route.php,添加路由。
Route::post('user/sendActivateEmail', 'api/User/sendActivateEmail');
打开application\api\controller\User.php,编写sendActivateEmail()方法。
public function sendActivateEmail()
{
}
创建配置文件application\api\config\lightbbs.php,保存发送邮件的配置。
<?php
return [
'email' => [
'SMTPAuth' => true,
'SMTPSecure' => 'ssl',
'Host' => Env::get('email.Host', ''),
'Port' => Env::get('email.Port', ''),
'Username' => Env::get('email.Username', ''),
'Password' => Env::get('email.Password', ''),
'Name' => 'LightBBS',
],
'sendEmail' => [
'clientURL' => 'http://localhost:8080' // 客户端URL
]
];
在.env文件中添加邮件服务器配置。可以到QQ邮箱或163邮箱开通SMTP服务,然后获取邮箱的账号。
……(原有代码)
[email]
Host = smtp.qq.com
Port = 465
Username = 用户名@qq.com
Password = SMTP密码
上述代码中的Username和Password需要填写自己申请的账号。
然后安装发送邮件模块。
composer require phpmailer/phpmailer=6.1
创建application\api\library\Email.php。
<?php
namespace app\api\library;
use PHPMailer\PHPMailer\PHPMailer;
use think\Facade\Config;
class Email
{
protected $config;
public function __construct()
{
$this->config = Config::get('lightbbs.email');
}
public function sendEmail($address, $name = '', $subject = '', $body = '')
{
$mail = new PHPMailer(); // 实例化PHPMailer对象
$mail->CharSet = 'UTF-8'; // 设定邮件编码
$mail->isSMTP(); // 设定使用SMTP服务
$mail->SMTPAuth = $this->config['SMTPAuth']; // 启用SMTP验证功能
$mail->SMTPSecure = $this->config['SMTPSecure']; // 使用安全协议
$mail->Host = $this->config['Host']; // SMTP服务器
$mail->Port = $this->config['Port']; // SMTP服务器的端口号
$mail->Username = $this->config['Username']; // SMTP服务器用户名
$mail->Password = $this->config['Password']; // SMTP服务器密码
$mail->SetFrom($mail->Username, $this->config['Name']); // 设置发件人信息
$replyEmail = ''; // 留空则为发件人EMAIL
$replyName = ''; // 回复名称(留空则为发件人名称)
$mail->AddReplyTo($replyEmail, $replyName); // 设置回复人信息,指的是收件人收到邮件后,如果要回复,回复邮件将发送到的邮箱地址
$mail->Subject = $subject; // 邮件标题
$mail->MsgHTML($body); // 邮件正文
$mail->AddAddress($address, $name); // 设置收件人信息
return $mail->Send() ? true : $mail->ErrorInfo;
}
}
在application\api\controller\User.php中导入命名空间。
use app\api\library\Email;
use think\Facade\Cache;
use think\Facade\Config;
编写sendActivateEmail()方法。
public function sendActivateEmail()
{
$id = $this->user->id;
$user = UserModel::get($id);
if (!$user) {
$this->error('用户不存在。');
}
}
生成激活码,拼接到邮件内容的字符串中。
public function sendActivateEmail()
{
……(原有代码)
$key = md5(microtime(true));
$url = Config::get('lightbbs.sendEmail.clientURL');
$url .= '/activate_account?key=' . $key;
$subject = '用户帐号激活';
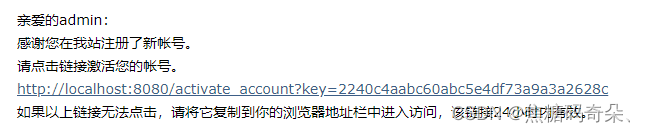
$body = '亲爱的' . $user->name . ':<br>感谢您在我站注册了新帐号。<br>请点击链接激活您的帐号。<br>';
$body .= '<a href="' . $url . '" target="_blank">' . $url . '</a><br>';
$body .= '如果以上链接无法点击,请将它复制到你的浏览器地址栏中进入访问,该链接24小时内有效。';
}
发送邮件,将生成的激活码保存在缓存中,有效期为24小时。
public function sendActivateEmail()
{
……(原有代码)
$email = new Email();
$res = $email->sendEmail($user->email, $user->name, $subject, $body);
if ($res === true) {
Cache::set('activate_email_url_' . $key, $user->id, 24 * 60 * 60);
} else {
$this->error('发送激活邮件失败,请联系网站管理员。');
}
$this->success('发送激活邮件成功,请登录您的邮箱查看。');
}
测试程序

到邮箱中查看邮件
限制发信次数。在application\api\config\lightbbs.php中添加配置。
'sendEmail' => [
'limitMinute' => 5, // 几分钟内只能发送一次邮件(最大值为1440)
'maxRetry' => 5, // 每日允许发送几次邮件
'clientURL' => 'http://localhost:8080' // 客户端URL
]
在application\api\controller\User.php中进行限制。
public function sendActivateEmail()
{
$id = $this->user->id;
$limitMinute = Config::get('lightbbs.sendEmail.limitMinute');
$maxRetry = Config::get('lightbbs.sendEmail.maxRetry');
$time = Cache::get('send_activate_email_time_' . $id, 0);
if ($time + $limitMinute * 60 > time()) {
$this->error($limitMinute . '分钟内只能发送一次邮件。');
}
if (date('d', $time) !== date('d')) {
Cache::set('send_activate_email_count_' . $id, 0);
}
$count = Cache::get('send_activate_email_count_' . $id, 0);
if ($count >= $maxRetry) {
$this->error('每天最多只能发送' . $maxRetry . '次邮件,您已经达到上限,请明天再试。');
}
Cache::set('send_activate_email_time_' . $id, time(), 86400);
Cache::set('send_activate_email_count_' . $id, $count + 1, 86400);
……(原有代码)
}
测试程序

4.激活账号
在src\router\index.js中添加路由。
routes: [
……(原有代码)
{ path: '/activate_account', name: 'activate_account', component: resolve => require(['@/pages/ActivateAccount.vue'], resolve), meta: { title: '激活账号' } },
],
创建src\pages\ActivateAccount.vue。
<template>
<div>
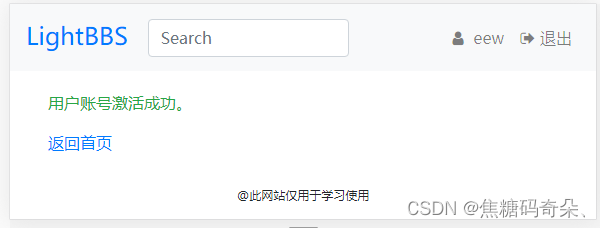
<div v-if="success">
<p class="text-success">{{ msg }}</p>
<router-link :to="{ name: 'home' }">返回首页</router-link>
</div>
<p v-else>正在激活您的账号……</p>
</div>
</template>
<script>
export default {
data () {
return {
msg: '',
success: false
}
},
created () {
var key = this.$route.query.key
if (key) {
var data = { key: key }
this.$http.post('user/activateAccount', data).then(res => {
if (res.data.code === 0) {
this.$toastr.e(res.data.msg)
} else if (res.data.code === 1) {
this.msg = res.data.msg
this.success = true
}
}).catch(() => {
this.$toastr.e('操作失败,服务器异常。')
})
}
}
}
</script>
<style scoped>
.link {
margin-top: 10px;
color: #007BFF;
text-decoration: underline;
cursor: pointer;
}
</style>
打开route\route.php,添加服务器路由。
Route::post('user/activateAccount', 'api/User/activateAccount');
在application\api\controller\User.php中编写activateAccount()方法。
public function activateAccount()
{
$key = $this->request->post('key/s');
$id = Cache::get('activate_email_url_' . $key);
if (!$id) {
$this->error('激活链接无效或已过期。');
}
$user = UserModel::get($id);
if (!$user) {
$this->error('用户不存在');
}
$user->is_active = 1;
$user->save();
$this->success('用户账号激活成功。');
}
将activateAccount()方法添加到“不检查登录”列表中。
protected $checkLoginExclude = ['login', 'register', 'activateaccount'];
测试程序

打开src\store\index.js,编写setUserActive()方法。
const mutations = {
……(原有代码)
setUserActive (state, is_active = true) {
state.user.is_active = is_active
}
}
在src\pages\ActivateAccount.vue中将用户激活。
this.$http.post('user/activateAccount', data).then(res => {
if (res.data.code === 0) {
this.$toastr.e(res.data.msg)
} else if (res.data.code === 1) {
this.msg = res.data.msg
this.success = true
if (this.$store.state.isLogin) {
this.$store.commit('setUserActive', true)
}
}
}).catch(() => {
this.$toastr.e('操作失败,服务器异常。')
})
测试程序
5.检查账号是否激活
打开application\api\controller\Common.php。
protected $checkActive = [];
在initialize()方法中进行检查。
if (!in_array($action, $this->checkLoginExclude)) {
……(原有代码)
if (!$this->user->is_active && in_array($action, $this->checkActive)) {
$this->error('操作失败,您的账号还没有激活。');
}
}
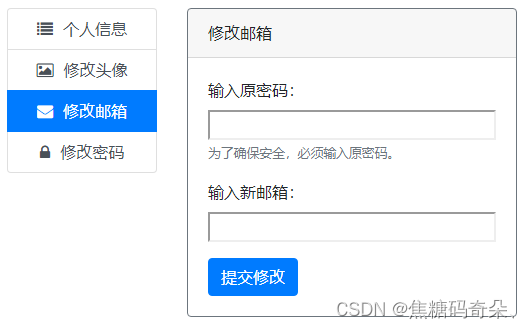
6.修改邮箱
打开src\pages\user\Email.vue,编写代码。
<template>
<div>
<transition appear appear-active-class="animated fadeIn">
<div class="card border-secondary">
<div class="card-header">修改邮箱</div>
<div class="card-body">
<div class="form-group">
<label>输入原密码:</label>
<input type="password" class="form-control-file" v-model="form.password" />
<small class="text-secondary">为了确保安全,必须输入原密码。</small>
</div>
<div class="form-group">
<label>输入新邮箱:</label>
<input type="text" class="form-control-file" v-model="form.email" />
</div>
<input @click="submit" type="button" class="btn btn-primary" value="提交修改" />
</div>
</div>
</transition>
</div>
</template>
<script>
export default {
data () {
return {
form: {
password: '',
email: ''
}
}
},
methods: {
submit () {
var data = this.form
this.$http.post('user/updateEmail', data).then(res => {
if (res.data.code === 0) {
this.$toastr.e(res.data.msg)
} else if (res.data.code === 1) {
this.$toastr.s(res.data.msg)
this.$router.push({ name: 'user/send_activate_email' })
}
}).catch(() => {
this.$toastr.e('服务器异常。')
})
}
}
}
</script>
页面效果如下
打开route\route.php,添加服务器路由。
Route::post('user/updateEmail', 'api/User/updateEmail');
打开application\api\controller\User.php,编写updateEmail()方法。
public function updateEmail()
{
$data = [
'email' => $this->request->post('email/s', ''),
'password' => $this->request->post('password/s', '')
];
}
在application\api\validate\User.php中添加验证场景。
public function sceneEmail()
{
return $this->remove('name')
->append('email', 'require|email|max:128|unique:user');
}
打开application\api\controller\User.php,编写updateEmail()方法。
public function updateEmail()
{
……(原有代码)
$validate = new UserValidate;
if (!$validate->scene('email')->check($data)) {
$this->error('修改失败:' . $validate->getError() . '。');
}
$id = $this->user->id;
$user = UserModel::get($id);
if (!$user) {
$this->error('修改失败,用户不存在。');
}
if ($user->password != $this->auth->passwordMD5($data['password'], $user->salt)) {
$this->error('修改失败,原密码不正确。');
}
$user->is_active = 0;
$user->email = $data['email'];
if (!$user->save()) {
$this->error('修改邮箱失败。');
}
$this->success('修改邮箱成功。');
}
测试程序

瓜分20万奖金 获得内推名额 丰厚实物奖励 易参与易上手
更多推荐


 0
0 0
0- 0


 已为社区贡献5条内容

所有评论(0)