

2023最新最全【OpenMV】 入门教程
1. 什么是OpenMVOpenMV 是一个开源,低成本,功能强大的 机器视觉模块。OpenMV上的机器视觉算法包括 寻找色块、人脸检测、眼球跟踪、边缘检测、标志跟踪 等。以STM32F427CPU为核心,集成了OV7725摄像头芯片,在小巧的硬件模块上,用C语言高效地实现了核心机器视觉算法,提供Python编程接口。(这也就意味着,我们可以通过python来对他进行编程,所以我们就需要学习一点基
1. 什么是OpenMV
OpenMV 是一个开源,低成本,功能强大的 机器视觉模块。
OpenMV上的机器视觉算法包括 寻找色块、人脸检测、眼球跟踪、边缘检测、标志跟踪 等。
以STM32F427CPU为核心,集成了OV7725摄像头芯片,在小巧的硬件模块上,用C语言高效地实现了核心机器视觉算法,提供Python编程接口。
(这也就意味着,我们可以通过python来对他进行编程,所以我们就需要学习一点基础的python知识)
————————————————
2. 关于OpenMV 和 OpenCV
OpenMV是 开源的机器视觉框架,而 OpenMV 是一种 开源计算机视觉库,两者都是实现视觉应用的工具,不同的是 OpenMV 可以运行在 MCU 上,而OpenCV可以运行在多种框架的 CPU上,OpenMV的优势在于轻量化,但是处理高复杂图形信息和告诉图像能力的时候明显弱于OpenCV
————————————————
3. OpenMV的教程
以上链接为 星瞳官方 所给我们的上手教程,我们接下来的内容也是对视频内容的笔记
以上链接为 Python 语法的学习网址,适合对其他语言有一些基础的同学
————————————————
4. OpenMV IDE 界面介绍

上面是我们下载完 IDE 后进入的界面

中间的这一块是我们的代码编辑框,我们可以在这里写代码

右上角是 Frame Buffer,可以用来查看OpenMV的摄像头的头像

右下方是 图像的直方图,可以查看图像不同的颜色阈值

当我们连接OpenMV后,点击连接,就可以看到 图像显示出来了

左上角的菜单栏 File

在下面了 示例 里面,有一些官方给的历程

————————————

控制一些 基本的外设
————————————————

画图,画十字,画线,画框
————————————————

与图像相关的滤波
————————————————

图像的截图保存等
————————————————

录制视频等
————————————————

人脸识别,人脸追踪
————————————————

这里面有一些特征点匹配:
直线线段 ,圆识别, 边缘检测,模板匹配等等
————————————————

瞳孔识别,人眼识别
————————————————

与颜色识别有关: 自动灰度颜色识别 ,自动彩图颜色识别,红外颜色识别 等等
————————————————

运行LCD程序,当我们外接LCD显示屏的时候使用
————————————————

红外热成像的一个例程
____________________________

蓝牙 , WIFI ,舵机拓展板 例程
——————————————

条码,二维码相关的扫描识别
____________________________________________________
然后 Edit 里面,就是我们最经常使用的复制 黏贴等

———————————————————————————
5. 基础程序的讲解
# Hello World Example
#
# Welcome to the OpenMV IDE! Click on the green run arrow button below to run the script!
import sensor, image, time
sensor.reset() # Reset and initialize the sensor.
sensor.set_pixformat(sensor.RGB565) # Set pixel format to RGB565 (or GRAYSCALE)
sensor.set_framesize(sensor.QVGA) # Set frame size to QVGA (320x240)
sensor.skip_frames(time = 2000) # Wait for settings take effect.
clock = time.clock() # Create a clock object to track the FPS.
while(True):
clock.tick() # Update the FPS clock.
img = sensor.snapshot() # Take a picture and return the image.
print(clock.fps()) # Note: OpenMV Cam runs about half as fast when connected
# to the IDE. The FPS should increase once disconnected.

- 1
- 2
- 3
- 4
- 5
- 6
- 7
- 8
- 9
- 10
- 11
- 12
- 13
- 14
- 15
- 16
- 17
- 18
- 19
上面这段代码,也就是我们刚进入 IDE 时,直接给我们的,我们对他先来进行分析
· 首先 import 是导入此代码所依赖的模块,在 hellow world 这个代码中主要依赖
| sensor | 感光元件模块 |
| image | 图像处理相关模块 |
| time | 时钟 |
| sensor.reset() | 重置感光元件 |
| RGB565 | 彩图 |
| sensor.set_pixformat(sensor.RGB565) | 设置感光元件的图像的色彩 |
| sensor.set_framesize(sensor.QVGA) | 设置感光元件的分辨率的大小 |
| sensor.skip_frames(time = 2000) | 使图像跳过几帧 |
| clock = time.clock() | 设置时钟 |
我们进入一个while大循环,在这里 image 在不断的截图保存图像,而截取的图像我们就可以在右上角看到
最后一句 也就是打印的帧率,我们可以在下面的框Terminal看到
——————————————————————————————————
5. 如何进行OpenMV的脱机运行程序
而我们想把我们的代码在我们不连接电脑的时候使用,我们就需要用到脱机运行
把代码保存的 OpenMV内置的 flash 内存 里面(也就是OpenMV连接电脑时,弹出的U盘,我们把文件保存在那里面,我们在那里面存储代码或图片)
我们使用 工具 里的 一键下载
当写入成功时,我们的灯会亮一下,就代表脱机完成,脱机成功后,我们给OpenMV重新上电(也就是重新启动一下),就可以自动运行里面的代码。我们也可以在 OpenMV的U盘里面看到我们刚刚保存的代码
OpenMV保存的 时候 会把我们的代码默认保存为 main.py,我们也可以在保存之后重新保存为其他的名称 .py
但需要注意的是,我们上电之后,他会自动执行我们 main.py的程序,而不是其他的程序
关于我们如何查看是否正确保存了我们的代码,我们可以将示例代码中闪灯的代码,作为测试,保存到我们的 main.py 里面,然后上电之后看看有没正确闪灯即可
如果我们发现,有时候并没有正确的把代码保存进去,我们就可以把U盘格式化一下,再重新保存
——————————————————————————————————
6. 颜色识别
前面我们知道,OpenMV里面有很多的颜色识别,我们就来看一下 单颜色彩色识别
# Single Color RGB565 Blob Tracking Example
#
# This example shows off single color RGB565 tracking using the OpenMV Cam.
import sensor, image, time, math
threshold_index = 0 # 0 for red, 1 for green, 2 for blue
Color Tracking Thresholds (L Min, L Max, A Min, A Max, B Min, B Max)
The below thresholds track in general red/green/blue things. You may wish to tune them…
thresholds = [(30, 100, 15, 127, 15, 127), # generic_red_thresholds
(30, 100, -64, -8, -32, 32), # generic_green_thresholds
(0, 30, 0, 64, -128, 0)] # generic_blue_thresholds
sensor.reset()
sensor.set_pixformat(sensor.RGB565)
sensor.set_framesize(sensor.QVGA)
sensor.skip_frames(time = 2000)
sensor.set_auto_gain(False) # must be turned off for color tracking
sensor.set_auto_whitebal(False) # must be turned off for color tracking
clock = time.clock()
Only blobs that with more pixels than “pixel_threshold” and more area than “area_threshold” are
returned by “find_blobs” below. Change “pixels_threshold” and “area_threshold” if you change the
camera resolution. “merge=True” merges all overlapping blobs in the image.
while(True):
clock.tick()
img = sensor.snapshot()
for blob in img.find_blobs([thresholds[threshold_index]], pixels_threshold=200, area_threshold=200, merge=True):
# These values depend on the blob not being circular - otherwise they will be shaky.
if blob.elongation() > 0.5:
img.draw_edges(blob.min_corners(), color=(255,0,0))
img.draw_line(blob.major_axis_line(), color=(0,255,0))
img.draw_line(blob.minor_axis_line(), color=(0,0,255))
# These values are stable all the time.
img.draw_rectangle(blob.rect())
img.draw_cross(blob.cx(), blob.cy())
# Note - the blob rotation is unique to 0-180 only.
img.draw_keypoints([(blob.cx(), blob.cy(), int(math.degrees(blob.rotation())))], size=20)
print(clock.fps())
- 1
- 2
- 3
- 4
- 5
- 6
- 7
- 8
- 9
- 10
- 11
- 12
- 13
- 14
- 15
- 16
- 17
- 18
- 19
- 20
- 21
- 22
- 23
- 24
- 25
- 26
- 27
- 28
- 29
- 30
- 31
- 32
- 33
- 34
- 35
- 36
- 37
- 38
- 39
- 40
- 41
- 42
- 43
- 44
最开始也是导入代码所需要的模块
import sensor, image, time, math
- 1
- 2
- 3
接下来设置颜色的阈值
threshold_index = 0 # 0 for red, 1 for green, 2 for blue
- 1
- 2
然后 重置感光元件,摄像头。设置颜色格式为RGB565, 图像大小为QVGA,设置帧率
关闭颜色识别中的白平衡和自动增益(打开可能会使颜色的阈值发生改变)
sensor.reset()
sensor.set_pixformat(sensor.RGB565)
sensor.set_framesize(sensor.QVGA)
sensor.skip_frames(time = 2000)
sensor.set_auto_gain(False) # must be turned off for color tracking
sensor.set_auto_whitebal(False) # must be turned off for color tracking
clock = time.clock()
- 1
- 2
- 3
- 4
- 5
- 6
- 7
- 8
在 while 循环里面
首先先截取感光元件的一张图片
for blob in img.find_blobs([thresholds[threshold_index]], pixels_threshold=200, area_threshold=200, merge=True):
- 1
- 2
这是 python的语法,在下面进行判断。
它的意思是 在这个函数中,我们进行颜色识别,find_blobs 这个函数会返回一个列表
roi是“感兴趣区”。
left_roi = [0,0,160,240]
blobs = img.find_blobs([red],roi=left_roi)
x_stride 就是查找的色块的x方向上最小宽度的像素,默认为2,如果你只想查找宽度10个像素以上的色块,那么就设置这个参数为10:
blobs = img.find_blobs([red],x_stride=10)
y_stride 就是查找的色块的y方向上最小宽度的像素,默认为1,如果你只想查找宽度5个像素以上的色块,那么就设置这个参数为5:
blobs = img.find_blobs([red],y_stride=5)
invert 反转阈值,把阈值以外的颜色作为阈值进行查找
area_threshold 面积阈值,如果色块被框起来的面积小于这个值,会被过滤掉
pixels_threshold 像素个数阈值,如果色块像素数量小于这个值,会被过滤掉
merge 合并,如果设置为True,那么合并所有重叠的blob为一个。
注意:这会合并所有的blob,无论是什么颜色的。如果你想混淆多种颜色的blob,只需要分别调用不同颜色阈值的find_blobs。
- 1
- 2
- 3
- 4
- 5
- 6
- 7
- 8
- 9
- 10
- 11
- 12
- 13
- 14
- 15
- 16
- 17
- 18
- 19
- 20
- 21
- 22
在这,我们是默认查找红色

他把红色给我们框出来了
find_blobs对象返回的是多个 blob 的列表。(注意区分blobs和blob,这只是一个名字,用来区分多个色块,和一个色块)。
列表类似与C语言的数组,一个blobs列表里包含很多blob对象,blobs对象就是色块,每个blobs对象包含一个色块的信息
blob有多个方法:
blob.rect() 返回这个色块的外框——矩形元组(x, y, w, h),可以直接在image.draw_rectangle中使用。
blob.x() 返回色块的外框的x坐标(int),也可以通过blob[0]来获取。
blob.y() 返回色块的外框的y坐标(int),也可以通过blob[1]来获取。
blob.w() 返回色块的外框的宽度w(int),也可以通过blob[2]来获取。
blob.h() 返回色块的外框的高度h(int),也可以通过blob[3]来获取。
blob.pixels() 返回色块的像素数量(int),也可以通过blob[4]来获取。
blob.cx() 返回色块的外框的中心x坐标(int),也可以通过blob[5]来获取。
blob.cy() 返回色块的外框的中心y坐标(int),也可以通过blob[6]来获取。
blob.rotation() 返回色块的旋转角度(单位为弧度)(float)。如果色块类似一个铅笔,那么这个值为0180°。如果色块是一个圆,那么这个值是无用的。如果色块完全没有对称性,那么你会得到0360°,也可以通过blob[7]来获取。
blob.code() 返回一个16bit数字,每一个bit会对应每一个阈值。举个例子:
blobs = img.find_blobs([red, blue, yellow], merge=True)
如果这个色块是红色,那么它的code就是0001,如果是蓝色,那么它的code就是0010。注意:一个blob可能是合并的,如果是红色和蓝色的blob,那么这个blob就是0011。这个功能可以用于查找颜色代码。也可以通过blob[8]来获取。
blob.count() 如果merge=True,那么就会有多个blob被合并到一个blob,这个函数返回的就是这个的数量。如果merge=False,那么返回值总是1。也可以通过blob[9]来获取。
blob.area() 返回色块的外框的面积。应该等于(w * h)
blob.density() 返回色块的密度。这等于色块的像素数除以外框的区域。如果密度较低,那么说明目标锁定的不是很好。
比如,识别一个红色的圆,返回的blob.pixels()是目标圆的像素点数,blob.area()是圆的外接正方形的面积。
- 1
- 2
- 3
- 4
- 5
- 6
- 7
- 8
- 9
- 10
- 11
- 12
- 13
- 14
- 15
- 16
- 17
- 18
- 19
- 20
- 21
- 22
- 23
- 24
- 25
- 26
- 27
- 28
- 29
- 30
- 31
- 32
- 33
————————
阈值
red = (minL, maxL, minA, maxA, minB, maxB)
- 1
- 2
- 3
以上是一个 颜色阈值的结构
元组里面的数值分别是L A B 的最小值和最大值。
OpenMV 的IDE里加入了阈值选择工具,极大的方便了对于颜色阈值的调试。
————————————————————————————
7. 视觉小车
控制视觉小车,对于OpenMV / K210 这端来说 最重要的就是识别元素,并且 把元素发送给我们的主控单片机,让主控来控制小车,这才是我们最需要的
所以接下来我主要从识别的区域和发送的区域来重新理解
(接下来的内容 以 2021电赛f题 送药小车为主体,参考了多个up主以博客,在后续我会一一标注上)
1. 关于OpenMV的循迹
#uart = UART(1, 115200)   # 串口配置      P1   P0(TX RX)
#uart = UART(3, 115200)   #               P4   P5
THRESHOLD = (20, 47, 21, 57, 11, 47)
import sensor, image, time,ustruct
from pyb import UART,LED
import pyb
sensor.reset()
#sensor.set_vflip(True)
#sensor.set_hmirror(True)
sensor.set_pixformat(sensor.RGB565)
sensor.set_framesize(sensor.QQQVGA)
#sensor.set_windowing([0,20,80,40])
sensor.skip_frames(time = 2000)
clock = time.clock()
#32通信
uart = UART(1,115200) #定义串口3变量
uart.init(115200, bits=8, parity=None, stop=1) # init with given parameters
#识别区域,绘图区域 左右上区域
roi1 = [(0, 17, 15, 25), # 左 x y w h
(65,17,15,25), # 右
(30,0,20,15), # 上
(0,0,80,60)] # 停车
def send_data_w(x,a,f_x,f_a):
global uart;
data = ustruct.pack(“<bbhhhhb”, #格式为俩个字符俩个短整型(2字节)
0x2C, #帧头1 00101100
0x12, #帧头2 00010010
#下面的4个数据存到上面的情况里面,进行一个打包
int(x), # rho 截距
int(a), # theat 角度
int(f_x), # 位置判断信息
int(f_a), # 位置判断信息
0x5B) # 帧尾 01011011
uart.write(data);
while(True):
clock.tick()
img = sensor.snapshot().binary([THRESHOLD])
line = img.get_regression([(100,100)], robust = True)
left_flag,right_flag,up_flag=(0,0,0)#三个区域块的值,和下面的判断相关
for rec in roi1:
        img.draw_rectangle(rec, color=(255,0,0))#绘制出roi区域

if (line):
    rho_err = abs(line.rho())-img.width()/2
    if line.theta()>90:
        theta_err = line.theta()-180
    else:
        theta_err = line.theta()
    #直角坐标调整
    img.draw_line(line.line(), color = 127)
    #画出直线
    x=int(rho_err)
    a=int(theta_err)
    f_x=0
    f_a=0
    if x<0:
      x=-x
      f_x=1
    if a<0:
      a=-a
      f_a=1

    if line.magnitude()>8:
        outdata=[x,a,f_x,f_a]
        print(outdata)
        send_data_w(x,a,f_x,f_a)  #outuart发送的就是 x,a,flag,对应的就是截距,角度
        if img.find_blobs([(96, 100, -13, 5, -11, 18)],roi=roi1[0]):  #left
            left_flag=1
        if img.find_blobs([(96, 100, -13, 5, -11, 18)],roi=roi1[1]):  #right
            right_flag=1
        if img.find_blobs([(96, 100, -13, 5, -11, 18)],roi=roi1[2]):  #up
            up_flag=1
        if left_flag==1 and right_flag==1:
            send_data_w(0,0,2,2)
            time.sleep_ms(100)
            send_data_w(0,0,2,2)
            print(0,0,2,2)
            print('shizi')


            continue
    else:
        pass
else:
    send_data_w(0,0,3,3)
    print('3')
    print('stop')
- 1
- 2
- 3
- 4
- 5
- 6
- 7
- 8
- 9
- 10
- 11
- 12
- 13
- 14
- 15
- 16
- 17
- 18
- 19
- 20
- 21
- 22
- 23
- 24
- 25
- 26
- 27
- 28
- 29
- 30
- 31
- 32
- 33
- 34
- 35
- 36
- 37
- 38
- 39
- 40
- 41
- 42
- 43
- 44
- 45
- 46
- 47
- 48
- 49
- 50
- 51
- 52
- 53
- 54
- 55
- 56
- 57
- 58
- 59
- 60
- 61
- 62
- 63
- 64
- 65
- 66
- 67
- 68
- 69
- 70
- 71
- 72
- 73
- 74
- 75
- 76
- 77
- 78
- 79
- 80
- 81
- 82
- 83
- 84
- 85
- 86
- 87
- 88
- 89
- 90
- 91
- 92
- 93
- 94
- 95
- 96
- 97
- 98
- 99
在其中最重要的就是我们的 打包函数
def send_data_w(x,a,f_x,f_a):
    global uart;
    data = ustruct.pack("<bbhhhhb",      #格式为俩个字符俩个短整型(2字节)
                   0x2C,                      #帧头1 00101100
                   0x12,                      #帧头2 00010010
                   #下面的4个数据存到上面的情况里面,进行一个打包
                   int(x),   # rho 截距
                   int(a),   # theat 角度
                   int(f_x), # 位置判断信息
                   int(f_a), # 位置判断信息
                   0x5B)     # 帧尾 01011011
    uart.write(data);
- 1
- 2
- 3
- 4
- 5
- 6
- 7
- 8
- 9
- 10
- 11
- 12
- 13
我们来解读一下这个函数,在首先,我们需要看一张图

我们定义的打包函数 bbhhhhb 也就是发送 2个字符(1 个 字节,所以我们在STM32上面接收到的前两个就会是 2C 12)
而下面的短整型也会和上面一样被转化(如 1 就会被换为 01 00),所以就需要我们注意一下读取的位数
我们利用感兴趣区来进行标记,以此来判断十字以及停止(同时发送特殊数据,加了延时以保证识别的特殊情况处理的时间)
2. K210的数字识别
import sensor, image, lcd, time
import KPU as kpu
import gc, sys
import ustruct
from machine import Timer
from fpioa_manager import fm
from machine import UART
fm.register(7, fm.fpioa.UART1_TX, force=True)
fm.register(6, fm.fpioa.UART1_RX, force=True)
uart = UART(UART.UART1, 115200, 8, 1, 0, timeout=1000, read_buf_len=4096)
def lcd_show_except(e):
import uio
err_str = uio.StringIO()
sys.print_exception(e, err_str)
err_str = err_str.getvalue()
img = image.Image(size=(224,224))
img.draw_string(0, 10, err_str, scale=1, color=(0xff,0x00,0x00))
lcd.display(img)
def main(anchors, labels = None, model_addr=0x500000, sensor_window=(224, 224), lcd_rotation=0, sensor_hmirror=False, sensor_vflip=False):
sensor.reset()
sensor.set_pixformat(sensor.RGB565)
sensor.set_framesize(sensor.QVGA)
sensor.set_windowing(sensor_window)
sensor.set_hmirror(sensor_hmirror)
sensor.set_vflip(sensor_vflip)
sensor.run(1)
lcd.init(type=1)
lcd.rotation(lcd_rotation)
lcd.clear(lcd.WHITE)

if not labels:
    with open('labels.txt','r') as f:
        exec(f.read())
if not labels:
    print("no labels.txt")
    img = image.Image(size=(320, 240))
    img.draw_string(90, 110, "no labels.txt", color=(255, 0, 0), scale=2)
    lcd.display(img)
    return 1
    try:
        img = image.Image("startup.jpg")
        lcd.display(img)
    except Exception:
        img = image.Image(size=(320, 240))
        img.draw_string(90, 110, "loading model...", color=(255, 255, 255), scale=2)
        lcd.display(img)

task = kpu.load(model_addr)
kpu.init_yolo2(task, 0.5, 0.3, 5, anchors) # threshold:[0,1], nms_value: [0, 1]
try:
    flag=1
    #num=0
    while flag:
        img = sensor.snapshot()
        t = time.ticks_ms()
        objects = kpu.run_yolo2(task, img)
        t = time.ticks_ms() - t

        if objects:
            for obj in objects:
                pos = obj.rect()
                img.draw_rectangle(pos)
                img.draw_string(pos[0], pos[1], "%s : %.2f" %(labels[obj.classid()], obj.value()), scale=2, color=(255, 0, 0))
                objx = int((obj.x()+obj.w())/2)
            if labels[obj.classid()] == "1" :
               uart.write('s')
               uart.write('z')
               uart.write('1')
               uart.write('e') # >95 右转 <95 左转
               print(1)

            if labels[obj.classid()] == "2":
               uart.write('s')
               uart.write('z')
               uart.write('2')
               uart.write('e')
               print(2)

            if labels[obj.classid()] == "3" and objx >= 92 and objx <= 98:
              # num = 3
               uart.write('s')
               uart.write('z')
               uart.write('3')
               uart.write('T')
               uart.write('e')
               print('T')
               print(3)
              # time.sleep(3)


            if labels[obj.classid()] == "3" and objx >98:
               num =0
               uart.write('s')
               uart.write('z')
               uart.write('3')
               uart.write('R')
               uart.write('e')
               print('R')
               print(3)
            if labels[obj.classid()] == "3" and objx <92:

               uart.write('s')
               uart.write('z')
               uart.write('3')
               uart.write('L')
               uart.write('e')
               print('L')
               print(3)


            if labels[obj.classid()] == "4" and objx >95:
               uart.write('s')
               uart.write('z')
               uart.write('4')
               uart.write('R')
               uart.write('e')
               print(4)
            if labels[obj.classid()] == "4" and objx <95:
               uart.write('s')
               uart.write('z')
               uart.write('4')
               uart.write('L')
               uart.write('e')
               print(4)


            if labels[obj.classid()] == "5" and objx >95:
               uart.write('s')
               uart.write('z')
               uart.write('5')
               uart.write('R')
               uart.write('e')
               print(5)
            if labels[obj.classid()] == "5" and objx <95:
               uart.write('s')
               uart.write('z')
               uart.write('5')
               uart.write('L')
               uart.write('e')
               print(5)

            if labels[obj.classid()] == "6" and objx >95:
               uart.write('s')
               uart.write('z')
               uart.write('6')
               uart.write('R')
               uart.write('e')
               print(6)
            if labels[obj.classid()] == "6" and objx <95:
               uart.write('s')
               uart.write('z')
               uart.write('6')
               uart.write('L')
               uart.write('e')
               print(6)

            if labels[obj.classid()] == "7" and objx >95:
               uart.write('s')
               uart.write('z')
               uart.write('7')
               uart.write('R')
               uart.write('e')
               print(7)
            if labels[obj.classid()] == "7" and objx <95:
               uart.write('s')
               uart.write('z')
               uart.write('7')
               uart.write('L')
               uart.write('e')
               print(7)

            if labels[obj.classid()] == "8" and objx >95:
               uart.write('s')
               uart.write('z')
               uart.write('8')
               uart.write('R')
               uart.write('e')
               print(8)
            if labels[obj.classid()] == "8" and objx <95:
               uart.write('s')
               uart.write('z')
               uart.write('8')
               uart.write('L')
               uart.write('e')
               print(8)


        img.draw_string(0, 200, "t:%dms" %(t), scale=2, color=(255, 0, 0))
        lcd.display(img)
except Exception as e:
    raise e
finally:
    kpu.deinit(task)
if name == “main”:
try:
labels = [‘1’, ‘2’, ‘3’, ‘4’, ‘5’, ‘6’, ‘7’, ‘8’]
anchors = [1.40625, 1.8125000000000002, 5.09375, 5.28125, 3.46875, 3.8124999999999996, 2.0, 2.3125, 2.71875, 2.90625]
#main(anchors = anchors, labels=labels, model_addr=“/sd/m.kmodel”, lcd_rotation=2, sensor_window=(224, 224))
main(anchors = anchors, labels=labels, model_addr=0x500000, lcd_rotation=2, sensor_window=(224, 224))
except Exception as e:
sys.print_exception(e)
lcd_show_except(e)
finally:
gc.collect()
- 1
- 2
- 3
- 4
- 5
- 6
- 7
- 8
- 9
- 10
- 11
- 12
- 13
- 14
- 15
- 16
- 17
- 18
- 19
- 20
- 21
- 22
- 23
- 24
- 25
- 26
- 27
- 28
- 29
- 30
- 31
- 32
- 33
- 34
- 35
- 36
- 37
- 38
- 39
- 40
- 41
- 42
- 43
- 44
- 45
- 46
- 47
- 48
- 49
- 50
- 51
- 52
- 53
- 54
- 55
- 56
- 57
- 58
- 59
- 60
- 61
- 62
- 63
- 64
- 65
- 66
- 67
- 68
- 69
- 70
- 71
- 72
- 73
- 74
- 75
- 76
- 77
- 78
- 79
- 80
- 81
- 82
- 83
- 84
- 85
- 86
- 87
- 88
- 89
- 90
- 91
- 92
- 93
- 94
- 95
- 96
- 97
- 98
- 99
- 100
- 101
- 102
- 103
- 104
- 105
- 106
- 107
- 108
- 109
- 110
- 111
- 112
- 113
- 114
- 115
- 116
- 117
- 118
- 119
- 120
- 121
- 122
- 123
- 124
- 125
- 126
- 127
- 128
- 129
- 130
- 131
- 132
- 133
- 134
- 135
- 136
- 137
- 138
- 139
- 140
- 141
- 142
- 143
- 144
- 145
- 146
- 147
- 148
- 149
- 150
- 151
- 152
- 153
- 154
- 155
- 156
- 157
- 158
- 159
- 160
- 161
- 162
- 163
- 164
- 165
- 166
- 167
- 168
- 169
- 170
- 171
- 172
- 173
- 174
- 175
- 176
- 177
- 178
- 179
- 180
- 181
- 182
- 183
- 184
- 185
- 186
- 187
- 188
- 189
- 190
- 191
- 192
- 193
- 194
- 195
- 196
- 197
- 198
- 199
- 200
- 201
- 202
- 203
- 204
- 205
- 206
- 207
- 208
- 209
- 210
- 211
- 212
- 213
- 214
- 215
- 216
- 217
- 218
- 219
- 220
- 221
- 222
- 223
- 224
2. 由大哥帮忙修改的代码,但是还需要在后续调整
#目前缺点:  第一次识别会直接发送出方向
import sensor, image, lcd, time
import KPU as kpu
import gc, sys
import ustruct
from Maix import GPIO
from machine import Timer
from fpioa_manager import fm
from machine import UART
fm.register(12, fm.fpioa.GPIO0,force=True)
fm.register(7, fm.fpioa.UART1_TX, force=True)
fm.register(6, fm.fpioa.UART1_RX, force=True)
uart = UART(UART.UART1, 115200, 8, 1, 0, timeout=1000, read_buf_len=4096)
LED_B = GPIO(GPIO.GPIO0, GPIO.OUT) #构建 LED 对象
def lcd_show_except(e):
import uio
err_str = uio.StringIO()
sys.print_exception(e, err_str)
err_str = err_str.getvalue()
img = image.Image(size=(224,224))
img.draw_string(0, 10, err_str, scale=1, color=(0xff,0x00,0x00))
lcd.display(img)
def await_num(num_await,num_input,objx):
“”"
等待数字 num_await 的出现
不需要了:如果出现了 num_await, 则返回 None, 可以接收新的数字输入了(进入recognize_num)
没有出现 num_await,那么就无限循环
“”"
if num_input == num_await:
if objx >110:
uart.write(‘s’)
uart.write(‘z’)
uart.write(num_await)
uart.write(‘R’)
uart.write(‘e’)
print(‘R’)
print(num_await)
elif objx <80:
uart.write(‘s’)
uart.write(‘z’)
uart.write(num_await)
uart.write(‘L’)
uart.write(‘e’)
print(‘L’)
print(num_await)
#return None # 下一次不用识别这个数字了
#修改:如果不返回值,这样就不会重新输入新的数字,也就是不会等待新数字,这样就会避免出现程序刷新弄到新的数字
return num_await
调用函数给下面的主函数,返回出识别的值
如果想要识别新的数字就可以通过重新上电来执行
def recognize_num(num,objx):
“”"
识别输入的数字
返回值: 接下来需要识别的数
“”"
识别输入的数字
不管识别到什么数字,其实操作是类似的,所以可以用一个函数概括这些操作,不用写很多遍
if num == ‘1’ or num == ‘2’:
# 这两个的操作类似,所以用一个 if 就可以了; 看代码读到这两个数字的时候,并不需要等待下一次继续出现这个数字?
uart.write(‘s’)
uart.write(‘z’)
uart.write(num)
uart.write(‘G’)
uart.write(‘e’) # >95 右转 <95 左转
print(num)
return None # 不需要等待任何数字
elif objx >= 80 and objx <= 110:
uart.write(‘s’)
uart.write(‘z’)
uart.write(num)
uart.write(‘T’)
uart.write(‘e’)
#time.sleep(1)
#time.sleep_ms(500)
print(num)
print(‘T’)
return num # 下一次需要等待的数字
def main(anchors, labels = None, model_addr=0x500000, sensor_window=(224, 224), lcd_rotation=0, sensor_hmirror=False, sensor_vflip=False):
sensor.reset()
sensor.set_pixformat(sensor.RGB565)
sensor.set_framesize(sensor.QVGA)
sensor.set_windowing(sensor_window)
sensor.set_hmirror(sensor_hmirror)
sensor.set_vflip(sensor_vflip)
sensor.run(1)
lcd.init(type=1)
lcd.rotation(lcd_rotation)
lcd.clear(lcd.WHITE)

if not labels:
    with open('labels.txt','r') as f:
        exec(f.read())
if not labels:
    print("no labels.txt")
    img = image.Image(size=(320, 240))
    img.draw_string(90, 110, "no labels.txt", color=(255, 0, 0), scale=2)
    lcd.display(img)
    return 1
    try:
        img = image.Image("startup.jpg")
        lcd.display(img)
    except Exception:
        img = image.Image(size=(320, 240))
        img.draw_string(90, 110, "loading model...", color=(255, 255, 255), scale=2)
        lcd.display(img)

task = kpu.load(model_addr)
kpu.init_yolo2(task, 0.5, 0.3, 5, anchors) # threshold:[0,1], nms_value: [0, 1]
try:
    flag=1
    num=None
    while flag:
        img = sensor.snapshot()
        t = time.ticks_ms()
        objects = kpu.run_yolo2(task, img)
        t = time.ticks_ms() - t

        if num != 0:
           LED_B.value(0)

        if objects:
            for obj in objects:
                pos = obj.rect()
                img.draw_rectangle(pos)
                img.draw_string(pos[0], pos[1], "%s : %.2f" %(labels[obj.classid()], obj.value()), scale=2, color=(255, 0, 0))
                objx = int((obj.x()+obj.w())/2)
            # 识别新的数字
                if num is None:
                   num = recognize_num(labels[obj.classid()],objx)
                else:
                   num = await_num(num,labels[obj.classid()],objx)

            img.draw_string(0, 200, "t:%dms" %(t), scale=2, color=(255, 0, 0))
            lcd.display(img)
except Exception as e:
    raise e
finally:
    kpu.deinit(task)
if name == “main”:
try:
labels = [‘1’, ‘2’, ‘3’, ‘4’, ‘5’, ‘6’, ‘7’, ‘8’]
anchors = [1.40625, 1.8125000000000002, 5.09375, 5.28125, 3.46875, 3.8124999999999996, 2.0, 2.3125, 2.71875, 2.90625]
main(anchors = anchors, labels=labels, model_addr=“/sd/m.kmodel”, lcd_rotation=2, sensor_window=(224, 224))
# main(anchors = anchors, labels=labels, model_addr=0x500000, lcd_rotation=2, sensor_window=(224, 224))
except Exception as e:
sys.print_exception(e)
lcd_show_except(e)
finally:
gc.collect()
- 1
- 2
- 3
- 4
- 5
- 6
- 7
- 8
- 9
- 10
- 11
- 12
- 13
- 14
- 15
- 16
- 17
- 18
- 19
- 20
- 21
- 22
- 23
- 24
- 25
- 26
- 27
- 28
- 29
- 30
- 31
- 32
- 33
- 34
- 35
- 36
- 37
- 38
- 39
- 40
- 41
- 42
- 43
- 44
- 45
- 46
- 47
- 48
- 49
- 50
- 51
- 52
- 53
- 54
- 55
- 56
- 57
- 58
- 59
- 60
- 61
- 62
- 63
- 64
- 65
- 66
- 67
- 68
- 69
- 70
- 71
- 72
- 73
- 74
- 75
- 76
- 77
- 78
- 79
- 80
- 81
- 82
- 83
- 84
- 85
- 86
- 87
- 88
- 89
- 90
- 91
- 92
- 93
- 94
- 95
- 96
- 97
- 98
- 99
- 100
- 101
- 102
- 103
- 104
- 105
- 106
- 107
- 108
- 109
- 110
- 111
- 112
- 113
- 114
- 115
- 116
- 117
- 118
- 119
- 120
- 121
- 122
- 123
- 124
- 125
- 126
- 127
- 128
- 129
- 130
- 131
- 132
- 133
- 134
- 135
- 136
- 137
- 138
- 139
- 140
- 141
- 142
- 143
- 144
- 145
- 146
- 147
- 148
- 149
- 150
- 151
- 152
- 153
- 154
- 155
- 156
- 157
- 158
- 159
- 160
- 161
- 162
- 163
- 164
- 165
- 166
——————————————
8. 寻找最大色块
寻找最大色块与上面寻找模板的区别是,它是以颜色进行区分,如果所需要寻找的东西不是 固定物体,就可以用颜色来区别
并且在寻找的时候就可以通过更改阈值来改变需要区分的物体:
测试代码如下:
import sensor,lcd,time
import gc,sys
import ustruct
from machine import UART,Timer
from fpioa_manager import fm
#映射串口引脚
fm.register(6, fm.fpioa.UART1_RX, force=True)
fm.register(7, fm.fpioa.UART1_TX, force=True)
uart = UART(UART.UART1, 115200, read_buf_len=4096)
#摄像头初始化
sensor.reset()
sensor.set_pixformat(sensor.RGB565)
sensor.set_framesize(sensor.QVGA)
sensor.set_vflip(1) #后置模式,所见即所得
sensor.set_auto_whitebal(False)#白平衡关闭
#lcd初始化
lcd.init()
颜色识别阈值 (L Min, L Max, A Min, A Max, B Min, B Max) LAB模型
此处识别为橙色,调整出的阈值,全部为红色
barries_red = (20, 100, -5, 106, 36, 123)
clock=time.clock()
#打包函数
def send_data_wx(x,a):
global uart;
data = ustruct.pack(“<bbhhhhb”,
0x2c,
0x12,
int(x),
int(a),
0x5B)
uart.write(data);
#找到最大色块函数
def find_max(blods):
max_size=0
for blob in blobs:
if blob.pixels() > max_size:
max_blob=blob
max_size=blob.pixels()
return max_blob
while True:
clock.tick()
img=sensor.snapshot()
#过滤
blods = img.find_blobs([barries_red],x_strid=50)
blods = img.find_blobs([barries_red],y_strid=50)
blods = img.find_blobs([barries_red],pixels_threshold=100)
blods = img.find_blobs([barries_red],area_threshold=60)
blobs = img.find_blobs([barries_red]) #找到阈值色块
cx=0;cy=0;
if blobs:
max_blob = find_max(blobs) #找到最大色块
cx=max_blob[5]
cy=max_blob[6]
cw=max_blob[2]
ch=max_blob[3]
img.draw_rectangle(max_blob[0:4])
img.draw_cross(max_blob[5],max_blob[6])
lcd.display(img)     #LCD显示图片
print(max_blob[5],max_blob[6])
send_data_wx(max_blob[5],max_blob[6])
- 1
- 2
- 3
- 4
- 5
- 6
- 7
- 8
- 9
- 10
- 11
- 12
- 13
- 14
- 15
- 16
- 17
- 18
- 19
- 20
- 21
- 22
- 23
- 24
- 25
- 26
- 27
- 28
- 29
- 30
- 31
- 32
- 33
- 34
- 35
- 36
- 37
- 38
- 39
- 40
- 41
- 42
- 43
- 44
- 45
- 46
- 47
- 48
- 49
- 50
- 51
- 52
- 53
- 54
- 55
- 56
- 57
- 58
- 59
- 60
- 61
- 62
- 63
- 64
- 65
- 66
- 67
- 68
- 69
- 70
- 71
- 72
- 73
- 74
- 75
- 76
- 77
- 78
- 79
- 80
- 81
==========> (To be contnue…)
[](https://blog.csdn.net/leah126/article/details/131410570?spm=1001.2014.3001.5502)[](https://blog.csdn.net/Python_0011/article/details/131370717?spm=1001.2014.3001.5502)**题外话**
- 1
- 2
====================================================================================================================================================================================================================================================================================================================================================================================================================================================================================================================================================================
初入计算机行业的人或者大学计算机相关专业毕业生,很多因缺少实战经验,就业处处碰壁。下面我们来看两组数据:
-
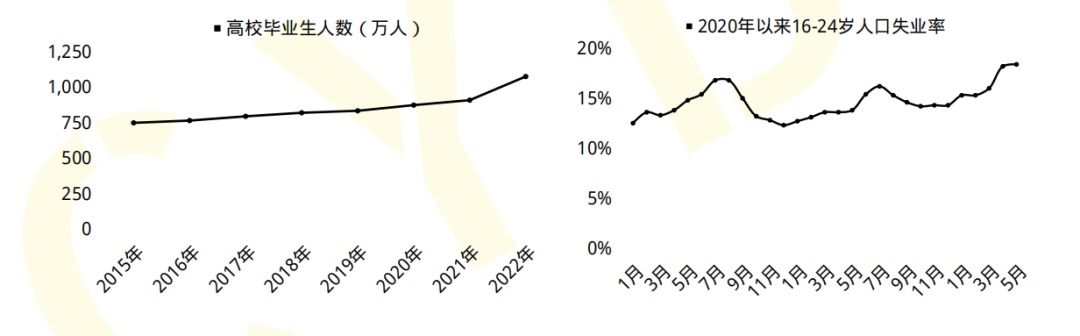
2023届全国高校毕业生预计达到1158万人,就业形势严峻;
-
国家网络安全宣传周公布的数据显示,到2027年我国网络安全人员缺口将达327万。
一方面是每年应届毕业生就业形势严峻,一方面是网络安全人才百万缺口。
6月9日,麦可思研究2023年版就业蓝皮书(包括《2023年中国本科生就业报告》《2023年中国高职生就业报告》)正式发布。
2022届大学毕业生月收入较高的前10个专业
本科计算机类、高职自动化类专业月收入较高。2022届本科计算机类、高职自动化类专业月收入分别为6863元、5339元。其中,本科计算机类专业起薪与2021届基本持平,高职自动化类月收入增长明显,2022届反超铁道运输类专业(5295元)排在第一位。
具体看专业,2022届本科月收入较高的专业是信息安全(7579元)。对比2018届,电子科学与技术、自动化等与人工智能相关的本科专业表现不俗,较五年前起薪涨幅均达到了19%。数据科学与大数据技术虽是近年新增专业但表现亮眼,已跻身2022届本科毕业生毕业半年后月收入较高专业前三。五年前唯一进入本科高薪榜前10的人文社科类专业——法语已退出前10之列。

“没有网络安全就没有国家安全”。当前,网络安全已被提升到国家战略的高度,成为影响国家安全、社会稳定至关重要的因素之一。
网络安全行业特点
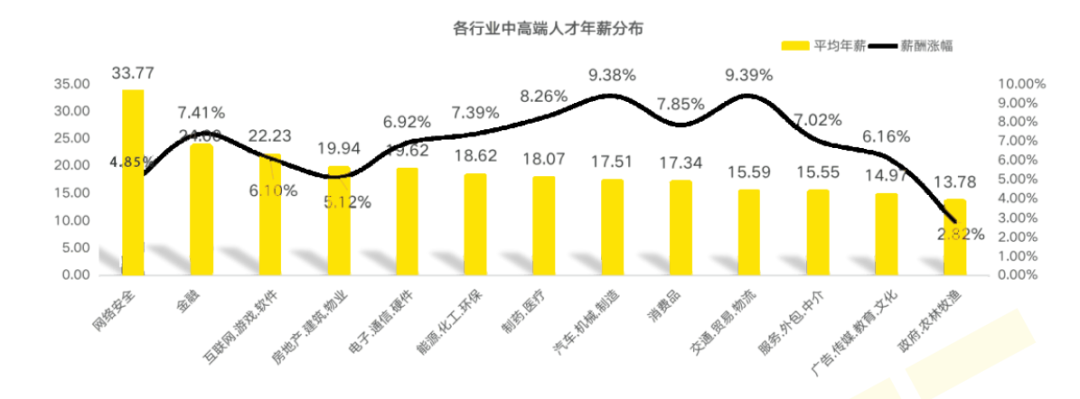
1、就业薪资非常高,涨薪快 2021年猎聘网发布网络安全行业就业薪资行业最高人均33.77万!
2、人才缺口大,就业机会多
2019年9月18日《中华人民共和国中央人民政府》官方网站发表:我国网络空间安全人才 需求140万人,而全国各大学校每年培养的人员不到1.5W人。猎聘网《2021年上半年网络安全报告》预测2027年网安人才需求300W,现在从事网络安全行业的从业人员只有10W人。
行业发展空间大,岗位非常多
网络安全行业产业以来,随即新增加了几十个网络安全行业岗位︰网络安全专家、网络安全分析师、安全咨询师、网络安全工程师、安全架构师、安全运维工程师、渗透工程师、信息安全管理员、数据安全工程师、网络安全运营工程师、网络安全应急响应工程师、数据鉴定师、网络安全产品经理、网络安全服务工程师、网络安全培训师、网络安全审计员、威胁情报分析工程师、灾难恢复专业人员、实战攻防专业人员…
职业增值潜力大
网络安全专业具有很强的技术特性,尤其是掌握工作中的核心网络架构、安全技术,在职业发展上具有不可替代的竞争优势。
随着个人能力的不断提升,所从事工作的职业价值也会随着自身经验的丰富以及项目运作的成熟,升值空间一路看涨,这也是为什么受大家欢迎的主要原因。
从某种程度来讲,在网络安全领域,跟医生职业一样,越老越吃香,因为技术愈加成熟,自然工作会受到重视,升职加薪则是水到渠成之事。
黑客&网络安全如何学习
今天只要你给我的文章点赞,我私藏的网安学习资料一样免费共享给你们,来看看有哪些东西。
1.学习路线图
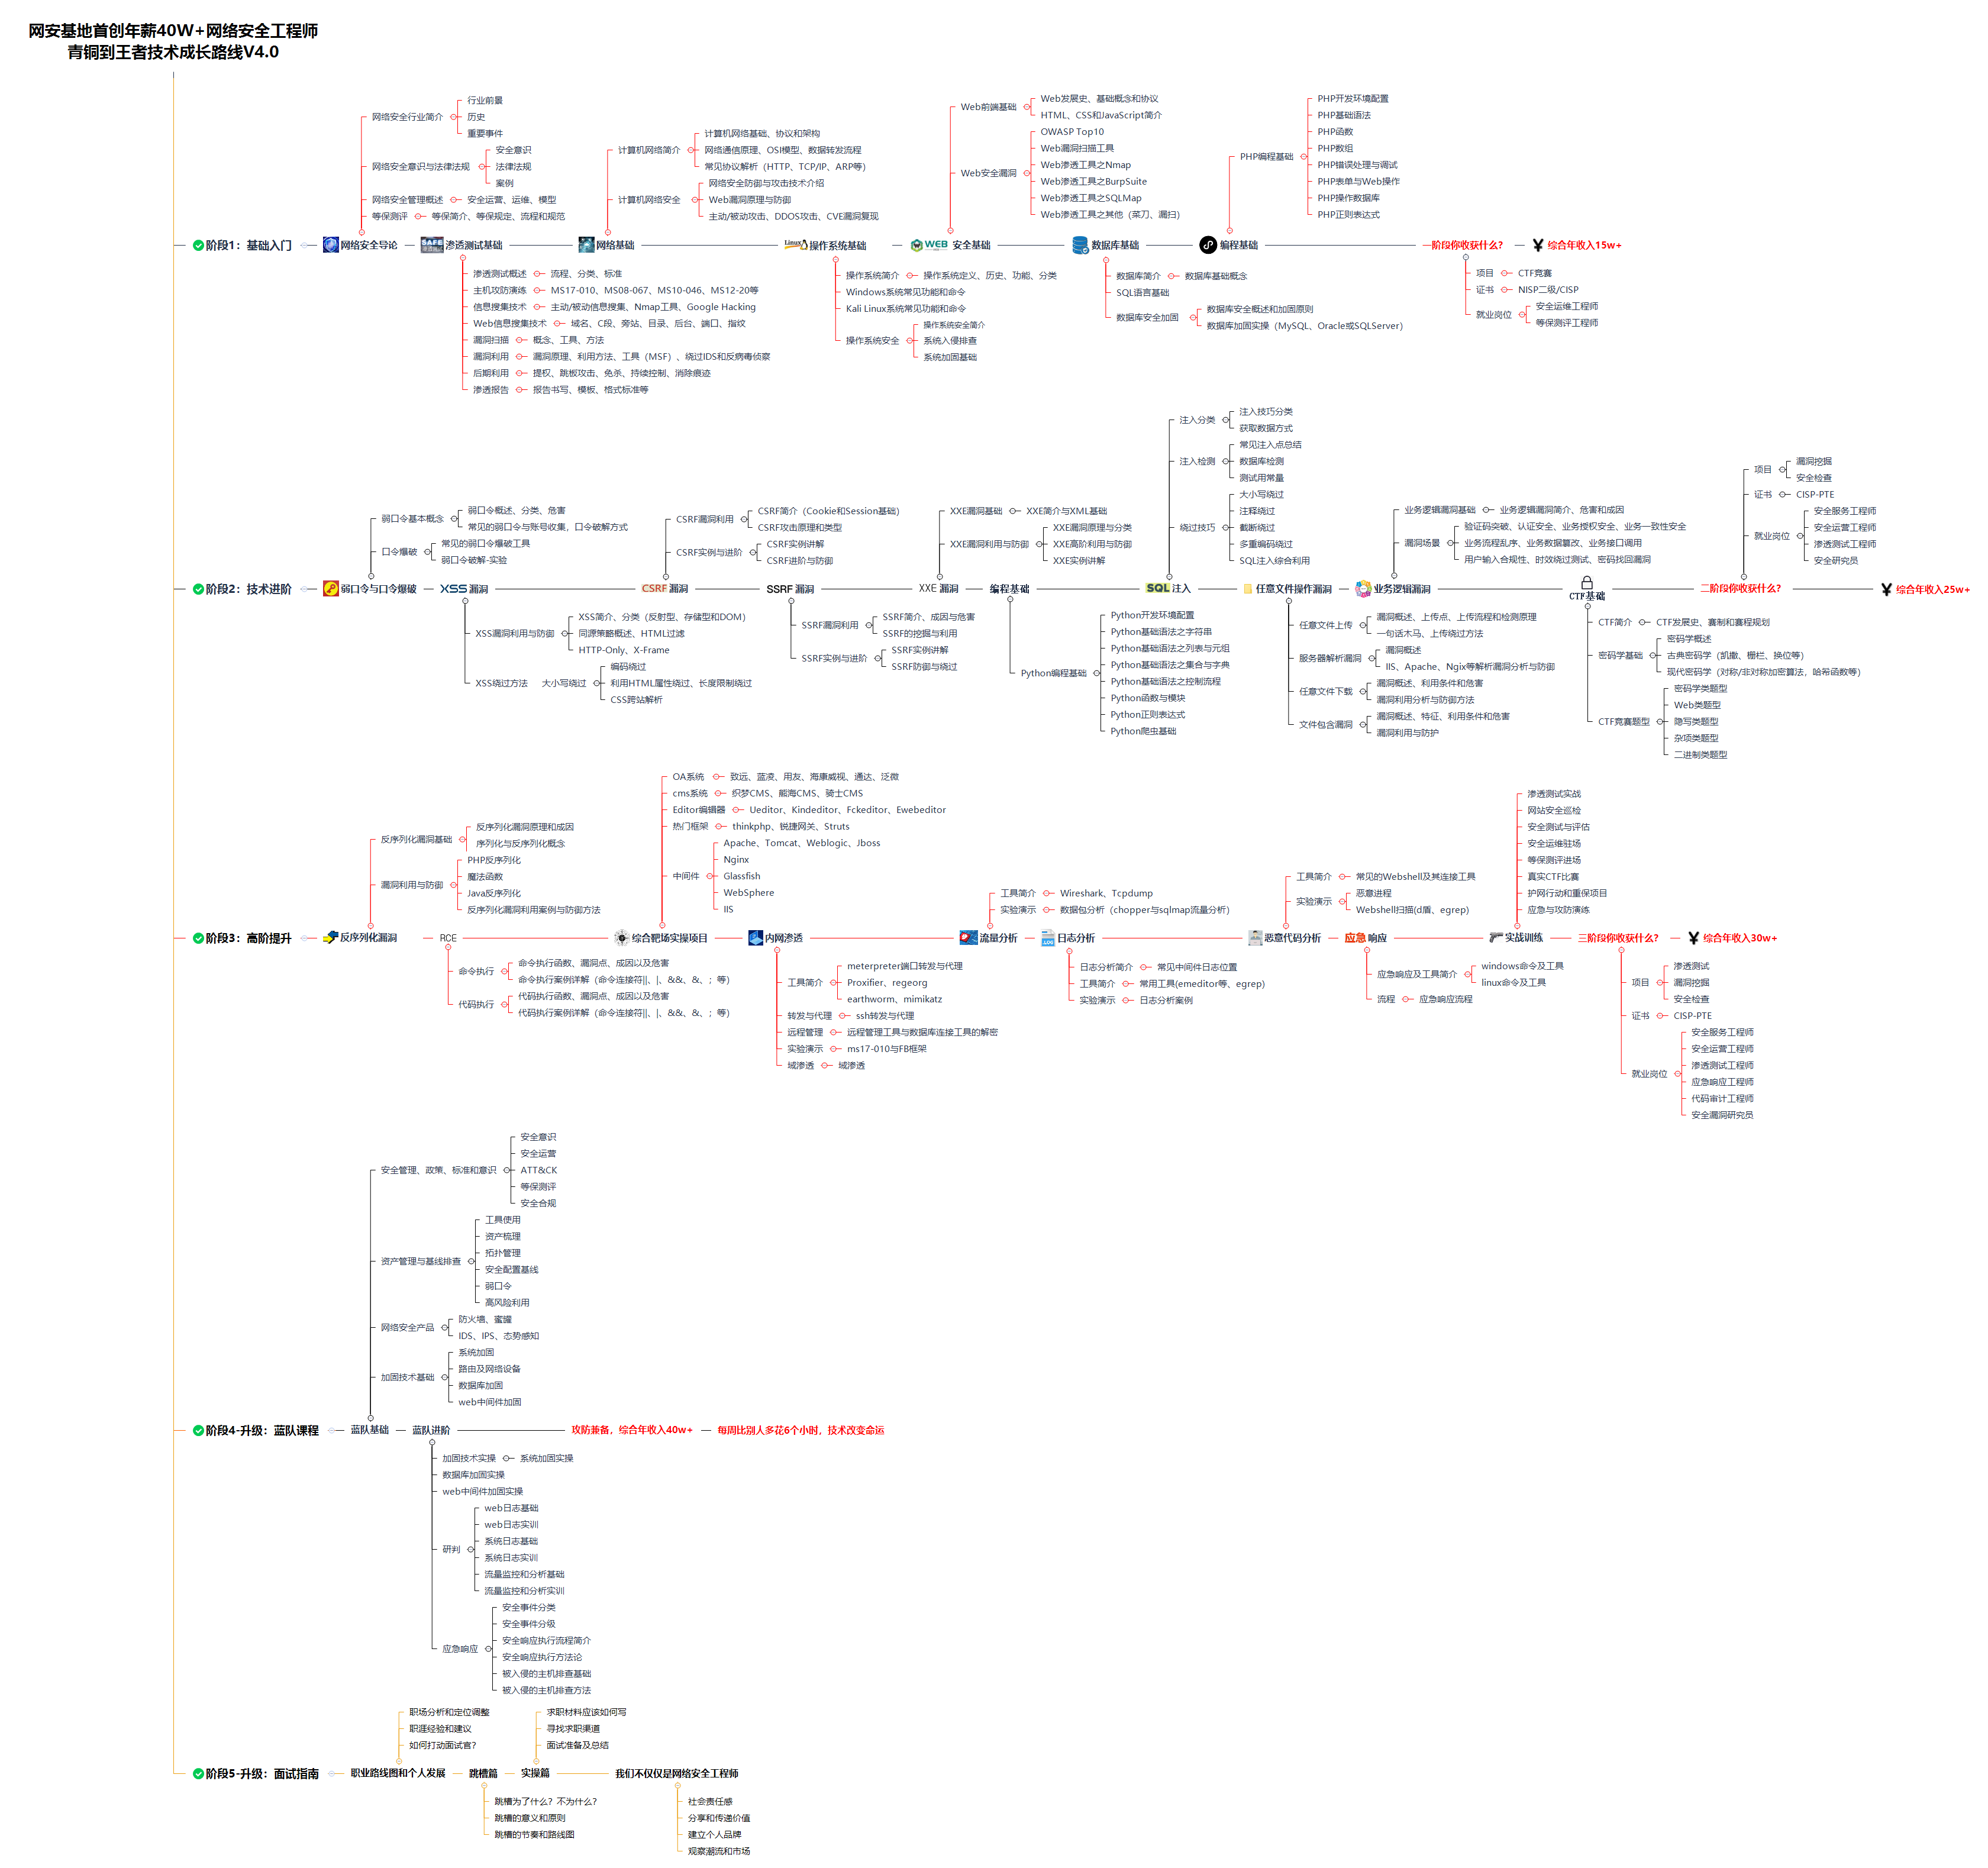
攻击和防守要学的东西也不少,具体要学的东西我都写在了上面的路线图,如果你能学完它们,你去就业和接私活完全没有问题。
2.视频教程
网上虽然也有很多的学习资源,但基本上都残缺不全的,这是我自己录的网安视频教程,上面路线图的每一个知识点,我都有配套的视频讲解。
内容涵盖了网络安全法学习、网络安全运营等保测评、渗透测试基础、漏洞详解、计算机基础知识等,都是网络安全入门必知必会的学习内容。
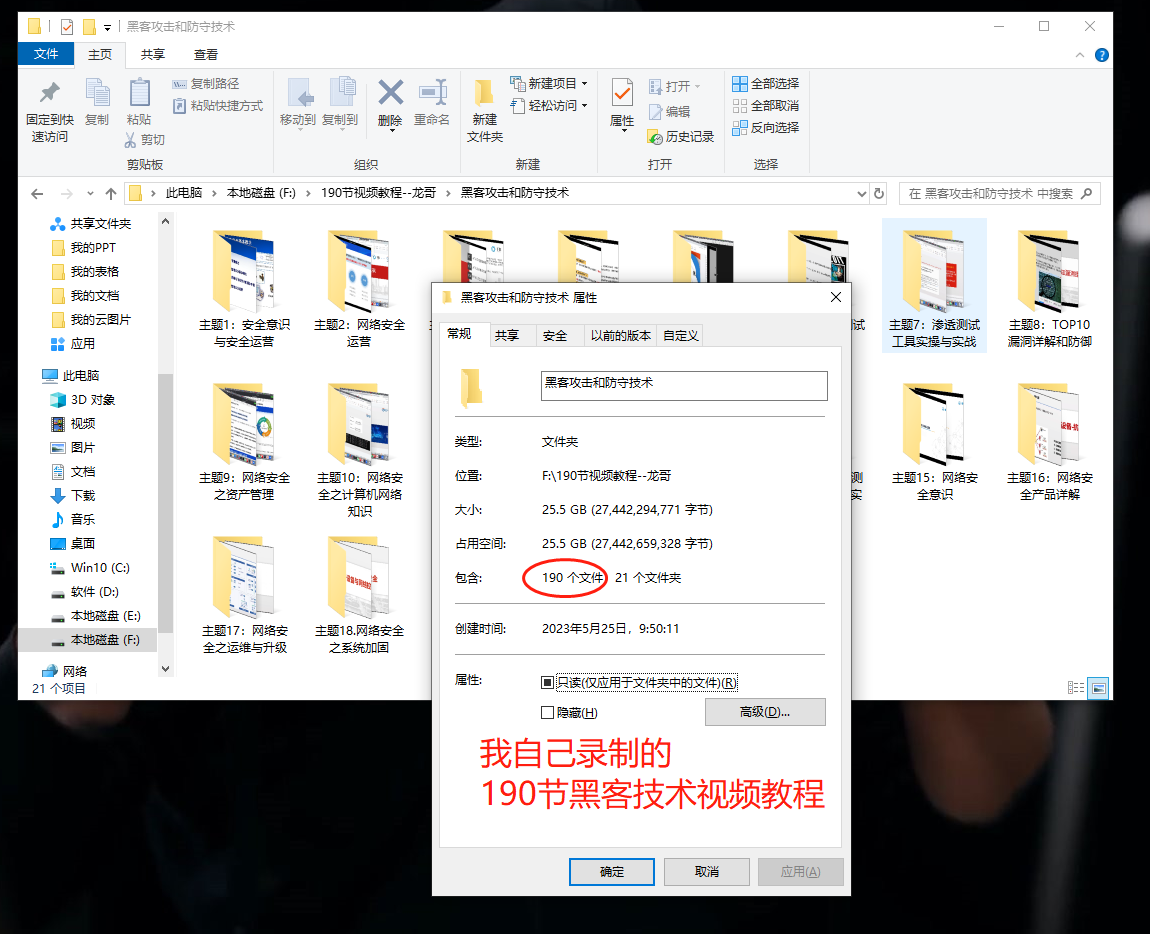
(都打包成一块的了,不能一一展开,总共300多集)
因篇幅有限,仅展示部分资料,需要点击下方链接即可前往获取
🐵这些东西我都可以免费分享给大家,需要的可以点这里自取👉:网安入门到进阶资源
3.技术文档和电子书
技术文档也是我自己整理的,包括我参加大型网安行动、CTF和挖SRC漏洞的经验和技术要点,电子书也有200多本,由于内容的敏感性,我就不一一展示了。
因篇幅有限,仅展示部分资料,需要点击下方链接即可前往获取
🐵这些东西我都可以免费分享给大家,需要的可以点这里自取👉:网安入门到进阶资源
4.工具包、面试题和源码
“工欲善其事必先利其器”我为大家总结出了最受欢迎的几十款款黑客工具。涉及范围主要集中在 信息收集、Android黑客工具、自动化工具、网络钓鱼等,感兴趣的同学不容错过。
还有我视频里讲的案例源码和对应的工具包,需要的话也可以拿走。
🐵这些东西我都可以免费分享给大家,需要的可以点这里自取👉:网安入门到进阶资源
最后就是我这几年整理的网安方面的面试题,如果你是要找网安方面的工作,它们绝对能帮你大忙。
这些题目都是大家在面试深信服、奇安信、腾讯或者其它大厂面试时经常遇到的,如果大家有好的题目或者好的见解欢迎分享。
参考解析:深信服官网、奇安信官网、Freebuf、csdn等
内容特点:条理清晰,含图像化表示更加易懂。
内容概要:包括 内网、操作系统、协议、渗透测试、安服、漏洞、注入、XSS、CSRF、SSRF、文件上传、文件下载、文件包含、XXE、逻辑漏洞、工具、SQLmap、NMAP、BP、MSF…

今天只要你给我的文章点赞,我私藏的网安学习资料一样免费共享给你们,来看看有哪些东西。
在这里领取:

这个是我花了几天几夜自整理的最新最全网安学习资料包免费共享给你们,其中包含以下东西:
1.学习路线&职业规划


2.全套体系课&入门到精通

3.黑客电子书&面试资料

4.漏洞挖掘工具和学习文档
这些东西都是免费领取哦:黑客最新大礼包

瓜分20万奖金 获得内推名额 丰厚实物奖励 易参与易上手
更多推荐


 0
0 0
0- 0


 已为社区贡献3条内容

所有评论(0)