k8s 1.18.20版本部署
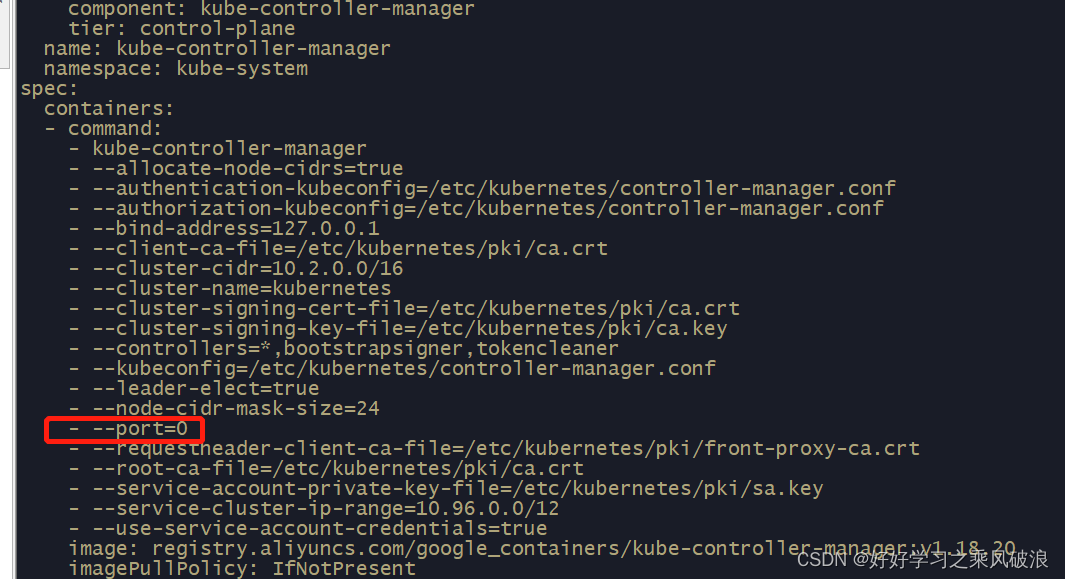
该状态其实不影响整个集群使用,是因为默认的kube-scheduler.yaml和kube-controller-manager.yaml 中默认使用了10251和10252的端口。可以将对应的配置文件中- --port=0 给注释掉。可以自行去github,找到 flannel/Documentation/kube-flannel.yml 路径,拷贝出代码,新建文件上传,然后修改为.yml。服务
身为k8s初学者,在掌握k8s理论知识的同时,也需要掌握一下实际部署k8s的过程,对于理论的学习起到一定的帮助作用。罗列了一下相关步骤,请各位参考:
一、环境准备
三台虚机:
操作系统: CentOS Linux release 7.9.2009 (Core)
内核版本:3.10.0-1160.88.1.el7.x86_64
k8s-master01: 192.168.66.200
k8s-master02: 192.168.66.201
k8s-node01: 192.168.66.250
本次安装k8s 1.18.20版本
二、服务器初始化配置
服务器初始化配置可以参考原先我写的1.15.0版本部署方案
K8s 1.15.0 版本部署安装_好好学习之乘风破浪的博客-CSDN博客
三、安装docker
3.1、安装指定的Docker版本
yum list docker-ce.x86_64 --showduplicates | sort -r
yum install -y containerd.io-1.6.18 docker-ce-23.0.1 docker-ce-cli-23.0.1

3.2、创建docker daemon.json文件
mkdir /etc/docker
cat > /etc/docker/daemon.json <<EOF
{
  "registry-mirrors": ["https://docker.mirrors.ustc.edu.cn"],
  "exec-opts": ["native.cgroupdriver=systemd"],
  "log-driver": "json-file",
  "log-opts": {
    "max-size": "100m"
  },
  "storage-driver": "overlay2",
  "storage-opts": [
    "overlay2.override_kernel_check=true"
  ]
}
EOF

3.3 启动docker
systemctl enable docker; systemctl start docker;systemctl status docker

3.4 查看安装后的docker版本
docker --version
四、安装软件包
4.1、安装软件
yum install -y kubelet-1.18.20 kubeadm-1.18.20 kubectl-1.18.20 ipvsadm

4.2、配置kubelet
cat >  /etc/sysconfig/kubelet <<EOF
KUBELET_CGROUP_ARGS="--cgroup-driver=systemd"
KUBELET_EXTRA_ARGS="--fail-swap-on=false"
EOF

4.3、启动kubelet并设置开机启动
systemctl enable kubelet && systemctl start kubelet

4.4、检查版本
kubeadm version
确认是所安装的版本
五、部署集群
以下操作在k8s-master01节点上操作
5.1 、生成初始化配置
kubeadm config print init-defaults > kubeadm.yaml
5.1 、生成初始化配置
kubeadm config print init-defaults > kubeadm.yaml

[root@k8s-master01 ~]# cat  kubeadm.yaml
apiVersion: kubeadm.k8s.io/v1beta2
bootstrapTokens:
- groups:
  - system:bootstrappers:kubeadm:default-node-token
  token: abcdef.0123456789abcdef
  ttl: 24h0m0s
  usages:
  - signing
  - authentication
kind: InitConfiguration
localAPIEndpoint:
  advertiseAddress: 192.168.66.200    ####需要修改为k8s-master01的地址
  bindPort: 6443
nodeRegistration:
  criSocket: /var/run/dockershim.sock
  name: k8s-master01                 ####需要修改为k8s-master01的主机名
  taints:
  - effect: NoSchedule
    key: node-role.kubernetes.io/master
---
apiServer:
  timeoutForControlPlane: 4m0s
apiVersion: kubeadm.k8s.io/v1beta2
certificatesDir: /etc/kubernetes/pki
clusterName: kubernetes
controllerManager: {}
dns:
  type: CoreDNS
etcd:
  local:
    dataDir: /var/lib/etcd
imageRepository: k8s.gcr.io
kind: ClusterConfiguration
kubernetesVersion: v1.18.20   ####需要修改为v1.18.20
networking:
  dnsDomain: cluster.local
  serviceSubnet: 10.96.0.0/12  ####保持默认
  podSubnet: 10.2.0.0/16     ####新增
scheduler: {}

---                                             ####新增
apiVersion: kubeproxy.config.k8s.io/v1alpha1    ####新增
kind: KubeProxyConfiguration                    ####新增
mode: ipvs                                      ####新增
5.2 、执行初始化配置
kubeadm init --config kubeadm.yaml
成功会显示如下信息
To start using your cluster, you need to run the following as a regular user:
mkdir -p $HOME/.kube
sudo cp -i /etc/kubernetes/admin.conf $HOME/.kube/config
sudo chown $(id -u):$(id -g) $HOME/.kube/config
You should now deploy a pod network to the cluster.
Run "kubectl apply -f [podnetwork].yaml" with one of the options listed at:
https://kubernetes.io/docs/concepts/cluster-administration/addons/
Then you can join any number of worker nodes by running the following on each as root:
kubeadm join 192.168.66.200:6443 --token abcdef.0123456789abcdef \
--discovery-token-ca-cert-hash sha256:8ba059662766394bbc081324dfba0bc6a1360687f99e93a1b5c7c3a1e6d53097
5.3 按照要求执行生成文件
mkdir -p $HOME/.kube
sudo cp -i /etc/kubernetes/admin.conf $HOME/.kube/config
sudo chown $(id -u):$(id -g) $HOME/.kube/config
5.4 查看组件状态
kubectl get cs

该状态其实不影响整个集群使用,是因为默认的kube-scheduler.yaml和kube-controller-manager.yaml 中默认使用了10251和10252的端口。可以将对应的配置文件中- --port=0 给注释掉


[root@k8s-master01 ~]# sed -i 's/- --port=0/#&/' /etc/kubernetes/manifests/kube-scheduler.yaml
[root@k8s-master01 ~]# sed -i 's/- --port=0/#&/' /etc/kubernetes/manifests/kube-controller-manager.yaml
[root@k8s-master01 ~]#  systemctl restart kubelet

5.5、部署flannel组件
mirrors / coreos / flannel · GitCode
可以自行去github,找到 flannel/Documentation/kube-flannel.yml 路径,拷贝出代码,新建文件上传,然后修改为.yml
# vi kube-flannel.yml
将
net-conf.json: |
{
"Network": "10.2.0.0/16", ####修改为podsubnet地址段
"Backend": {
"Type": "vxlan"
}
}
(注:镜像路径可以不用修改)
[root@k8s-master01 ~]# cat kube-flannel.yml
---
kind: Namespace
apiVersion: v1
metadata:
  name: kube-flannel
  labels:
    pod-security.kubernetes.io/enforce: privileged
---
kind: ClusterRole
apiVersion: rbac.authorization.k8s.io/v1
metadata:
  name: flannel
rules:
- apiGroups:
  - ""
  resources:
  - pods
  verbs:
  - get
- apiGroups:
  - ""
  resources:
  - nodes
  verbs:
  - get
  - list
  - watch
- apiGroups:
  - ""
  resources:
  - nodes/status
  verbs:
  - patch
- apiGroups:
  - "networking.k8s.io"
  resources:
  - clustercidrs
  verbs:
  - list
  - watch
---
kind: ClusterRoleBinding
apiVersion: rbac.authorization.k8s.io/v1
metadata:
  name: flannel
roleRef:
  apiGroup: rbac.authorization.k8s.io
  kind: ClusterRole
  name: flannel
subjects:
- kind: ServiceAccount
  name: flannel
  namespace: kube-flannel
---
apiVersion: v1
kind: ServiceAccount
metadata:
  name: flannel
  namespace: kube-flannel
---
kind: ConfigMap
apiVersion: v1
metadata:
  name: kube-flannel-cfg
  namespace: kube-flannel
  labels:
    tier: node
    app: flannel
data:
  cni-conf.json: |
    {
      "name": "cbr0",
      "cniVersion": "0.3.1",
      "plugins": [
        {
          "type": "flannel",
          "delegate": {
            "hairpinMode": true,
            "isDefaultGateway": true
          }
        },
        {
          "type": "portmap",
          "capabilities": {
            "portMappings": true
          }
        }
      ]
    }
  net-conf.json: |
    {
      "Network": "10.2.0.0/16",
      "Backend": {
        "Type": "vxlan"
      }
    }
---
apiVersion: apps/v1
kind: DaemonSet
metadata:
  name: kube-flannel-ds
  namespace: kube-flannel
  labels:
    tier: node
    app: flannel
spec:
  selector:
    matchLabels:
      app: flannel
  template:
    metadata:
      labels:
        tier: node
        app: flannel
    spec:
      affinity:
        nodeAffinity:
          requiredDuringSchedulingIgnoredDuringExecution:
            nodeSelectorTerms:
            - matchExpressions:
              - key: kubernetes.io/os
                operator: In
                values:
                - linux
      hostNetwork: true
      priorityClassName: system-node-critical
      tolerations:
      - operator: Exists
        effect: NoSchedule
      serviceAccountName: flannel
      initContainers:
      - name: install-cni-plugin
        image: docker.io/flannel/flannel-cni-plugin:v1.1.2
       #image: docker.io/rancher/mirrored-flannelcni-flannel-cni-plugin:v1.1.2
        command:
        - cp
        args:
        - -f
        - /flannel
        - /opt/cni/bin/flannel
        volumeMounts:
        - name: cni-plugin
          mountPath: /opt/cni/bin
      - name: install-cni
        image: docker.io/flannel/flannel:v0.21.3
       #image: docker.io/rancher/mirrored-flannelcni-flannel:v0.21.3
        command:
        - cp
        args:
        - -f
        - /etc/kube-flannel/cni-conf.json
        - /etc/cni/net.d/10-flannel.conflist
        volumeMounts:
        - name: cni
          mountPath: /etc/cni/net.d
        - name: flannel-cfg
          mountPath: /etc/kube-flannel/
      containers:
      - name: kube-flannel
        image: docker.io/flannel/flannel:v0.21.3
       #image: quay-mirror.qiniu.com/coreos/flannel:v0.21.3
       #image: docker.io/rancher/mirrored-flannelcni-flannel:v0.21.3
        command:
        - /opt/bin/flanneld
        args:
        - --ip-masq
        - --kube-subnet-mgr
        resources:
          requests:
            cpu: "100m"
            memory: "50Mi"
        securityContext:
          privileged: false
          capabilities:
            add: ["NET_ADMIN", "NET_RAW"]
        env:
        - name: POD_NAME
          valueFrom:
            fieldRef:
              fieldPath: metadata.name
        - name: POD_NAMESPACE
          valueFrom:
            fieldRef:
              fieldPath: metadata.namespace
        - name: EVENT_QUEUE_DEPTH
          value: "5000"
        volumeMounts:
        - name: run
          mountPath: /run/flannel
        - name: flannel-cfg
          mountPath: /etc/kube-flannel/
        - name: xtables-lock
          mountPath: /run/xtables.lock
      volumes:
      - name: run
        hostPath:
          path: /run/flannel
      - name: cni-plugin
        hostPath:
          path: /opt/cni/bin
      - name: cni
        hostPath:
          path: /etc/cni/net.d
      - name: flannel-cfg
        configMap:
          name: kube-flannel-cfg
      - name: xtables-lock
        hostPath:
          path: /run/xtables.lock
          type: FileOrCreate
应用flannel组件
kubectl apply -f kube-flannel.yml
查询flannel的pod信息
kubectl get pod -n kube-flannel

查看pod和node节点
kubectl get pod -n kube-system
kubectl get node
六、部署node节点
将k8s-node01节点添加到集群中
kubeadm join 192.168.66.200:6443 --token abcdef.0123456789abcdef \
--discovery-token-ca-cert-hash sha256:8ba059662766394bbc081324dfba0bc6a1360687f99e93a1b5c7c3a1e6d53097
查询node节点情况

登录master01节点检查所有组件运行情况
kubectl get pod -A -owide

更多推荐
 已为社区贡献1条内容


所有评论(0)