
Tomcat源码之旅--让我们的Servlet容器支持多线程
上一篇我们试了下怎么写一个简易的Servlet容器,这段时间继续看了下面的章节,讲的内容对应的分支V1.5和V1.6https://github.com/lovejj1994/SimpleServletv1.5 实现 tomcat4/5 默认的连接器v1.6 重点改进Processor多线程支持,并且完善BootStrap,Connector,Processor等组件Connec...
上一篇我们试了下怎么写一个简易的Servlet容器,这段时间继续看了下面的章节,讲的内容对应的分支V1.5和V1.6
https://github.com/lovejj1994/SimpleServlet- v1.5 实现 tomcat4/5 默认的连接器
- v1.6 重点改进Processor多线程支持,并且完善BootStrap,Connector,Processor等组件
Connector
上一篇是一个简单的demo,这一节模仿tomcat的写法,对一些功能做拆分,实现一个tomcat4的默认连接器的简化版,大致流程如下图。
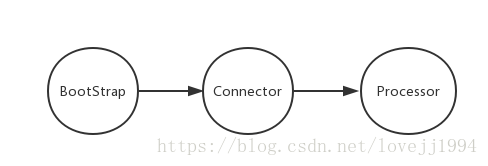
首先上一篇文章中的HttpServlet同时做了Connector和Processor的工作,这一分支会被替换成HttpConnector和HttpProcessor,而HttpConnector在tomcat中称之为连接器,它负责ServerSocket的创建,接受http请求和分发请求给Processor(处理线程)等工作,下面是改进的代码:
这段代码包括了一个processors队列,我们称为处理线程,下节再说。
package connector.http;

import java.io.IOException;
import java.io.InputStream;
import java.io.OutputStream;
import java.net.InetAddress;
import java.net.ServerSocket;
import java.net.Socket;
import java.time.LocalDateTime;
import java.util.concurrent.ConcurrentLinkedQueue;
import java.util.logging.Logger;

public class HttpConnector implements Runnable {


    private static final Logger log = Logger.getLogger(HttpConnector.class.getName());

    private boolean shutdown = false;
    private String scheme = "http";
    private static final int port = 8080;

    private static final String SHUTDOWN_COMMAND = "/SHUTDOWN";

    ServerSocket serverSocket = null;
    /**
     * The background thread.
     */
    private Thread thread = null;
    /**
     * The minimum number of processors to start at initialization time.
     */
    protected int minProcessors = 5;


    /**
     * The maximum number of processors allowed, or <0 for unlimited.
     */
    private int maxProcessors = 15;

    /**
     * The current number of processors that have been created.
     */
    private int curProcessors = 0;

    /**
     * Processor线程池,可以多线程处理请求
     * The set of processors that have been created but are not currently
     * being used to process a request.
     */
    private ConcurrentLinkedQueue<HttpProcessor> processors = new ConcurrentLinkedQueue();

    public String getScheme() {
        return scheme;
    }

    public HttpConnector() {
    }

    @Override
    public void run() {

        while (true) {

            log.info("等待指令。。。。" + LocalDateTime.now().toString());
            Socket socket;
            InputStream input;
            OutputStream output;

            try {
                socket = serverSocket.accept();

                HttpProcessor httpProcessor = getProcessor();
                if (httpProcessor == null) {
                    try {
                        log.info("线程池已空,忽略请求");
                        socket.close();
                    } catch (IOException e) {
                        continue;
                    }
                }
                httpProcessor.assign(socket);
            } catch (Exception e) {
                continue;
            }

        }
    }


    /**
     * Recycle the specified Processor so that it can be used again.
     *
     * @param processor The processor to be recycled
     */
    void recycle(HttpProcessor processor) {
        processors.offer(processor);
    }


    /**
     * Create and return a new processor suitable for processing HTTP
     * requests and returning the corresponding responses.
     */
    private HttpProcessor newProcessor() {
        curProcessors++;
        HttpProcessor processor = new HttpProcessor(this);
        new Thread(processor).start();
        return processor;
    }


    /**
     * Create (or allocate) and return an available processor for use in
     * processing a specific HTTP request, if possible.  If the maximum
     * allowed processors have already been created and are in use, return
     * <code>null</code> instead.
     */
    private HttpProcessor getProcessor() {
        if (processors.size() > 0) {
            return processors.poll();
        }
        if ((maxProcessors > 0) && (curProcessors < maxProcessors)) {
            return (newProcessor());
        } else {
            if (maxProcessors < 0) {
                return (newProcessor());
            } else {
                return null;
            }
        }
    }


    /**
     * 初始化ServerSocket
     */
    public void initialize() throws IOException {
        serverSocket = new ServerSocket(port, 1, InetAddress.getByName("localhost"));
    }

    /**
     * 初始化Connector,包括初始化Processors线程池
     *
     * @throws LifecycleException if a fatal startup error occurs
     */
    public void start() {

        // Start our background thread
        threadStart();

        // Create the specified minimum number of processors
        while (curProcessors < minProcessors) {
            if ((maxProcessors > 0) && (curProcessors >= maxProcessors))
                break;
            HttpProcessor processor = newProcessor();
            recycle(processor);
        }

    }


    /**
     * 启动Connector线程
     */
    private void threadStart() {
        log.info("httpConnector.starting");

        thread = new Thread(this, "SimpleServlet v1.6");
        thread.setDaemon(true);
        thread.start();
    }
}
Processor 与 Connector 的配合
HttpProcessor主要就是拿到socket实例后进行数据解析,根据情况转发给ServletProcessor或StaticResourceProcessor。在上一篇文章中,整个程序是同步执行的,在一个请求没有完全响应之前,是不能响应下一个请求的,所以在这一分支中,我们让HttpConnector拥有一个HttpProcessor连接池,Connector拿到的请求都批量分发给Processor连接池,达到多线程并行执行的目的。代码很长,就没贴出来,可以去github看源代码。
这里有涉及到多线程的应用,重要的方法包括await()和assign(Socket socket)方法,HttpProcessor和HttpConnector是如何配合的呢?
先看下面是HttpProcessor的run方法和HttpConnector的newProcessor方法,newProcessor主要为processor线程池创建实例并且启动processor实例,因为HttpProcessor实现了Runnable接口,所以激活了HttpProcessor的run方法。
HttpProcessor run()
@Override
    public void run() {

        // Process requests until we receive a shutdown signal
        while (true) {

            // Wait for the next socket to be assigned
            Socket socket = await();
            if (socket == null) {
                continue;
            }

            // Process the request from this socket
            try {
                process(socket);
                socket.close();
            } catch (Throwable t) {
                throw new RuntimeException(t);
            }
            // Finish up this request
            connector.recycle(this);
        }
    }
HttpConnector newProcessor()
    private HttpProcessor newProcessor() {
        curProcessors++;
        HttpProcessor processor = new HttpProcessor(this);
        new Thread(processor).start();
        return processor;
    }
但是HttpProcessor 刚创建的实例是没有socket给它处理的,所以我们要看下HttpProcessor 的 await()方法。available默认是false,所以await()会阻塞线程。
HttpProcessor await()
    private synchronized Socket await() {

        // Wait for the Connector to provide a new Socket
        while (!available) {
            try {
                wait();
            } catch (InterruptedException e) {
            }
        }

        // Notify the Connector that we have received this Socket
        Socket socket = this.socket;
        available = false;
        notifyAll();

        return socket;
    }
看到这 我们又要跳回到HttpConnector的run()方法,当serverSocket.accept()接收到socket实例时,会从processors连接池里弹出一个已经初始化好的实例,然后调用assign方法。
HttpConnector run()
public void run() {

        while (true) {

            log.info("等待指令。。。。" + LocalDateTime.now().toString());
            Socket socket;
            InputStream input;
            OutputStream output;

            try {
                socket = serverSocket.accept();

                HttpProcessor httpProcessor = getProcessor();
                if (httpProcessor == null) {
                    try {
                        log.info("线程池已空,忽略请求");
                        socket.close();
                    } catch (IOException e) {
                        continue;
                    }
                }
                httpProcessor.assign(socket);
            } catch (Exception e) {
                continue;
            }

        }
    }
因为available为false,所以assign方法不会走while循环,它会拿到HttpConnector 给的socket实例,并将available设为true,关键的来了,它通过notifyAll 唤醒之前HttpProcessor run方法里阻塞的线程,因为available已经为true,所以HttpProcessor await方法的代码会跳出循环,继续往下执行,而且available会重新设为false,再下面处理socket的过程跟上一篇文章一样。
因为存在socket还没处理完(available 仍为true),HttpConnector又给HttpProcessor一个socket待处理,所以这时调用assign方法会进入while循环并阻塞,直到前一个任务处理完并设available为false并且notifyAll 唤醒线程。
HttpProcessor assign(Socket socket)
    synchronized void assign(Socket socket) {
        // Wait for the Processor to get the previous Socket
        while (available) {
            try {
                wait();
            } catch (InterruptedException e) {
            }
        }

        // Store the newly available Socket and notify our thread
        this.socket = socket;
        available = true;
        notifyAll();
    }
处理完socket之后,会执行一个recycle方法回收processor线程
HttpConnector recycle(HttpProcessor processor)
    void recycle(HttpProcessor processor) {
        processors.offer(processor);
    }
BootStrap
前面可以知道,Connector具有举足轻重的作用,它支配Processor的运行,那谁负责Connector的启动呢?这就是BootStrap 的工作了.
package startup;

import connector.http.HttpConnector;

import java.io.IOException;

public class BootStrap {
    public static void main(String[] args) throws IOException {
        HttpConnector httpConnector = new HttpConnector();
        httpConnector.initialize();
        httpConnector.start();
    }
}
initialize 用于SocketServer的初始化;
HttpConnector initialize()
    /**
     * 初始化ServerSocket
     */
    public void initialize() throws IOException {
        serverSocket = new ServerSocket(port, 1, InetAddress.getByName("localhost"));
    }
因为HttpConnector实现了Runnable,所以start用于启动Connector线程
HttpConnector start()
    /**
     * 初始化Connector,包括初始化Processors线程池
     *
     * @throws LifecycleException if a fatal startup error occurs
     */
    public void start() {

        // Start our background thread
        threadStart();

        // Create the specified minimum number of processors
        while (curProcessors < minProcessors) {
            if ((maxProcessors > 0) && (curProcessors >= maxProcessors))
                break;
            HttpProcessor processor = newProcessor();
            recycle(processor);
        }
    }
瓜分20万奖金 获得内推名额 丰厚实物奖励 易参与易上手
更多推荐


 2
2 0
0- 0


 已为社区贡献1条内容

所有评论(0)