
基于python的dlib库的人脸识别
首先通过pip安装cmake,只有安装了cmake才能装上dlib库,建议装dlib的时候关闭后台的360杀毒软件。源代码如下:import dlibimport cv2 as cvimage_path = "xiaomin.jpg"detector = dlib.get_frontal_face_detector()image = dlib.load_rgb_image(image_path)d
首先通过pip安装cmake,只有安装了cmake才能装上dlib库,建议装dlib的时候关闭后台的360杀毒软件。
源代码如下:
import dlib
import cv2 as cv
image_path = "xiaomin.jpg"
detector = dlib.get_frontal_face_detector()
image = dlib.load_rgb_image(image_path)
detection = detector(image, 1)
for i, dect in enumerate(detection):
cv.rectangle(image, tuple([dect.left(), dect.top()]), tuple([dect.right(), dect.bottom()]), (237, 98, 205), 3)
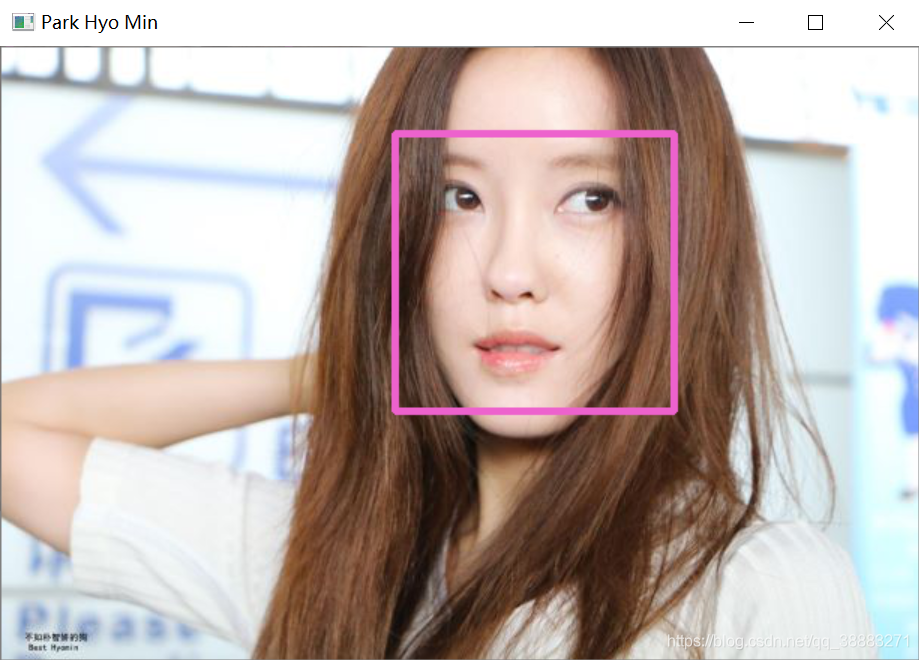
cv.imshow("Park Hyo Min", image[:, :, ::-1])
cv.waitKey(0)
cv.destroyAllWindows()
这里通过dlib.get_frontal_face_detector()生成一个人脸检测器,在dlib.load_rgb_image()函数中传入要检测的图像路径,在生成好的人脸检测器detector中传入图像,以及采样次数,对于多个人脸识别采样次数可以相对增大,但也不是越大越好。
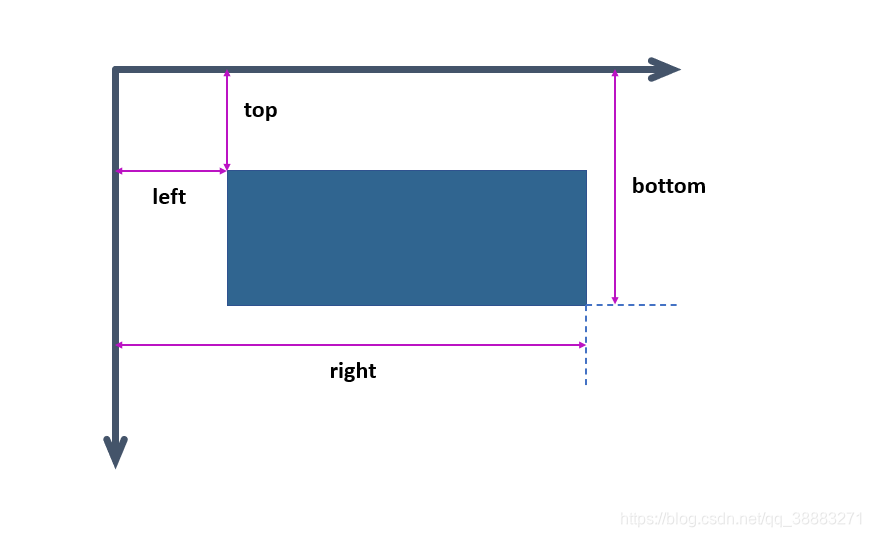
程序里的detection是<class 'dlib.rectangles'>类类型,detection中存放了检测到的所有人脸矩形框的像素位置,我们可以通过enumerate()方法返回每个人脸矩形框的索引以及像素位置left,top,right,bottom,其相对人脸矩形框的位置信息如下:
下面是对多个人脸的检测:
import dlib
import cv2 as cv
image_path = "people.jpg"
detector = dlib.get_frontal_face_detector()
image = dlib.load_rgb_image(image_path)
detection = detector(image, 1)
for i, dect in enumerate(detection):
cv.rectangle(image, tuple([dect.left(), dect.top()]), tuple([dect.right(), dect.bottom()]), (0, 255, 0), 3)
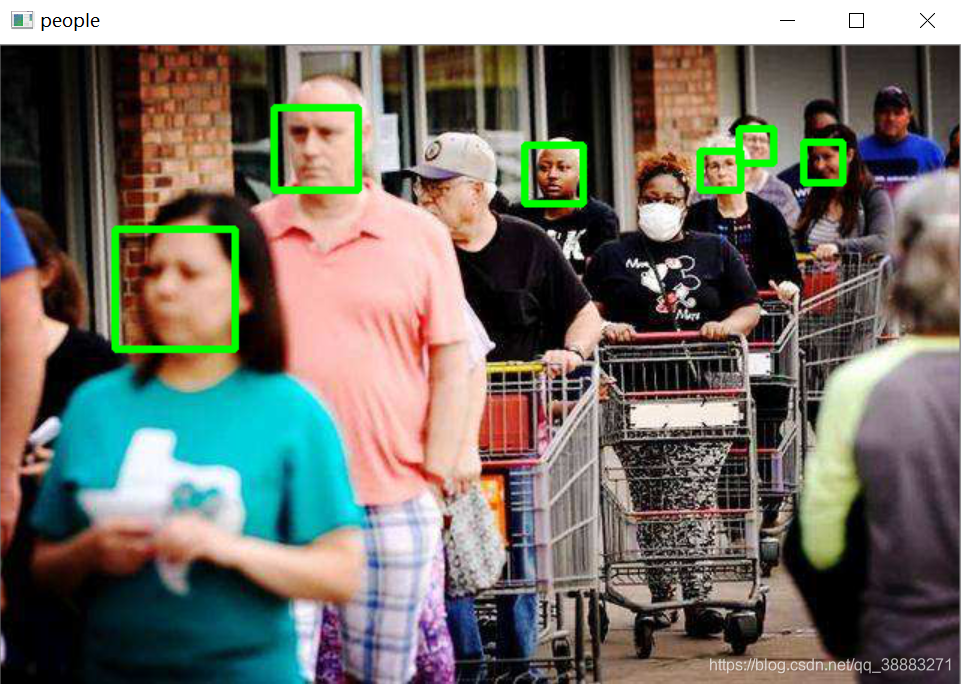
cv.imshow("people", image[:, :, ::-1])
cv.waitKey(0)
cv.destroyAllWindows()
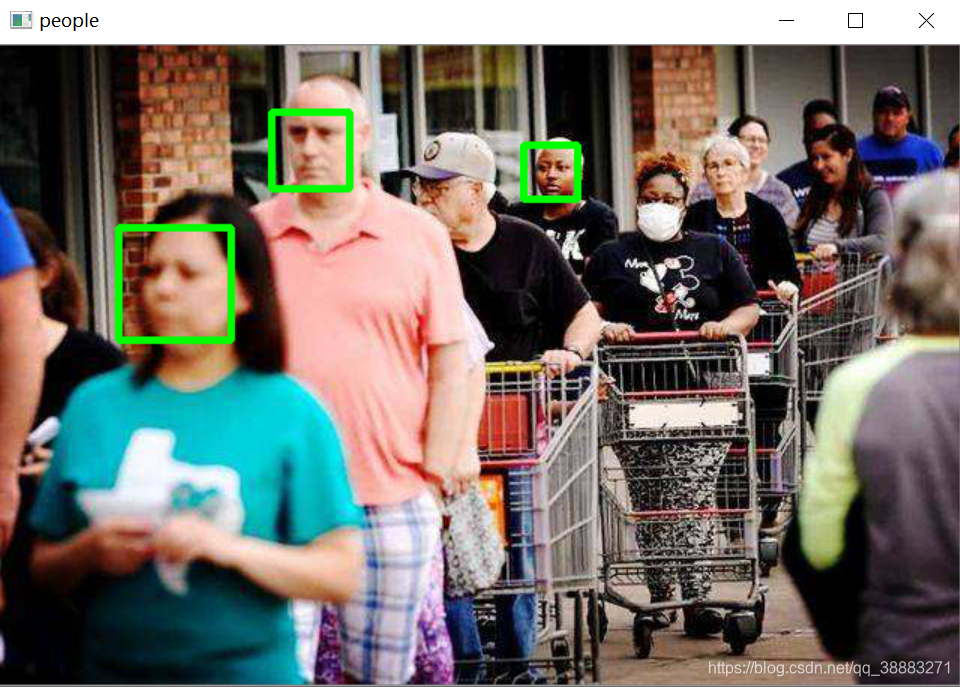
当采样次数为1时显然有很多人脸检测不出来,设置采样次数为3得到的结果更好一些,但是戴口罩的人脸以及部分被遮挡住的人脸仍然不能识别,需要用到深度学习的方法。
除此之外,可以利用shape_predictor_68_face_landmarks.dat官网训练好的脸部的68个特征来检测人脸:
import dlib
import cv2 as cv

predictor_path = "shape_predictor_68_face_landmarks.dat"
image_path = "xiaomin.jpg"

detector = dlib.get_frontal_face_detector()
predictor = dlib.shape_predictor(predictor_path)

image = dlib.load_rgb_image(image_path)
detection = detector(image, 1)

for i, dect in enumerate(detection):
    face_mark = [(p.x, p.y) for p in predictor(image, dect).parts()]
    for index, point in enumerate(face_mark):
        cv.circle(image, point, 3, color=(210, 85, 232))
        font = cv.FONT_HERSHEY_COMPLEX_SMALL
        cv.putText(image, str(index), point, font, 0.5, color=(0, 255, 0), thickness=1, lineType=cv.LINE_AA)

cv.imshow("xiaomin", image[:, :, ::-1])
cv.waitKey(0)
cv.destroyAllWindows()
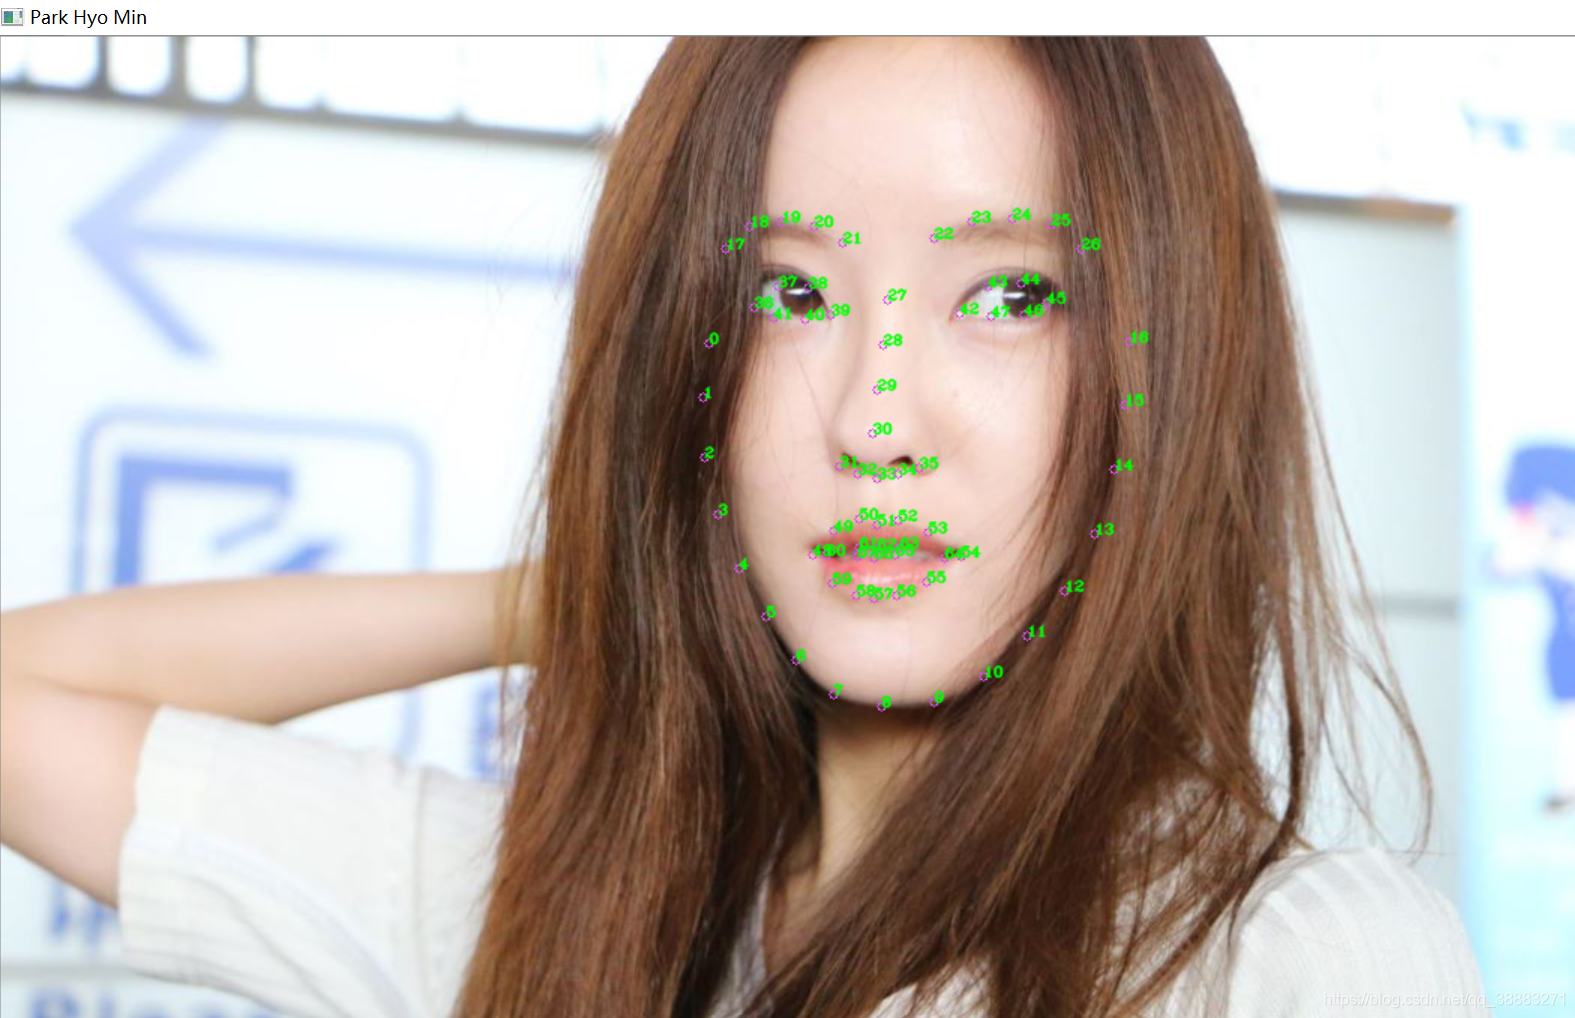
在图像中检测出人脸的68个特征,并进行了标记。predictor(image, dect).parts()方法在图像的每个人脸矩形框中捕获68个人脸特征,返回的是<class 'dlib.points'>类类型,返回值存放的是每个人脸矩形框中的68个特征的像素位置即x和y坐标值。
利用dlib官网训练好的resnet分类网络对未知人脸进行识别:
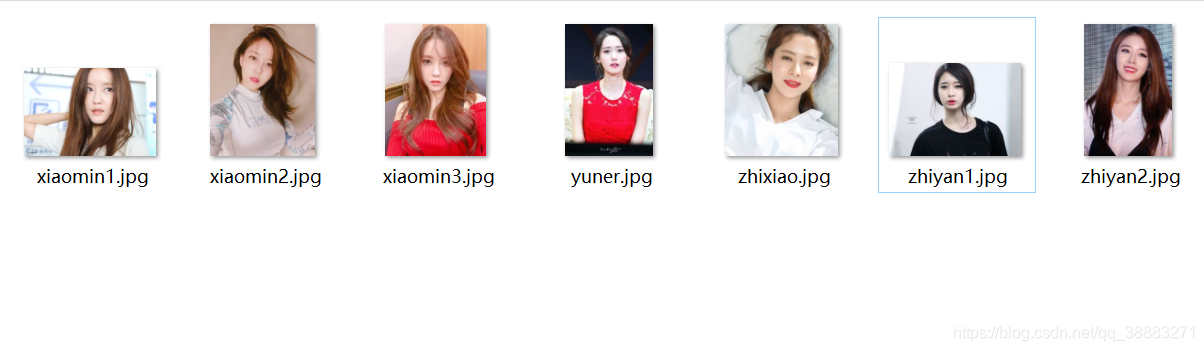
用来训练的图像:
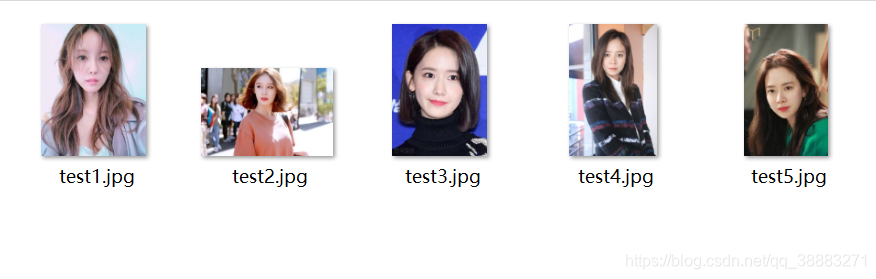
用来进行测试的图像:
import dlib
import os
import glob
import numpy as np

predictor_path = "shape_predictor_68_face_landmarks.dat"
recognition_path = "dlib_face_recognition_resnet_model_v1.dat"
train_image_path = "E://python//train"
test_image_path = "E://python//test"

detector = dlib.get_frontal_face_detector()
predictor = dlib.shape_predictor(predictor_path)
face_rec = dlib.face_recognition_model_v1(recognition_path)

train_image_names = ["朴孝敏", "朴孝敏", "朴孝敏", "林允儿", "宋智孝", "朴智妍", "朴智妍"]
descriptors = []
for path in glob.glob(os.path.join(train_image_path, "*.jpg")):
    image = dlib.load_rgb_image(path)
    detection_train = detector(image, 1)
    for i, det in enumerate(detection_train):
        face_mark_train = predictor(image, det)
        face_des_train = face_rec.compute_face_descriptor(image, face_mark_train)
        descriptors.append(np.array(face_des_train))

for path in glob.glob(os.path.join(test_image_path, "*.jpg")):
    dist = []
    image = dlib.load_rgb_image(path)
    detection_test = detector(image, 1)
    for i, det in enumerate(detection_test):
        face_mark_test = predictor(image, det)
        face_des_test = face_rec.compute_face_descriptor(image, face_mark_test)
        face_des_array = np.array(face_des_test)
    for v in descriptors:
        dist.append(np.sqrt(np.sum(np.square(face_des_array-v))))
    test_result = np.argsort(dist)
    if train_image_names[test_result[0]] in train_image_names:
        print("人脸识别的结果是:", train_image_names[test_result[0]])
    else:
        pass
测试结果:
人脸识别的结果是: 朴孝敏
人脸识别的结果是: 朴智妍
人脸识别的结果是: 林允儿
人脸识别的结果是: 朴孝敏
人脸识别的结果是: 宋智孝
测试结果中只有倒数第二张图像的人脸识别的结果错误。 关于Resnet残差网络可以看一下这篇博客深度学习笔记(七)–ResNet(残差网络)

瓜分20万奖金 获得内推名额 丰厚实物奖励 易参与易上手
更多推荐


 4
4 0
0- 0


 已为社区贡献1条内容

所有评论(0)