
Docker--Docker consul的容器服务更新与发现
这里写目录标题一、Docker consul理论基础二、Docker consul自动发现服务架构的构建2.1实验环境2.2 Consul服务器部署2.3 node服务器部署一、Docker consul理论基础consul是HashiCorp公司推出使用go语言编写的开源工具,用于实现分布式系统的服务发现与配置具有如下特性:●consul支持健康检查,允许存储键值对●一致性协议采用Raft算法,
这里写目录标题
一、Docker consul理论基础
consul是HashiCorp公司推出使用go语言编写的开源工具,用于实现分布式系统的服务发现与配置
具有如下特性:
●consul支持健康检查,允许存储键值对
●一致性协议采用Raft算法,用来保证服务的高可用
●成员管理和消息广播采用GOSSIP协议,支持ACL访问控制
●方便部署,与Docker等轻量级容器可无缝配合
●基于nginx和consul构建高可用及自动发现的Docker服务架构

二、Docker consul自动发现服务架构的构建
2.1实验环境
| 服务器名称 | IP地址 | 需要部署的软件名称 |
|---|---|---|
| consul服务器 | 20.0.0.16 | Docker-ce、Compose 、Consul、Consul-template |
| node服务器 | 20.0.0.12 | Docker-ce、registrator |
2.2 Consul服务器部署
1.consul服务器中安装consul
上传consul_0.9.2_linux_amd64.zip软件到/root中
[root@localhost ~]# mkdir consul
[root@localhost ~]# cd consul/
[root@localhost consul]# rz -E
rz waiting to receive.
[root@localhost consul]# ll
总用量 9996
-rw-r--r--. 1 root root 10233177 11月 30 05:32 consul_0.9.2_linux_amd64.zip
[root@localhost consul]# unzip consul_0.9.2_linux_amd64.zip
Archive:  consul_0.9.2_linux_amd64.zip
  inflating: consul
[root@localhost consul]# mv consul /usr/bin
[root@localhost consul]# consul agent \          ##设置代理
> -server \                                      ##服务功能
> -bootstrap \                                   ##参与选举
> -ui \                                          ##提供web界面
> -data-dir=/var/lib/consul-data \               ##提供一个代理存储数据目录
> -bind=20.0.0.16 \                              ##绑定本地地址
> -client=0.0.0.0 \                              ##面对的客户端地址
> -node=consul-server01 &> /var/log/consul.log &    ##定义节点名称,日志混合输出到log,并且放到后台运行
[1] 9983
[root@localhost consul]# consul members    ##查看集群信息
Node             Address         Status  Type    Build  Protocol  DC
consul-server01  20.0.0.16:8301  alive   server  0.9.2  2         dc1
2,通过HTTP api获取集群信息
##curl 127.0.0.1:8500/v1/status/peers   '查看集群server成员'
##curl 127.0.0.1:8500/v1/status/leaders  '查看集群Raf leader'
##curl 127.0.0.1:8500/v1/catalog/services '查看注册的所有服务'
##curl 127.0.0.1:8500/v1/catalog/nginx   '查看nginx服务的信息'
##curl 127.0.0.1:8500/v1/catalog/nodes   '集群节点详细信息'

[root@localhost consul]# curl 127.0.0.1:8500/v1/status/peers
["20.0.0.16:8300"][root@localhost consul]# curl 127.0.0.1:8500/v1/status/leader
"20.0.0.16:8300"[root@localhost consul]# curl 127.0.0.1:8500/v1/catalog/services
{"consul":[]}[root@localhost consul]# curl 127.0.0.1:8500/v1/catalog/nginx
[root@localhost consul]# curl 127.0.0.1:8500/v1/catalog/nodes
[{"ID":"7810ec0f-fd97-0045-193c-08fe4ad74fb5","Node":"consul-server01","Address":"20.0.0.16","Datacenter":"dc1","TaggedAddresses":{"lan":"20.0.0.16","wan":"20.0.0.16"},"Meta":{},"CreateIndex":5,"ModifyIndex":6}][root@localhost consul]#
2.3 node服务器部署
1.安装gliderlabs/registrator
[root@localhost ~]# docker run -d \
> --name=registrator \                           ##定义容器名称
> --net=host \                                   ##定义网络
> -v /var/run/docker.sock:/tmp/docker.sock \     ##指定数据卷,存储信息
> --restart=always \                             ##容器关闭后一直重启
> gliderlabs/registrator:latest \                ##定义镜像
> -ip=20.0.0.12 \                                ##指定本地地址
> consul://20.0.0.16:8500                        ##指定consul管理节点地址、端口
2,安装nginx服务和httpd服务进行测试
[root@localhost ~]# docker run -itd -p:1314:80 --name test-01 -h test01 nginx   ##第一次所以要加载
[root@localhost ~]# docker run -itd -p:1315:80 --name test-02 -h test02 nginx
[root@localhost ~]# docker run -itd -p:1316:80 --name test-03 -h test03 httpd
[root@localhost ~]# docker run -itd -p:1317:80 --name test-04 -h test04 httpd
[root@localhost ~]# docker ps -a
CONTAINER ID        IMAGE                           COMMAND                  CREATED              STATUS              PORTS                  NAMES
4a66104e20da        httpd                           "httpd-foreground"       52 seconds ago       Up 51 seconds       0.0.0.0:1317->80/tcp   test-04
22aeef1f8b97        httpd                           "httpd-foreground"       About a minute ago   Up About a minute   0.0.0.0:1316->80/tcp   test-03
699838b927c3        nginx                           "/docker-entrypoint.…"   3 minutes ago        Up 3 minutes        0.0.0.0:1315->80/tcp   test-02
b9d9d7d36cc9        nginx                           "/docker-entrypoint.…"   3 minutes ago        Up 3 minutes        0.0.0.0:1314->80/tcp   test-01
69f03a40ed33        gliderlabs/registrator:latest   "/bin/registrator -i…"   10 minutes ago       Up 10 minutes                              registrator
3,回到consul节点查看nginx,httpd是否被自动注册
[root@localhost consul]# curl 127.0.0.1:8500/v1/catalog/services
{"consul":[],"httpd":[],"nginx":[]}[root@localhost consul]#
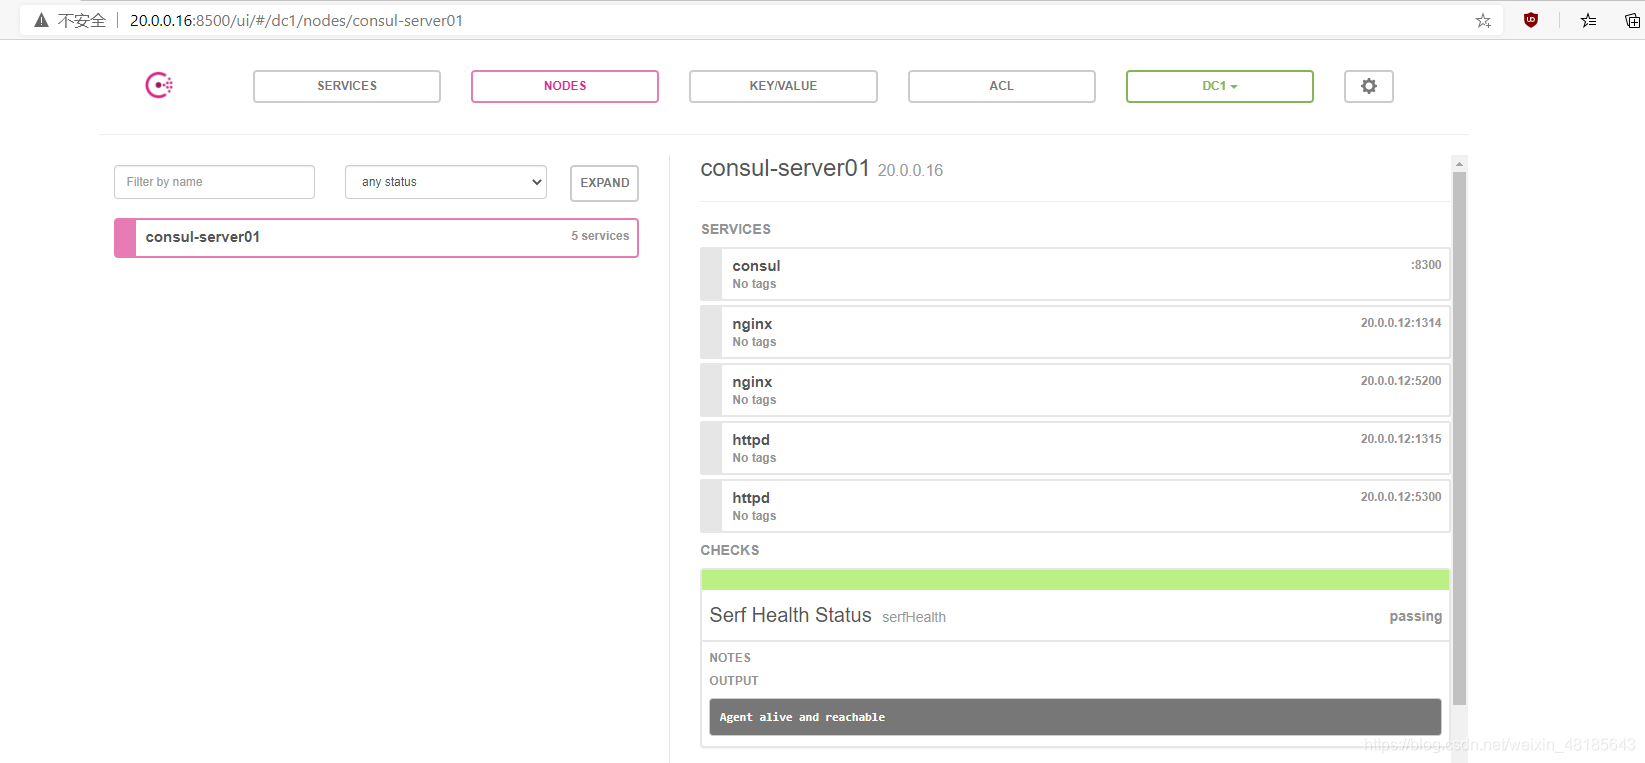
4,验证nginx和httpd服务是否注册到consul,浏览器输入http://20.0.0.16:8500
点击“NODES”,再点击“consul-server01”,会出现自动添加的两个nginx服务和两个httpd服务
2.4 在consul服务器 安装consul-template
●Consul-Template是一个守护进程,用于实时查询Consul集群信息,并更新文件系统上任意数量的指定模板,生成配置文件。更新完成以后,可以选择运行shell命令执行更新操作,重新加载 Nginx。Consul-Template可以查询Consul中的服务目录、Key、Key-values等。
●这种强大的抽象功能和查询语言模板可以使Consul-Template特别适合动态的创建配置文件。
例如:创建Apache/Nginx Proxy Balancers、Haproxy Backends
1 ,准备template nginx模板文件
[root@localhost ~]# vim consul/nginx.ctmpl
upstream http_backend {
   {{range service "nginx"}}
    server {{.Address}}:{{.Port}};
     {{end}}
}

server {
  listen 1314;
  server_name localhost 20.0.0.16;
  access_log /var/log/nginx/kgc.cn-access.log;
  index index.html index.php;
  location / {
    proxy_set_header HOST $host;
    proxy_set_header X-Real-IP $remote_addr;
    proxy_set_header Client-IP $remote_addr;
    proxy_set_header X-Forwarded-For $proxy_add_x_forwarded_for;
    proxy_pass http://http_backend;
  }
}
2,编译安装nginx,并在配置文件中添加子目录
[root@docker ~]# yum install gcc pcre-devel zlib-devel -y
[root@docker ~]# tar nginx-1.12.2.tar.gz
[root@docker ~]# cd nginx-1.12.2/
[root@docker nginx-1.12.2]# ./configure --prefix=/usr/local/nginx
[root@docker nginx-1.12.2]# make && make install
[root@localhost ~]# vim /usr/local/nginx/conf/nginx.conf
http {
    include       mime.types;
    include       vhost/*.conf;    ##添加虚拟主机目录
    default_type  application/octet-stream;
3,配置并启动template
[root@localhost ~]# cd consul/
[root@localhost consul]# rz -E ##导入template
rz waiting to receive.
[root@localhost consul]# unzip consul-template_0.19.3_linux_amd64.zip
Archive: consul-template_0.19.3_linux_amd64.zip
inflating: consul-template
[root@localhost consul]# mv consul-template /usr/local/bin/
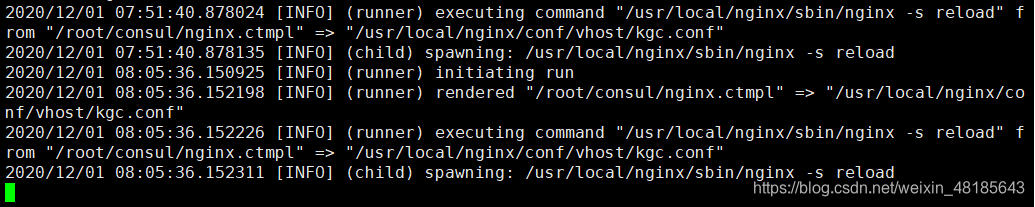
[root@localhost consul]# consul-template -consul-addr 20.0.0.16:8500 \
> -template "/root/consul/nginx.ctmpl:/usr/local/nginx/conf/vhost/kgc.conf:/usr/local/nginx/sbin/nginx -s reload" \
> --log-level=info
2020/12/01 07:51:40.856424 [INFO] consul-template v0.19.3 (ebf2d3d)
2020/12/01 07:51:40.856441 [INFO] (runner) creating new runner (dry: false, once: false)
2020/12/01 07:51:40.856828 [INFO] (runner) creating watcher
2020/12/01 07:51:40.857168 [INFO] (runner) starting
2020/12/01 07:51:40.857197 [INFO] (runner) initiating run
2020/12/01 07:51:40.876782 [INFO] (runner) initiating run
2020/12/01 07:51:40.878001 [INFO] (runner) rendered "/root/consul/nginx.ctmpl" => "/usr/local/nginx/conf/vhost/kgc.conf"
2020/12/01 07:51:40.878024 [INFO] (runner) executing command "/usr/local/nginx/sbin/nginx -s reload" from "/root/consul/nginx.ctmpl" => "/usr/local/nginx/conf/vhost/kgc.conf"
2020/12/01 07:51:40.878135 [INFO] (child) spawning: /usr/local/nginx/sbin/nginx -s reload
4 验证:再开一个终端
[root@localhost ~]# vim /usr/local/nginx/conf/vhost/kgc.conf
upstream http_backend {

    server 20.0.0.12:1314;       ##映射

    server 20.0.0.12:1315;

}

server {
  listen 1314;
  server_name localhost 20.0.0.16;
  access_log /var/log/nginx/kgc.cn-access.log;
  index index.html index.php;
  location / {
    proxy_set_header HOST $host;
    proxy_set_header X-Real-IP $remote_addr;
    proxy_set_header Client-IP $remote_addr;
    proxy_set_header X-Forwarded-For $proxy_add_x_forwarded_for;
    proxy_pass http://http_backend;
  }
}

5,在node服务端在创建一个 nginx 容器节点,检测服务发现及配置更新功能(信息更新了)
[root@localhost ~]# docker run -itd -p:1318:80 --name test-05 -h test05 nginx
又自动映射一个
[root@localhost ~]# vim /usr/local/nginx/conf/vhost/kgc.conf
upstream http_backend {

    server 20.0.0.12:1314;

    server 20.0.0.12:1318;

    server 20.0.0.12:1315;

}

server {
  listen 1314;
  server_name localhost 20.0.0.16;
  access_log /var/log/nginx/kgc.cn-access.log;
  index index.html index.php;
  location / {
    proxy_set_header HOST $host;
    proxy_set_header X-Real-IP $remote_addr;
    proxy_set_header Client-IP $remote_addr;
    proxy_set_header X-Forwarded-For $proxy_add_x_forwarded_for;
    proxy_pass http://http_backend;
  }
}
6,删除一个nginx容器节点,查看配置文件变化
[root@localhost ~]# docker stop 1b07521babc6
1b07521babc6
[root@localhost ~]# docker rm 1b07521babc6   ##删除test1
1b07521babc6
[root@localhost ~]# docker ps -a
CONTAINER ID        IMAGE                           COMMAND                  CREATED             STATUS              PORTS                  NAMES
670e966e1397        nginx                           "/docker-entrypoint.…"   4 minutes ago       Up 4 minutes        0.0.0.0:1318->80/tcp   test-05
7bc2046110a8        httpd                           "httpd-foreground"       32 minutes ago      Up 32 minutes       0.0.0.0:1317->80/tcp   test-04
d69cfb40cf79        httpd                           "httpd-foreground"       33 minutes ago      Up 33 minutes       0.0.0.0:1316->80/tcp   test-03
c258cc004a74        nginx                           "/docker-entrypoint.…"   33 minutes ago      Up 33 minutes       0.0.0.0:1315->80/tcp   test-0
a632dc328ece        nginx                           "/docker-entrypoint.…"   34 minutes ago      Created                                    test-02
5ab4f04bc0e6        gliderlabs/registrator:latest   "/bin/registrator -i…"   36 minutes ago      Up 36 minutes                              registrator
又变成2个nginx
upstream http_backend {

    server 20.0.0.12:1318;

    server 20.0.0.12:1315;

}

server {
  listen 1314;
  server_name localhost 20.0.0.16;
  access_log /var/log/nginx/kgc.cn-access.log;
  index index.html index.php;
  location / {
    proxy_set_header HOST $host;
    proxy_set_header X-Real-IP $remote_addr;
    proxy_set_header Client-IP $remote_addr;
    proxy_set_header X-Forwarded-For $proxy_add_x_forwarded_for;
    proxy_pass http://http_backend;
  }
}
~

瓜分20万奖金 获得内推名额 丰厚实物奖励 易参与易上手
更多推荐


 0
0 0
0- 0


 已为社区贡献1条内容

所有评论(0)