
Openjtag与Openocd
1. Openjtag与OpenOCD简介OpenJTag是一个开源项目(包含软件和硬件)。硬件是一个USB接口转JTag接口的适配器。借助开源软件OpenOCD可以完成程序的烧写,调试等任务OpenJTag的功能:1. 往Flash烧写程序: 支持NOR Flash 和 NAND Flash2. 支持Windows以及Linux3. 能够用在支持GDB调试协议的工具上: 如IAR, Eclips
1. Openjtag与OpenOCD简介
OpenJTag是一个开源项目(包含软件和硬件)。
硬件是一个USB接口转JTag接口的适配器。
借助开源软件OpenOCD可以完成程序的烧写,调试等任务OpenJTag的功能:
1. 往Flash烧写程序: 支持NOR Flash 和 NAND Flash
2. 支持Windows以及Linux
3. 能够用在支持GDB调试协议的工具上: 如IAR, Eclipse
4. USB转串口功能
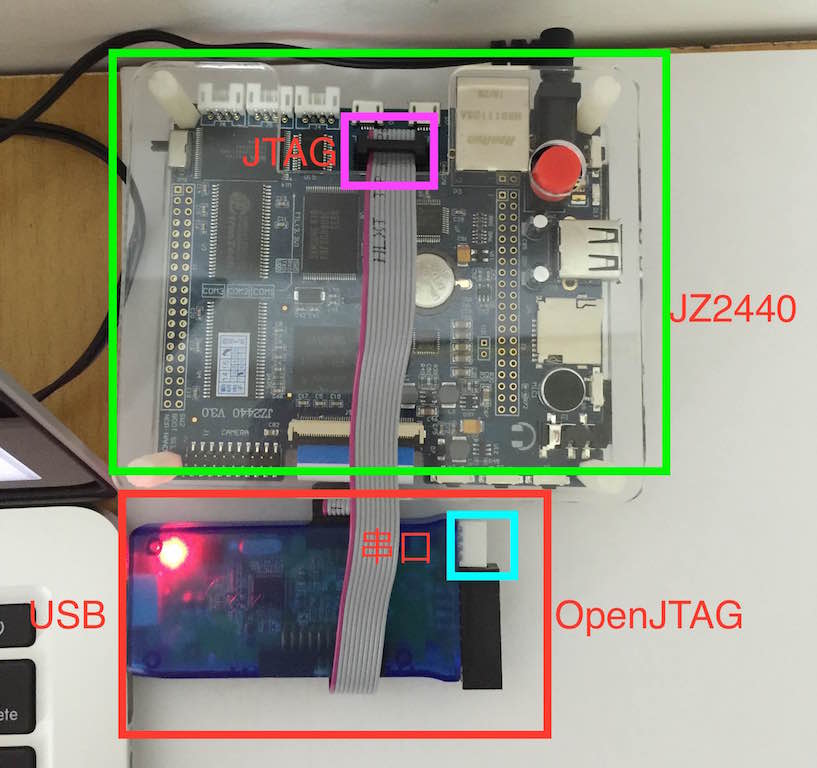
开发板和OpenJTAG的连接方式:
2. OpenOCD编译
sudo apt-get install libusb-dev
sudo apt-get install libusb-1.0-0-dev
sudo apt-get install libtool
sudo apt-get install libtool-bin
sudo apt install automake libtool m4 autoconf
sudo apt install pkg-config
sudo apt install pkgconf
./bootstrap
2.1 安装libftdi和ftdi-eeprom
下载地址http://www.intra2net.com/en/developer/libftdi/download.php:
1、下载confuse-2.5.tar.gz libftdi1-1.3.tar.bz2并解压:
root@ubuntu:/work/tmp# ls /mnt/hgfs/jz2440/download/
confuse-2.5.tar.gz libftdi1-1.3.tar.bz2
root@ubuntu:/work/tmp# tar -jxvf /mnt/hgfs/jz2440/download/libftdi1-1.3.tar.bz2 -C ./ root@ubuntu:/work/tmp# tar -zxvf /mnt/hgfs/jz2440/download/confuse-2.5.tar.gz -C ./
2、安装libftdi,参考源码目录下的README.build:
root@ubuntu:/work/tmp/libftdi1-1.3# mkdir build; cd build:
root@ubuntu:/work/tmp/libftdi1-1.3# cmake  -DCMAKE_INSTALL_PREFIX="/usr" ../; make; sudo make install
3、安装ftdi-eeprom,参考源码目录下的INSTALL
root@ubuntu:/work/tmp# cd confuse-2.5/; ./configure; make; make install2.2 安装OpenOCD
1、下载OpenOCD
root@ubuntu:/work/tmp# git clone git://openocd.git.sourceforge.net/gitroot/openocd/openocd2、编译并安装,请参考源码目录下的README.build
root@ubuntu:/work/tmp/openocd# ./bootstrap
root@ubuntu:/work/tmp/openocd# ./configure --enable-ftdi
root@ubuntu:/work/tmp/openocd# make; make install

编译后的版本为:
root@ubuntu:/work/tmp/openocd# openocd -v
Open On-Chip Debugger 0.10.0-dev-00371-g81631e4 (2016-09-11-18:21) Licensed under GNU GPL v2 For bug reports, read http://openocd.org/doc/doxygen/bugs.html
3、增加udev规则,以便使用普通用户权限操作调试器。以root权限创建/etc/udev/rules.d/45-openjtag.rules(文件名可以换成别的):
SYSFS{idProduct}=="5118", SYSFS{idVendor}=="1457", MODE="666", GROUP="plugdev"
4、添加OpenOCD配置文件openocd.cfg:
interface ftdi
#通过描述来指定设备,应当和dmesg中的Product一致
#ftdi_device_desc "USB<=>JTAG&RS232"
#通过PID VID指定调试器,比描述更准确些
ftdi_vid_pid 0x1457 0x5118
#如果有多个同样的调试器,还可以指定要使用的调试器序列号
#ftdi_serial

#引脚定义,相当于旧版中的 ft2232_layout jtagkey
ftdi_layout_init 0x0c08 0x0f1b
ftdi_layout_signal nTRST -data 0x0100 -noe 0x0400
ftdi_layout_signal nSRST -data 0x0200 -noe 0x0800

# Target configuration for the Samsung 2440 system on chip
# Tested on a S3C2440 Evaluation board by keesj
# Processor       : ARM920Tid(wb) rev 0 (v4l)
# Info:   JTAG tap: s3c2440.cpu tap/device found: 0x0032409d (Manufacturer: 0x04e, Part: 0x0324, Version: 0x0)

if { [info exists CHIPNAME] } {
   set  _CHIPNAME $CHIPNAME
} else {
   set  _CHIPNAME s3c2440
}

if { [info exists ENDIAN] } {
   set  _ENDIAN $ENDIAN
} else {
  # this defaults to a bigendian
   set  _ENDIAN little
}

if { [info exists CPUTAPID ] } {
   set _CPUTAPID $CPUTAPID
} else {
  # force an error till we get a good number
   set _CPUTAPID 0x0032409d
}

#jtag scan chain
jtag newtap $_CHIPNAME cpu -irlen 4 -ircapture 0x1 -irmask 0x0f -expected-id $_CPUTAPID

#
#jtag_rclk 3000
adapter_khz 1234

#set _TARGETNAME $_CHIPNAME.cpu
#target create $_TARGETNAME arm920t -endian $_ENDIAN -chain-position $_TARGETNAME -variant arm920t
#$_TARGETNAME configure -work-area-phys 0x200000 -work-area-size 0x4000 -work-area-backup 0
#arm7_9 fast_memory_access enable


set _TARGETNAME $_CHIPNAME.cpu
target create $_TARGETNAME arm920t -chain-position $_TARGETNAME
$_TARGETNAME configure -work-area-phys 0x00200000 \
-work-area-size 0x4000 -work-area-backup 0


#reset configuration
reset_config trst_and_srst

#Flash CFG<openocd.pdf P[74~]
#flash bank name driver base size chip_width bus_width target [driver_options]
#usage: flash bank <name> <driver> <base> <size> <chip_width> <bus_width> <target>
#flash bank bank_id driver_name base_address size_bytes chip_width_bytes bus_width_bytes target [driver_options ...]
flash bank 0 cfi 0x0 0x200000 2 2 $_TARGETNAME

#NAND CFG <openocd.pdf P[88~92]>
#nand device name driver target [ configparams... ]
nand device 0 s3c2440 $_TARGETNAME
最后启动OpenOCD:首先将EasyOpenJTAG USB连接至PC,然后开发板上电,最后在和配置文件openocd.cfg相同目录执行openocd
root@ubuntu:~# openocd 需要把相同名字的配置文件放置在这个程序执行的当前目录下面,默认找这个目录作为初始配置文件的获取点。
Open On-Chip Debugger 0.10.0-dev-00371-g81631e4 (2016-09-11-22:15)
Licensed under GNU GPL v2
For bug reports, read
http://openocd.org/doc/doxygen/bugs.html
Info : auto-selecting first available session transport "jtag". To override use 'transport select <transport>'.
adapter speed: 1234 kHz
trst_and_srst separate srst_gates_jtag trst_push_pull srst_open_drain connect_deassert_srst
Info : clock speed 1234 kHz
Info : JTAG tap: s3c2440.cpu tap/device found: 0x0032409d (mfg: 0x04e (Samsung), part: 0x0324, ver: 0x0)
Info : Embedded ICE version 2
Info : s3c2440.cpu: hardware has 2 breakpoint/watchpoint units
然后在另外一个端口上面进行Telnet配置命令下去:
telnet localhost 4444

root@ubuntu:~# telnet localhost 4444

Trying 127.0.0.1...

Connected to localhost.

Escape character is '^]'.

Open On-Chip Debugger

> halt

> nand probe 0

NAND flash device 'NAND 256MiB 3.3V 8-bit (Samsung)' found

> load_image leds.bin

136 bytes written at address 0x00000000

downloaded 136 bytes in 0.015671s (8.475 KiB/s)

> resume 0x0
最后启动OpenOCD:首先将EasyOpenJTAG USB连接至PC,然后开发板上电,最后在和配置文件openocd.cfg相同目录执行openocd
root@ubuntu:~# openocd

Open On-Chip Debugger 0.10.0-dev-00371-g81631e4 (2016-09-11-22:15)

Licensed under GNU GPL v2

For bug reports, read

http://openocd.org/doc/doxygen/bugs.html

Info : auto-selecting first available session transport "jtag". To override use 'transport select <transport>'.

adapter speed: 1234 kHz

trst_and_srst separate srst_gates_jtag trst_push_pull srst_open_drain connect_deassert_srst

Info : clock speed 1234 kHz

Info : JTAG tap: s3c2440.cpu tap/device found: 0x0032409d (mfg: 0x04e (Samsung), part: 0x0324, ver: 0x0)

Info : Embedded ICE version 2

Info : s3c2440.cpu: hardware has 2 breakpoint/watchpoint units
可以看到设备已经识别成功。

瓜分20万奖金 获得内推名额 丰厚实物奖励 易参与易上手
更多推荐


 1
1 0
0- 0


 已为社区贡献4条内容

所有评论(0)