python语音信号时频分析_Python分析离散心率信号(上)
Python分析离散心率信号(上)一些理论和背景心率包含许多有关信息。如果拥有心率传感器和一些数据,那么当然可以购买分析包或尝试一些可用的开源产品,但是并非所有产品都可以满足需求。也是这种情况。那么,为什么不尝试自己做一个人呢?如果正在阅读本文,那么可能想尝试一下。本文适合那些有兴趣了解更多关于心率分析以及如何使用一些基本模块用Python编写简单但有效的分析算法的人。在谈论心率信号的形状时,每个
Python分析离散心率信号(上)

一些理论和背景
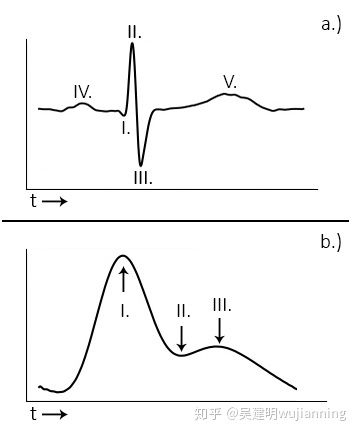
心率包含许多有关信息。如果拥有心率传感器和一些数据,那么当然可以购买分析包或尝试一些可用的开源产品,但是并非所有产品都可以满足需求。也是这种情况。那么,为什么不尝试自己做一个人呢?如果正在阅读本文,那么可能想尝试一下。本文适合那些有兴趣了解更多关于心率分析以及如何使用一些基本模块用Python编写简单但有效的分析算法的人。在谈论心率信号的形状时,每个搏动都具有QRS复数的特征,如a。,I-III(QRS)所示。还有一个P波(IV)和一个T波(V)。R成分是大峰(II)。这是感兴趣的一个each beat is characterized by a QRS-complex as shown below in a.), I-III (Q-R-S). There is also a P-wave (IV), and a T-wave (V). The R component is the large peak (II). This is the one of interest to us::

在光体积描记图信号(PPG)中,信号略有不同。PPG信号显示在图像的b。)中。这里的组成部分是舒张压峰值(I)和舒张压峰值(III),舒张压峰值是最高的血压点。这两个波被所谓的重症陷波(II)分开。在这种情况下,收缩峰(I)用于心率提取。
为了开发峰值检测算法,这是一个很好的巧合:对于两种信号,都需要标记每个复合物中的最高峰。
首先,
首先让下载数据集并绘制信号图,以便对数据有所了解并开始寻找有意义地分析数据的方法。将熊猫用于大多数数据任务,并将matplotlib用于大多数绘图需求。
import pandas as pd
import matplotlib.pyplot as plt
dataset = pd.read_csv("data.csv") #Read data from CSV datafile
plt.title("Heart Rate Signal") #The title of our plot
plt.plot(dataset.hart) #Draw the plot object
plt.show() #Display the plot
复制

信号看起来很干净。请记住,即使使用良好的传感器,也并非总是如此,尤其是在实验室外进行测量时!以后会分析如何处理噪声和自动确定信号质量。
检测第一个峰
第一步是找到所有R峰的位置。为此,需要确定感兴趣区域(ROI),即信号中的每个R峰。得到这些之后,需要确定最大值。有几种方法可以做到这一点:
§ 在ROI数据点上拟合曲线,求解最大值的x位置;
§ 确定ROI中每组点之间的斜率,找到斜率反转的位置;
§ 在ROI内标记数据点,找到最高点的位置。
第一个提供了精确的数学解决方案(更精确:根据需要精确),但是也是计算上最昂贵的。对于示例数据集,差异并不重要,但是在开发此算法时,不得不快速遍历近十亿个数据点,而未来的数据集似乎只会变得更大。大部分代码还将被重写为C以便在嵌入式ARM芯片上使用,因此需要保持其简单高效。
后两种方法在计算上便宜得多,但精度也较低。这些方法的高精度比曲线拟合方法更加依赖于高采样率。毕竟,曲线的实际最大值可能会位于两个数据点之间,而不是位于实际数据点上,如果采样率较高,则误差容限将减小。还将使用曲线拟合方法来更精确地近似R峰,因为现在,将ROI中最高点的位置用作拍子的位置。
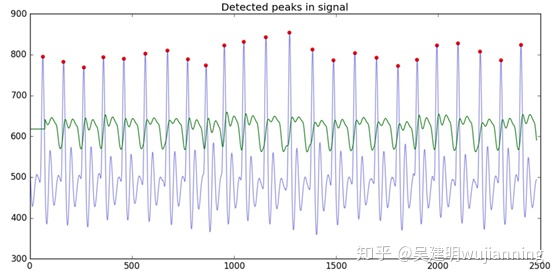
现在开始工作:首先将不同的峰彼此分离。为此,绘制一个移动平均线,标记心率信号位于移动平均线上方的ROI,并最终在每个ROI中找到最高点,如下所示:
import pandas as pd
import matplotlib.pyplot as plt
import numpy as np
import math
dataset = pd.read_csv("data.csv")
#Calculate moving average with 0.75s in both directions, then append do dataset
hrw = 0.75 #One-sided window size, as proportion of the sampling frequency
fs = 100 #The example dataset was recorded at 100Hz
mov_avg = dataset['hart'].rolling(int(hrw*fs)).mean() #Calculate moving average
#Impute where moving average function returns NaN, which is the beginning of the signal where x hrw
avg_hr = (np.mean(dataset.hart))
mov_avg = [avg_hr if math.isnan(x) else x for x in mov_avg]
mov_avg = [x*1.2 for x in mov_avg] #For now we raise the average by 20% to prevent the secondary heart contraction from interfering, in part 2 we will do this dynamically
dataset['hart_rollingmean'] = mov_avg #Append the moving average to the dataframe
#Mark regions of interest
window = []
peaklist = []
listpos = 0 #We use a counter to move over the different data columns
for datapoint in dataset.hart:
rollingmean = dataset.hart_rollingmean[listpos] #Get local mean
if (datapoint < rollingmean) and (len(window) < 1): #If no detectable R-complex activity -> do nothing
listpos += 1
elif (datapoint > rollingmean): #If signal comes above local mean, mark ROI
window.append(datapoint)
listpos += 1
else: #If signal drops below local mean -> determine highest point
maximum = max(window)
beatposition = listpos - len(window) + (window.index(max(window))) #Notate the position of the point on the X-axis
peaklist.append(beatposition) #Add detected peak to list
window = [] #Clear marked ROI
listpos += 1
ybeat = [dataset.hart[x] for x in peaklist] #Get the y-value of all peaks for plotting purposes
plt.title("Detected peaks in signal")
plt.xlim(0,2500)
plt.plot(dataset.hart, alpha=0.5, color='blue') #Plot semi-transparent HR
plt.plot(mov_avg, color ='green') #Plot moving average
plt.scatter(peaklist, ybeat, color='red') #Plot detected peaks
plt.show()
复制

已经在信号中标记了每个R复合体的最高点,还不错!但是,这是一个理想的信号。将了解如何处理噪声,测量误差,检测误差以及如何防止模块在质量差的信号部分抛出误差。有人可能会问:为什么要移动平均线,为什么不仅仅使用700左右的水平线作为阈值?这是一个有效的问题,可以很好地处理此信号。为什么使用移动平均线与理想化程度较低的信号有关。R峰值的幅度会随时间变化,尤其是当传感器稍微移动时。较小的次要峰的振幅也可以独立于R峰的振幅而变化,有时具有几乎相同的振幅。减少错误检测到的峰的一种方法是通过拟合不同高度处的移动平均值并确定哪种拟合效果最佳。稍后再详细介绍。
计算心率
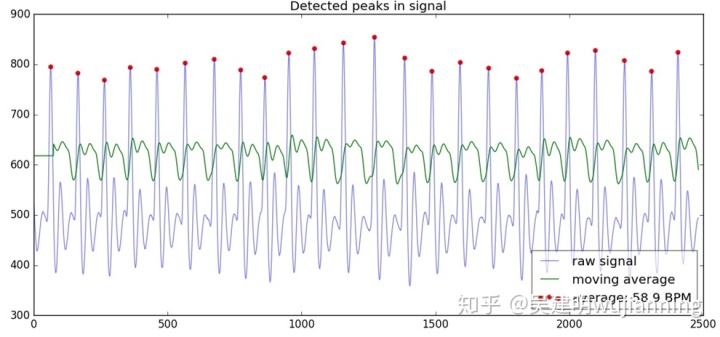
知道每个峰值在时间上的位置,因此计算此信号的平均“每分钟心跳数”(BPM)度量很简单。只需计算峰之间的距离,取平均值并转换为每分钟的值,如下所示:
RR_list = []
cnt = 0
while (cnt < (len(peaklist)-1)):
RR_interval = (peaklist[cnt+1] - peaklist[cnt]) #Calculate distance between beats in # of samples
ms_dist = ((RR_interval / fs) * 1000.0) #Convert sample distances to ms distances
RR_list.append(ms_dist) #Append to list
cnt += 1
bpm = 60000 / np.mean(RR_list) #60000 ms (1 minute) / average R-R interval of signal
print "Average Heart Beat is: %.01f" %bpm #Round off to 1 decimal and print
复制
还要更新绘图方法以在图例中显示BPM:
plt.title("Detected peaks in signal")
plt.xlim(0,2500)
plt.plot(dataset.hart, alpha=0.5, color='blue', label="raw signal") #Plot semi-transparent HR
plt.plot(mov_avg, color ='green', label="moving average") #Plot moving average
plt.scatter(peaklist, ybeat, color='red', label="average: %.1f BPM" %bpm) #Plot detected peaks
plt.legend(loc=4, framealpha=0.6)
plt.show()
复制

已迈出分析心率信号的第一步。每分钟的心跳数是一种非常有用的量度,在科学研究中经常使用,并且还有许多非科学用途,但是信号包含的信息要多得多。将处理从心率信号中提取更复杂的信息。
四舍五入
最后,整理一下代码并将其放入可调用函数中。这将使生活在下一部分变得更加轻松,并且代码将更加有条理和可重用。请注意,可能要做的是整洁的事情,使函数成为类的一部分,但为了使本教程也可供那些不太熟悉Python(并且可能对类不熟悉或不熟悉)的人访问,选择从此处省略本教程系列中的所有代码。
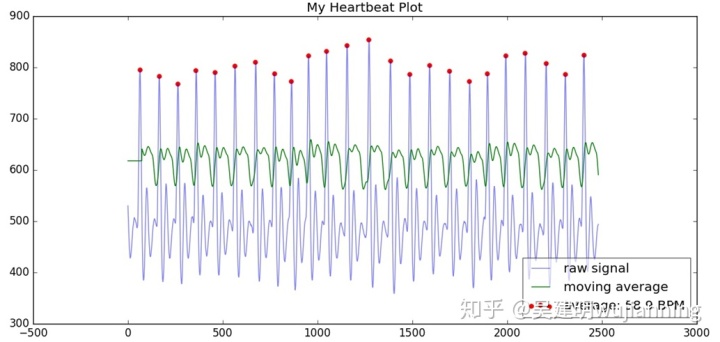
让将BPM值和计算出的列表放在一个可以调用的字典中,并可以附加计算出的度量。还让编写一个包装函数process(),以便可以使用尽可能少的代码来调用分析:
import pandas as pd
import matplotlib.pyplot as plt
import numpy as np
import math
measures = {}
def get_data(filename):
dataset = pd.read_csv(filename)
return dataset
def rolmean(dataset, hrw, fs):
mov_avg = dataset['hart'].rolling(int(hrw*fs)).mean()
avg_hr = (np.mean(dataset.hart))
mov_avg = [avg_hr if math.isnan(x) else x for x in mov_avg]
mov_avg = [x*1.2 for x in mov_avg]
dataset['hart_rollingmean'] = mov_avg
def detect_peaks(dataset):
window = []
peaklist = []
listpos = 0
for datapoint in dataset.hart:
rollingmean = dataset.hart_rollingmean[listpos]
if (datapoint < rollingmean) and (len(window) < 1):
listpos += 1
elif (datapoint > rollingmean):
window.append(datapoint)
listpos += 1
else:
maximum = max(window)
beatposition = listpos - len(window) + (window.index(max(window)))
peaklist.append(beatposition)
window = []
listpos += 1
measures['peaklist'] = peaklist
measures['ybeat'] = [dataset.hart[x] for x in peaklist]
def calc_RR(dataset, fs):
RR_list = []
peaklist = measures['peaklist']
cnt = 0
while (cnt < (len(peaklist)-1)):
RR_interval = (peaklist[cnt+1] - peaklist[cnt])
ms_dist = ((RR_interval / fs) * 1000.0)
RR_list.append(ms_dist)
cnt += 1
measures['RR_list'] = RR_list
def calc_bpm():
RR_list = measures['RR_list']
measures['bpm'] = 60000 / np.mean(RR_list)
def plotter(dataset, title):
peaklist = measures['peaklist']
ybeat = measures['ybeat']
plt.title(title)
plt.plot(dataset.hart, alpha=0.5, color='blue', label="raw signal")
plt.plot(dataset.hart_rollingmean, color ='green', label="moving average")
plt.scatter(peaklist, ybeat, color='red', label="average: %.1f BPM" %measures['bpm'])
plt.legend(loc=4, framealpha=0.6)
plt.show()
def process(dataset, hrw, fs): #Remember; hrw was the one-sided window size (we used 0.75) and fs was the sample rate (file is recorded at 100Hz)
rolmean(dataset, hrw, fs)
detect_peaks(dataset)
calc_RR(dataset, fs)
calc_bpm()
plotter(dataset, "My Heartbeat Plot")
复制
这样调用:
import heartbeat as hb #Assuming we named the file 'heartbeat.py'
dataset = hb.get_data("data.csv")
hb.process(dataset, 0.75, 100)
#We have imported our Python module as an object called 'hb'
#This object contains the dictionary 'measures' with all values in it
#Now we can also retrieve the BPM value (and later other values) like this:
bpm = hb.measures['bpm']
#To view all objects in the dictionary, use "keys()" like so:
print hb.measures.keys()
复制
请注意,将get_data()函数与包装器分开。这样,模块还可以接受已经存储在内存中的数据帧对象,例如在由另一个程序生成这些数据帧对象时很有用。这使模块保持灵活。


开放原子开发者工作坊旨在鼓励更多人参与开源活动,与志同道合的开发者们相互交流开发经验、分享开发心得、获取前沿技术趋势。工作坊有多种形式的开发者活动,如meetup、训练营等,主打技术交流,干货满满,真诚地邀请各位开发者共同参与!
更多推荐
 已为社区贡献1条内容


所有评论(0)