spring-cloud(七)消息总线(Spring Cloud Bus)(Finchley版本)
上文中进行了配置中心的搭建当修改git上配置文件时,config-server服务可以获取最新的配置文件但是config-client服务读取的还是修改前的配置文件因为当一个系统中的配置文件发生改变的时候,我们需要重新启动该服务,才能使得新的配置文件生效,spring cloud config可以实现微服务中的所有系统的配置文件的统一管理,而且还可以实现当配置文件发生变化的时候...
上文中进行了配置中心的搭建
当修改git上配置文件时,config-server服务可以获取最新的配置文件

但是config-client服务读取的还是修改前的配置文件

因为当一个系统中的配置文件发生改变的时候,我们需要重新启动该服务,才能使得新的配置文件生效,spring cloud config可以实现微服务中的所有系统的配置文件的统一管理,而且还可以实现当配置文件发生变化的时候,系统会自动更新获取新的配置。

我们将配置文件放入git或者svn等服务中,通过一个Config Server服务来获取git中的配置数据,而我们需要使用的到配置文件的Config Client系统可以通过Config Server来获取对应的配置。
Spring Cloud Bus 将分布式的节点用轻量的消息代理连接起来。它可以用于广播配置文件的更改或者服务之间的通讯,也可以用于监控。本文要讲述的是用Spring Cloud Bus实现通知微服务架构的配置文件的更改。
启动rabbitMQ

默认用户是guest 密码guest 端口号5672 http://localhost:15672可以进入管理页面

修改config-client服务
在pom文件中添加spring-cloud-starter-bus-amqp spring-boot-starter-actuator依赖
<?xml version="1.0" encoding="UTF-8"?>
<project xmlns="http://maven.apache.org/POM/4.0.0" xmlns:xsi="http://www.w3.org/2001/XMLSchema-instance"
         xsi:schemaLocation="http://maven.apache.org/POM/4.0.0 http://maven.apache.org/xsd/maven-4.0.0.xsd">
    <modelVersion>4.0.0</modelVersion>

    <groupId>com.xuxu</groupId>
    <artifactId>config-client</artifactId>
    <version>0.0.1-SNAPSHOT</version>
    <packaging>jar</packaging>

    <name>config-client</name>
    <description>Demo project for Spring Boot</description>

    <parent>
        <groupId>com.xuxu</groupId>
        <artifactId>springcloudconfig</artifactId>
        <version>1.0-SNAPSHOT</version>
    </parent>

    <dependencies>
        <dependency>
            <groupId>org.springframework.boot</groupId>
            <artifactId>spring-boot-starter-web</artifactId>
        </dependency>
        <dependency>
            <groupId>org.springframework.cloud</groupId>
            <artifactId>spring-cloud-starter-config</artifactId>
        </dependency>
        <dependency>
            <groupId>org.springframework.cloud</groupId>
            <artifactId>spring-cloud-starter-netflix-eureka-client</artifactId>
        </dependency>
        <dependency>
            <groupId>org.springframework.cloud</groupId>
            <artifactId>spring-cloud-starter-bus-amqp</artifactId>
        </dependency>
        <dependency>
            <groupId>org.springframework.boot</groupId>
            <artifactId>spring-boot-starter-actuator</artifactId>
        </dependency>
    </dependencies>

    <build>
        <plugins>
            <plugin>
                <groupId>org.springframework.boot</groupId>
                <artifactId>spring-boot-maven-plugin</artifactId>
            </plugin>
        </plugins>
    </build>
</project>
bootstrap.properties中添加RabbitMq的配置,包括RabbitMq的地址、端口,用户名、密码。并需要加上spring.cloud.bus的三个配置
spring.application.name=config
spring.cloud.config.label=master
spring.cloud.config.profile=dev
#spring.cloud.config.uri= http://localhost:8888
#server.port=8881

eureka.client.serviceUrl.defaultZone=http://localhost:8880/eureka/
spring.cloud.config.discovery.enabled=true
spring.cloud.config.discovery.serviceId=config-server
server.port=8881

spring.rabbitmq.host=localhost
spring.rabbitmq.port=5672
spring.rabbitmq.username=guest
spring.rabbitmq.password=guest

spring.cloud.bus.enabled=true
spring.cloud.bus.trace.enabled=true
management.endpoints.web.exposure.include=bus-refresh启动类加上注解@RefreshScope @EnableDiscoveryClient
@SpringBootApplication
@RestController
@EnableEurekaClient
@RefreshScope
@EnableDiscoveryClient
public class ConfigClientApplication {

    public static void main(String[] args) {
        SpringApplication.run(ConfigClientApplication.class, args);
    }

    @Value("${config}")
    private String config;

    @RequestMapping("/hi")
    public String hi(){
        return config;
    }
}
依次启动eureka-server、confg-cserver,启动两个config-client,端口为:8881、8882。
访问http://localhost:8881/hi 或者http://localhost:8882/hi 浏览器显示:


这时我们去代码仓库将config的值改为“i am dev updated1127”,即改变配置文件config的值。如果是传统的做法,需要重启服务,才能达到配置文件的更新。此时,我们只需要发送post请求:http://localhost:8882/actuator/bus-refresh,你会发现config-client会重新读取配置文件


另外,/actuator/bus-refresh接口可以指定服务,即使用"destination"参数,比如 “/actuator/bus-refresh?destination=customers:**” 即刷新服务名为customers的所有服务。
此时的架构图: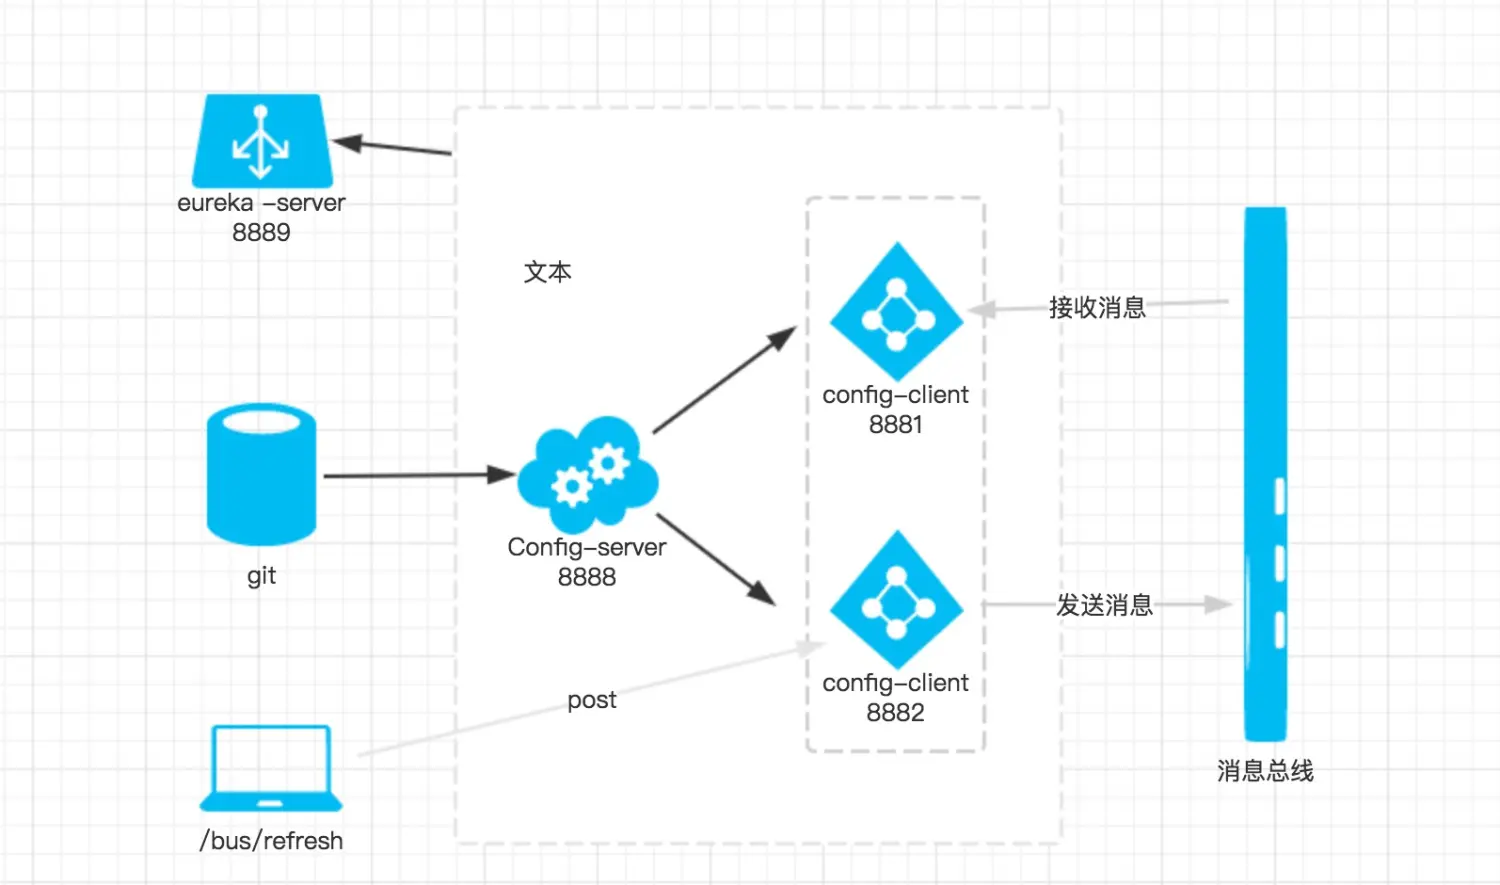
当git文件更改的时候,通过pc端用post 向端口为8882的config-client发送请求/bus/refresh/;此时8882端口会发送一个消息,由消息总线向其他服务传递,从而使整个微服务集群都达到更新配置文件。

开放原子开发者工作坊旨在鼓励更多人参与开源活动,与志同道合的开发者们相互交流开发经验、分享开发心得、获取前沿技术趋势。工作坊有多种形式的开发者活动,如meetup、训练营等,主打技术交流,干货满满,真诚地邀请各位开发者共同参与!
更多推荐
 0
0 0
0- 0


 已为社区贡献5条内容

所有评论(0)