
开放原子训练营(第二季)RT-Thread Nano学习营 参与有感
RT-Thread 国产操作系统STM32
前言
作者早年从事于单片机相关产品的开发,近几年的工作主要从事于工业网络安全相关领域的开发和研究,近期有几个物联网数据采集的项目,需要采集CAN协议转换为MQTT协议,正当我一筹莫展时,收到了CSDN关于RT-Thread线下培训的邀请,通过这次培训让我对RT-Thread国产操作系统有了全新的认识。
开发环境
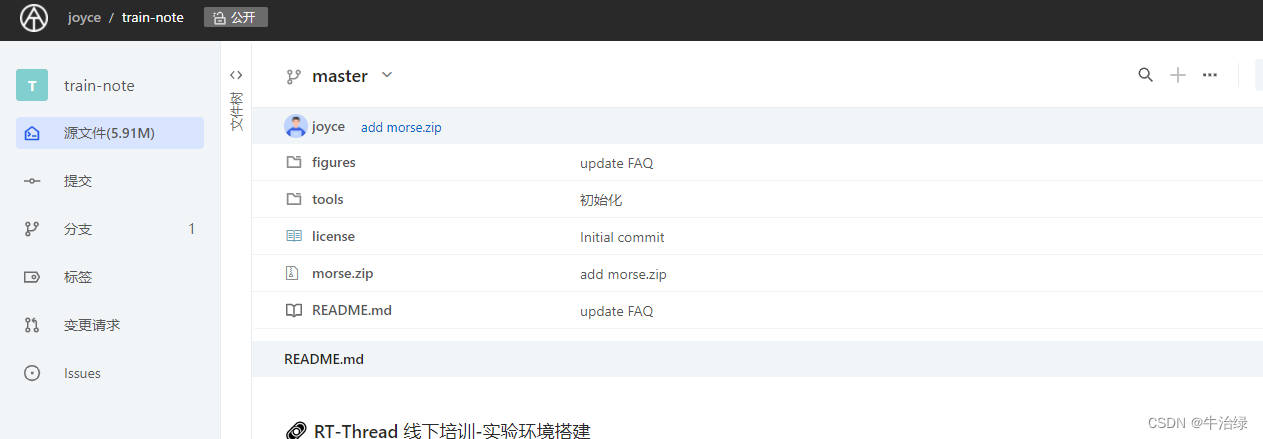
首先,尝试搭建了RT-Thread Studio 开发环境,按照老师们提供的URL:https://atomgit.com/joyce/train-note
作者刚开始以为搭建环境十分麻烦,不过经过作者20分钟的安装后,都解决了,微信群里面的老师也很负责,帮我们解决了各种问题,最重要的一点就是跟着文章走,文章内所有遇到的问题老师都已经提前写了。
RT-Thread Studio 作为一个开发工具软件,类似于Keil的开发工具,如果用户之前是Keil工具使用者,那么使用RT-Thread Studio毫无压力。
实验内容
在现场在老师的带领下,由浅入深的完成了如下几个项目的测试:
- LED 灯以 500ms 为间隔闪烁
#include <rtthread.h>
#include <rtdevice.h>
#include <board.h>
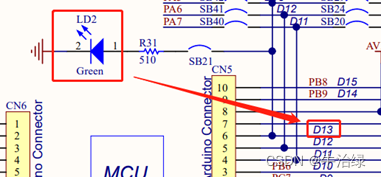
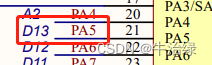
/* defined the LED0 pin: PA5 */
#define USER_LED_PIN GET_PIN(A, 5)
int main(void)
{
int count = 1;
/* set LED0 pin mode to output */
rt_pin_mode(LED0_PIN, PIN_MODE_OUTPUT);
while (count++)
{
rt_pin_write(LED0_PIN, PIN_HIGH);
rt_thread_mdelay(500);
rt_pin_write(LED0_PIN, PIN_LOW);
rt_thread_mdelay(500);
}
return RT_EOK;
}
如上代码块实现了设置PA5(也即LED接口)为输出模式,设置500毫秒的高低电平切换,请注意,此处使用了rt_thread_mdelay接口一是起到延迟的作用,二是起到了让出CPU的作用,在多线程编程中,有效的让出CPU才能保证其他线程得到执行;
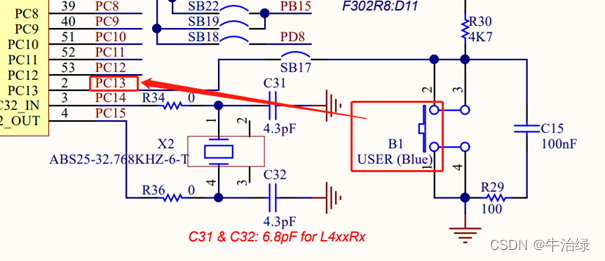
- 按键作为输入,按下串口输出
#include <rtthread.h>
#include <rtdevice.h>
#include <board.h>

#define USER_KEY GET_PIN(C, 13) // GET_PIN(H,4)

void irq_callback()
{
    rt_kprintf("RT-Thread!\r\n");
}

int main(void)
{
    rt_pin_mode(USER_KEY, PIN_MODE_INPUT_PULLUP);
    rt_pin_attach_irq(USER_KEY, PIN_IRQ_MODE_RISING_FALLING, irq_callback, RT_NULL);
    rt_pin_irq_enable(USER_KEY, PIN_IRQ_ENABLE);
    return 0;
}
如上代码经过设置PC13为输入模式,并绑定到irq_callback到中断上,当按键按下执行irq_callback函数,打印出信息,可以在串口上显示出RT-Thread!的信息。
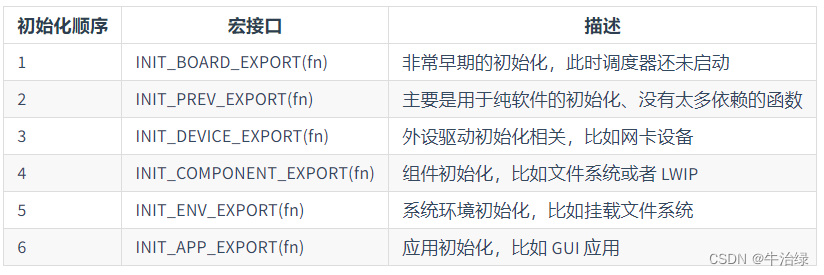
- 自动初始化机制
自动初始化机制令我震惊,可以保证代码在main函数运行前执行,这十分方便。
#include <rtthread.h>

int export_app(void)
{
    rt_kprintf("export_app RT-Thread!\r\n");
    return 0;
}
INIT_APP_EXPORT(export_app);
如上通过注册APP级别的函数,在main函数执行前输出信息;
RT-Thread支持如下6级自动初始化注册,满足用户不同级别功能的需要。
- 自定义 msh 命令
笔者平常进行Linux开发的过程中,如果需要增加后台命令行可执行命令非常复杂,没想到在RT-Thread操作系统中,增加后台可执行命令如此简单。
void hello(void)
{
    rt_kprintf("hello RT-Thread!\n");
}

MSH_CMD_EXPORT(hello , say hello to RT-Thread);
只需要在代码中通过MSH_CMD_EXPORT注册即可,后台即可通过执行hello达到输出hello RT-Thread!的目的。
- 线程管理
作为一款操作系统,线程管理的复杂度,决定了开发者进行代码的难易程度,得益于RT-Thread所见即所得的API,线程开发非常简单。
#include <rtthread.h>

#define THREAD_PRIORITY         25
#define THREAD_STACK_SIZE       512
#define THREAD_TIMESLICE        5

static rt_thread_t tid1 = RT_NULL;

/* 线程 1 的入口函数 */
static void thread1_entry(void *parameter)
{
    rt_uint32_t count = 0;

    while (1)
    {
        /* 线程 1 采用低优先级运行,一直打印计数值 */
        rt_kprintf("thread1 count: %d\n", count ++);
        rt_thread_mdelay(500);
    }
}

ALIGN(RT_ALIGN_SIZE)
static char thread2_stack[1024];
static struct rt_thread thread2;
/* 线程 2 入口 */
static void thread2_entry(void *param)
{
    rt_uint32_t count = 0;

    /* 线程 2 拥有较高的优先级,以抢占线程 1 而获得执行 */
    for (count = 0; count < 10 ; count++)
    {
        /* 线程 2 打印计数值 */
        rt_kprintf("thread2 count: %d\n", count);
    }
    rt_kprintf("thread2 exit\n");
    /* 线程 2 运行结束后也将自动被系统脱离 */
}
/* 线程示例 */
int thread_sample(void)
{
    /* 创建线程 1,名称是 thread1,入口是 thread1_entry*/
    tid1 = rt_thread_create("thread1",
                            thread1_entry, RT_NULL,
                            THREAD_STACK_SIZE,
                            THREAD_PRIORITY, THREAD_TIMESLICE);

    /* 如果获得线程控制块,启动这个线程 */
    if (tid1 != RT_NULL)
    rt_thread_startup(tid1);

    /* 初始化线程 2,名称是 thread2,入口是 thread2_entry */
    rt_thread_init(&thread2,
                    "thread2",
                    thread2_entry,
                    RT_NULL,
                    &thread2_stack[0],
                    sizeof(thread2_stack),
                    THREAD_PRIORITY - 1, THREAD_TIMESLICE);
    rt_thread_startup(&thread2);

    return 0;
}

/* 导出到 msh 命令列表中 */
MSH_CMD_EXPORT(thread_sample, thread sample);
如上代码实现了一下功能:
线程1:每隔500ms打印一次计数
线程2:打印10次计数后,打印退出并退出
这个例子创建一个动态线程初始化一个静态线程,一个线程在运行完毕后自动被系统删除,另一个线程一直打印计数
- 定时器管理
RealTime操作系统关键功能就是进行定时执行任务,如下为RT-Thread的定时器实例代码。
#include <rtthread.h>

/* 定时器的控制块 */
static rt_timer_t timer1;
static rt_timer_t timer2;
static int cnt = 0;

/* 定时器 1 超时函数 */
static void timeout1(void *parameter)
{
    rt_kprintf("periodic timer is timeout %d\n", cnt);

    /* 运行第 10 次,停止周期定时器 */
    if (cnt++ >= 9)
    {
        rt_timer_stop(timer1);
        rt_kprintf("periodic timer was stopped! \n");
    }
}

/* 定时器 2 超时函数 */
static void timeout2(void *parameter)
{
    rt_kprintf("one shot timer is timeout\n");
}

int timer_sample(void)
{
    /* 创建定时器 1  周期定时器 */
    timer1 = rt_timer_create("timer1", timeout1,
                             RT_NULL, 10,
                             RT_TIMER_FLAG_PERIODIC);

    /* 启动定时器 1 */
    if (timer1 != RT_NULL)
        rt_timer_start(timer1);

    /* 创建定时器 2 单次定时器 */
    timer2 = rt_timer_create("timer2", timeout2,
                             RT_NULL, 30,
                             RT_TIMER_FLAG_ONE_SHOT);

    /* 启动定时器 2 */
    if (timer2 != RT_NULL)
        rt_timer_start(timer2);
    return 0;
}

/* 导出到 msh 命令列表中 */
MSH_CMD_EXPORT(timer_sample, timer sample);
如上代码实现如下功能:
定时器1:周期定时器,10次之后让其停止
定时器2:单次定时器
这个例程会创建两个动态定时器,一个是单次定时,一个是周期性定时并让周期定时器运行一段时间后停止运行。
- 消息队列
在多线程通讯过程中,消息队列十分重要,在实操中体验到了API的所见即所得的清晰接口:
#include <rtthread.h>

/* 消息队列控制块 */
static struct rt_messagequeue mq;
/* 消息队列中用到的放置消息的内存池 */
static rt_uint8_t msg_pool[2048];

ALIGN(RT_ALIGN_SIZE)
static char thread1_stack[1024];
static struct rt_thread thread1;
/* 线程 1 入口函数 */
static void thread1_entry(void *parameter)
{
    char buf = 0;
    rt_uint8_t cnt = 0;

    while (1)
    {
        /* 从消息队列中接收消息 */
        if (rt_mq_recv(&mq, &buf, sizeof(buf), RT_WAITING_FOREVER) == RT_EOK)
        {
            rt_kprintf("thread1: recv msg from msg queue, the content:%c\n", buf);
            if (cnt == 19)
            {
                break;
            }
        }
        /* 延时 50ms */
        cnt++;
        rt_thread_mdelay(50);
    }
    rt_kprintf("thread1: detach mq \n");
    rt_mq_detach(&mq);
}

ALIGN(RT_ALIGN_SIZE)
static char thread2_stack[1024];
static struct rt_thread thread2;
/* 线程 2 入口 */
static void thread2_entry(void *parameter)
{
    int result;
    char buf = 'A';
    rt_uint8_t cnt = 0;

    while (1)
    {
        if (cnt == 8)
        {
            /* 发送紧急消息到消息队列中 */
            result = rt_mq_urgent(&mq, &buf, 1);
            if (result != RT_EOK)
            {
                rt_kprintf("rt_mq_urgent ERR\n");
            }
            else
            {
                rt_kprintf("thread2: send urgent message - %c\n", buf);
            }
        }
        else if (cnt >= 20) /* 发送 20 次消息之后退出 */
        {
            rt_kprintf("message queue stop send, thread2 quit\n");
            break;
        }
        else
        {
            /* 发送消息到消息队列中 */
            result = rt_mq_send(&mq, &buf, 1);
            if (result != RT_EOK)
            {
                rt_kprintf("rt_mq_send ERR\n");
            }

            rt_kprintf("thread2: send message - %c\n", buf);
        }
        buf++;
        cnt++;
        /* 延时 5ms */
        rt_thread_mdelay(5);
    }
}

/* 消息队列示例的初始化 */
int msgq_sample(void)
{
    rt_err_t result;

    /* 初始化消息队列 */
    result = rt_mq_init(
        &mq,
        "mqt",
        &msg_pool[0],     /* 内存池指向 msg_pool */
        1,                /* 每个消息的大小是 1 字节 */
        sizeof(msg_pool), /* 内存池的大小是 msg_pool 的大小 */
        RT_IPC_FLAG_PRIO  /* 如果有多个线程等待,优先级大小的方法分配消息 */
    );

    if (result != RT_EOK)
    {
        rt_kprintf("init message queue failed.\n");
        return -1;
    }

    rt_thread_init(&thread1,
                   "thread1",
                   thread1_entry,
                   RT_NULL,
                   &thread1_stack[0],
                   sizeof(thread1_stack), 25, 5);
    rt_thread_startup(&thread1);

    rt_thread_init(&thread2,
                   "thread2",
                   thread2_entry,
                   RT_NULL,
                   &thread2_stack[0],
                   sizeof(thread2_stack), 25, 5);
    rt_thread_startup(&thread2);

    return 0;
}

/* 导出到 msh 命令列表中 */
MSH_CMD_EXPORT(msgq_sample, msgq sample);
这是一个消息队列的应用例程,例程中初始化了 2 个静态线程,一个线程会从消息队列中收取消息;另一个线程会定时给消息队列发送普通消息和紧急消息;
线程1:接收消息,20次后不再接收,最后删除消息队列。
线程2:发送消息,第8次发送一条紧急消息,20次后退出。
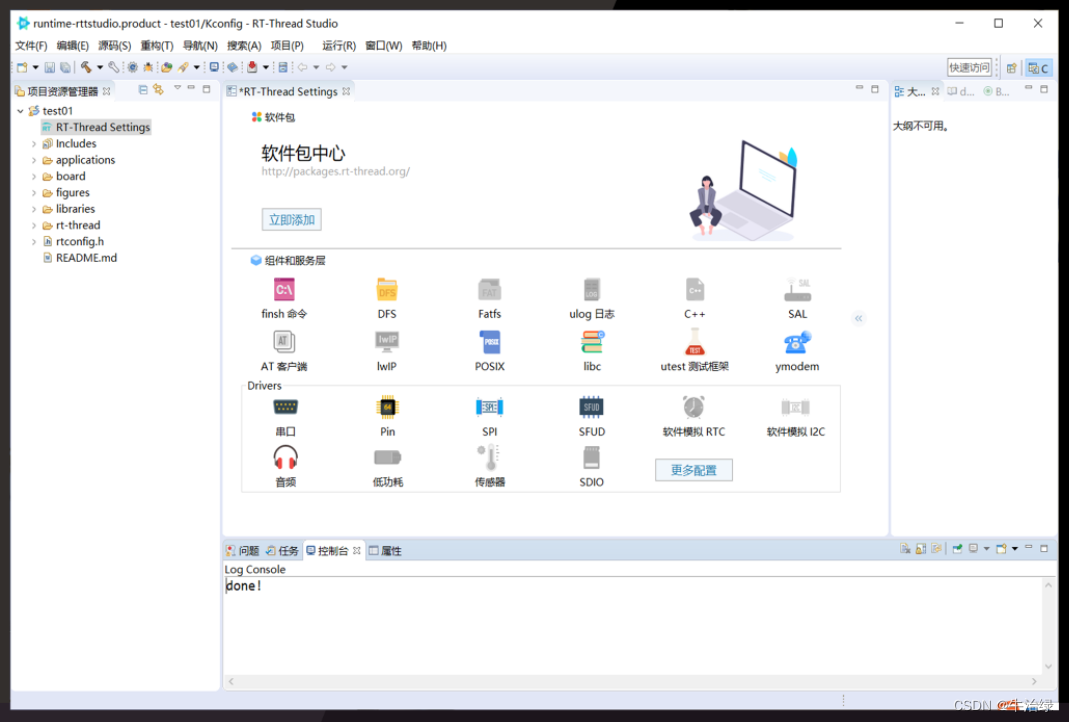
- 终极项目:摩斯电码体验-使用morse 软件包来体验摩斯电码
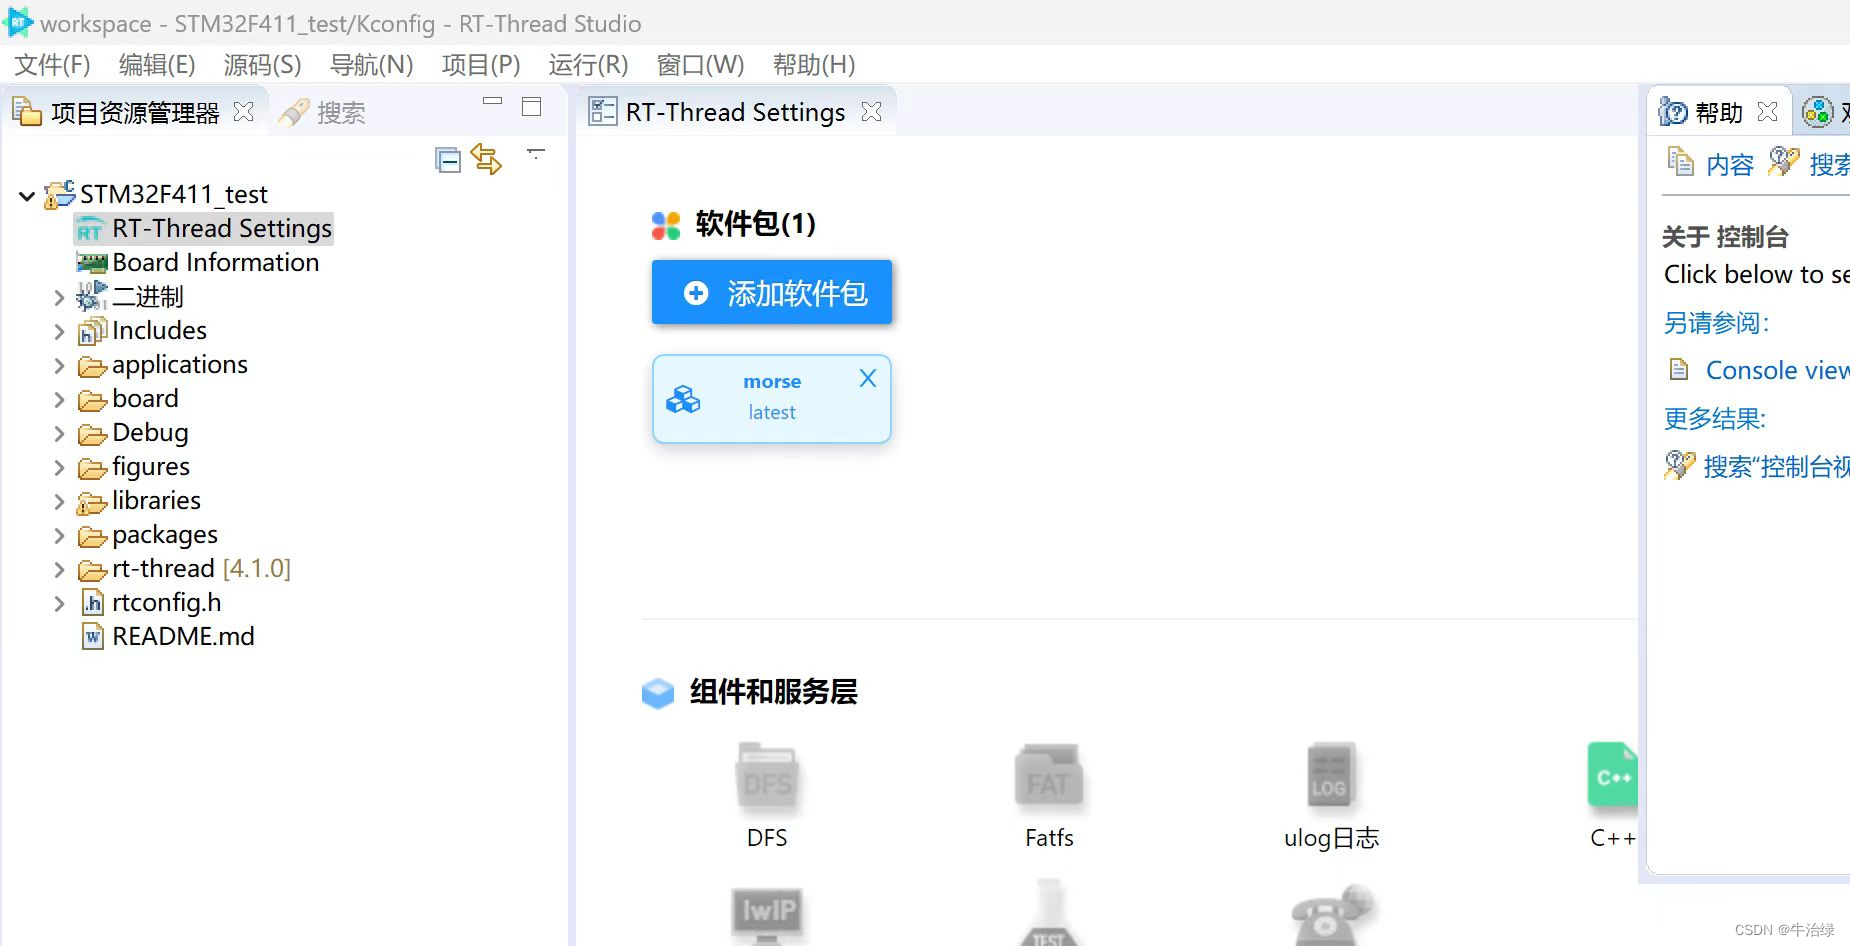
RT-Thread Setting的软件报中心包含600多个开发者上传的开发包,极大的节约开发者的时间。
笔者在安装开发环境的过程中发现,RT-Thread studio的包管理器十分强大:
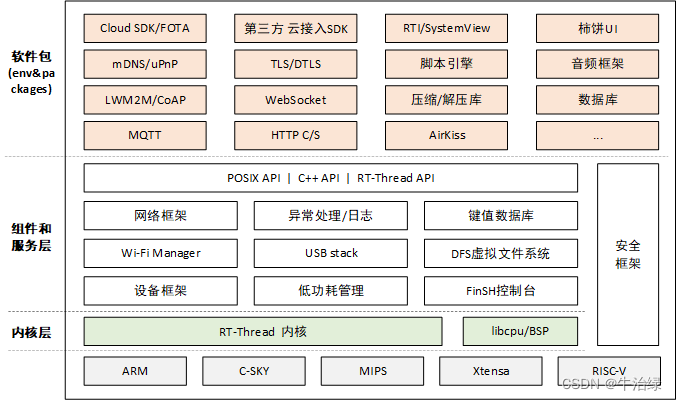
精简的内核:支持精简版、标准版、专业版,支持多场景使用;
开箱即用的开发环境:常见的ST、TI、瑞芯微等芯片或开发版,直接上手;
丰富的开发包支持:包括Modbus、CAN、各种常用的开发包,这将极大地缩短我们的开发周期;
以上两点十分关键,尤其对于小白而言,极大的减少入门难度。
总结
RT-Thread包括 Nano版本、标准版、Smart版、专业版等,RT-Thread 系统完全开源,遵循 Apache License 2.0 开源许可协议,可以免费在商业产品中使用,并且不需要公开私有代码,没有潜在商业风险。完全开源的系统,让开发者没有后顾之忧。

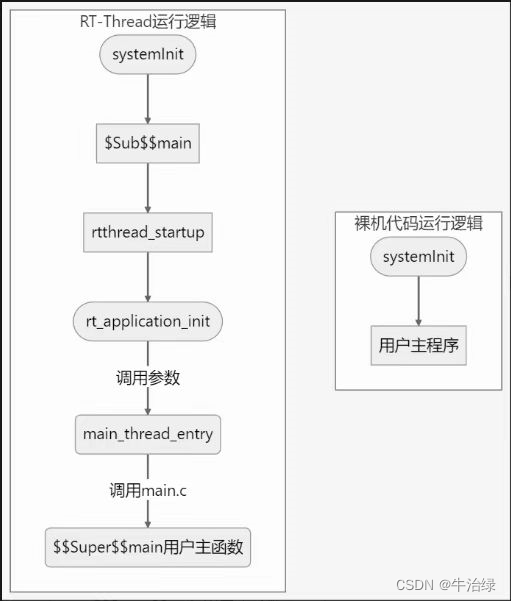
下午老师还为我们详细讲解了RT-Thread的架构和启动流程,让我们对RT-Thread的整体框架有了更深一步的了解。
最后总结
此次线下培训收获颇丰,让我从以STM32开发板为例,实操了STM32F411开发板的各项实验,体验了RT-Thread开箱即用的功能。RT-Thread 作为一款主要由中国开源社区主导开发的开源实时操作系统其开源的授权让各厂商不必担心授权问题,经过和开发工程师的了解,针对工业安全、网络交换设备的环境RT-Thread还可以适配DDOS芯片、安全加密芯片等实现安全场景的需求。RT-Thread操作系统不仅仅是一个单一的实时操作系统内核,更是一个完整的应用系统,包含了实时、嵌入式系统相关的各个组件:TCP/IP协议栈,libc接口,图形用户界面等,丰富的功能极大地满足了当前数字转型下物联网数据安全数据采集、自动化控制的需求。RT-Thread作为一款真正由中国自主构建的国产实时操作系统,目前已经装机13亿台,未来必定继续在工业、医疗、能源、机器人等各领域得到广泛应用。
笔者将持续关注RT-Thread 技术,后续有更新一步的学习后,再向广大开发者分享。
如下资源,感兴趣的朋友可以开始动手学习了:
rtthread-nano atomGit 源码仓

瓜分20万奖金 获得内推名额 丰厚实物奖励 易参与易上手
更多推荐
 2
2 0
0- 0


 已为社区贡献1条内容

所有评论(0)